Facing: the history of occurrence. Corrugated paper and napkin trimming technique: master class

 Wandering through the expanses of the Internet, sometimes you simply wonder - how rich the human imagination is, how diverse people's interests are, and what talents are hidden in them. Interesting techniques for making crafts are amazing. For example, trimming from corrugated paper allows you to make unique works of art with your own hands.
After passing the elementary master class, you will get acquainted with an interesting method and will be able to create:
- Paintings
- Topiary (corrugated paper tree)
- Volumetric figures
Parents will teach this fascinating process to the child, and the teacher will teach the whole class.
The trimming method is very easy to implement. You will need:
- Multicolored corrugated paper rolls ( see photo)
- Scissors
- PVA glue
- A wooden stick with one blunt end or a regular ballpoint pen
- To make a picture - a sketch you like (for example, as in the photo), or children's drawings
If you create a sculpture or topiary, you will need plasticine.
To make the master class enjoyable, stock up on imagination and patience.
We make blanks
 Before you engage directly in creativity, you need to learn how to make miter tubes. Let's go through this master class in detail. The technique for creating blanks is as follows:

Here is such a simple master class. And having prepared the workpiece by the described method, we proceed to the process of facing.
flat image
 Facing will allow you to turn any drawing into a unique masterpiece. The technique of creating a picture from paper consists of several stages. Apply a layer of PVA glue to the sketch. Carefully glue the trimming tube to the surface of the sheet (as shown in the photo).
This should be done slowly, placing paper blanks as close as possible to each other.
The described master class leads to a picturesque result, and you get a colorful canvas, for example, as in the photo.
 Other trimming methods are possible. There is a method in which the contour is first pasted over with tubes, and then the middle of the picture is already filled. Or the glue is applied not to the surface of the pattern, but to the workpiece itself.
fairy garden
If you have successfully completed the previous master class, then we will consider volumetric trimming and create a topiary using corrugated paper.
This technique is more time consuming, but the effect produced is worth your effort.
Immediately decide which trees your topiary will be organized from - traditional green or magical multi-colored. Depending on this, take colored paper.
The man-made tree consists of a stand, a trunk and a crown.
As a crown, an ordinary round New Year's toy, or a children's ball, or a ball made by you from plasticine, a wad of newspaper and wrapped with threads is suitable. The diameter of the crown depends on what size you want to make the topiary.
Instead of a trunk, take an ordinary pencil and strengthen it in the future crown ( see photo).
Make a tree stand from a plastic cup or flower pot. Fill the container with gypsum, paraffin (fill with plasticine) and set the pencil-barrel with the crown up.
After the plaster hardens, you have a semi-finished product in your hands, which it's time to turn into a topiary.
To make it more convincing, cover the crown with green paint, and the trunk with brown, and start trimming. 
Please note that this method recommends that you start pasting with corrugated paper from below ( see photo).
After you "green" the entire top, do not forget that the "surface of the earth" in the pot should also be covered with blanks from trimming tubes. And, having mastered this master class, you will create a topiary that will delight everyone around you with its naturalness.
To create unusual trees, use brightly colored paper.
Volumetric figures
The technique of trimming volumetric objects allows you to make not only topiary, but also interesting sculptures.
In this case, the master class also exists in several versions.
A children's rubber or plastic toy is taken as the basis, which is then  sequentially glued with blanks of multi-colored paper. You need to act in sequence from the bottom up (just like you did when creating the topiary).
Plasticine is often used to corrugate a three-dimensional figure. A blank is pre-molded from it.
And the trimming tubes are simply pressed into the elastic mass (without the use of glue). This method is considered simpler, which does not detract from its merits.
This is the simplest example. The charming creature obtained as a result of your actions, as in the photo, will surely cause a smile in many and will cause a good mood. And, using unlimited creativity and acquired skills, you will soon be able to boast a whole gallery of cute characters.
DIY miracles
 If you have mastered all the ways to create crafts from corrugated paper, then you have rightfully won the title of " facing master". Enjoying the process of creation, you make the whole world around you better.
Infect your children, friends and acquaintances with your example. After all, a common passion brings people closer. Especially when it's so interesting.
And by spending free time with your children, you will learn to understand each other and, perhaps, keep memories of such happy moments for the rest of your life.
To work, you need corrugated, plain colored or tissue paper (silence), a pencil, scissors, glue and a base on which the parts will be attached.
1. Cut out a square from paper (a circle, a piece with uneven edges, etc.).
2. Press its center with a pencil.

3. Roll the paper around the pencil.

4. Glue the resulting twist, without removing it from the pencil, onto the base (cardboard, paper, etc.).

5. The following trimmings are glued next to the first. The papers should fit snugly against each other and cover the base with a solid carpet.

Facing types
1. Contour facing- paper twists frame the outline of the picture. Used to create piping, borders, borders and when combined with other techniques such as scrapbooking.


2. Plane cutting. In this case, the trimmings are placed vertically and very tightly to each other over the entire surface.

3.Volumetric cutting. This type of work involves a different density of twisting of the trimmings and attachment to a three-dimensional surface at different angles of inclination, which allows you to create very beautiful complex compositions.

A plasticine base was used to create a cactus
4.Trimming in layers involves gluing parts into each other. The combination of trimmings of different shades and colors makes it possible to achieve unusual effects and “revive” paper crafts.

All types of facing can be successfully combined with each other.
Application
The technique we are talking about is often used to create flower arrangements. Depending on the size and type of flower, the size and shape of the original parts are selected.
For violets, circles are cut out with a diameter of 3-4 cm. They are twisted loosely by 1/3 of the trimming. Glue the trimmings at a large slope.

Poppies are made in the same way as violets, but the size of the circles is increased to 6-7 cm, and their edges are cut out in waves.

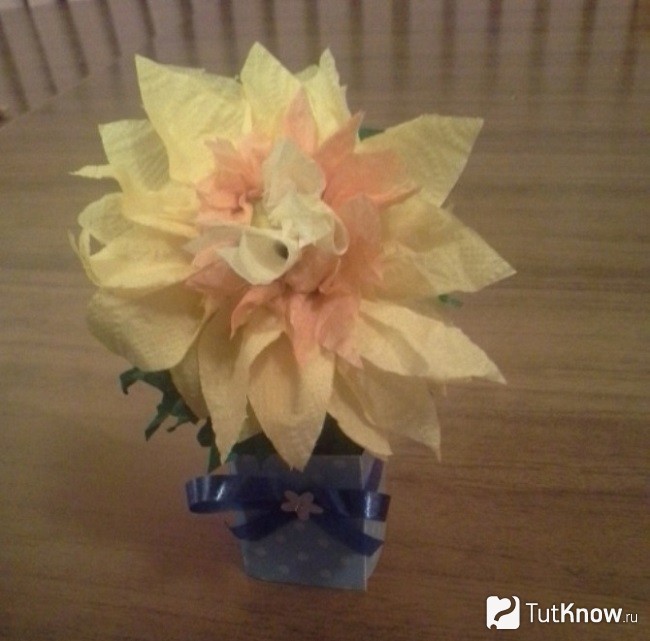
To create dahlias, small, strongly twisted squares are used. They begin to glue tightly from the center of the flower with a slight slope. If, as you move towards the edges, the size of the squares and their slope are increased, and the density of the twist is reduced, then you get a large blooming flower. For a bud, the parts are glued almost vertically.
Any other flowers made using the same technique will look lush and voluminous.

The trimming technique can also be used to decorate three-dimensional figures made of cardboard, paper, plasticine, plastic, clay, and the Oasis floral sponge.
Trimming can create paintings of any size. In this case, the contours of the image are applied to the base with a pencil, and each segment is densely filled with twists of the corresponding colors.


| More |
Facing out of paper allows you to make fluffy crafts, extraordinarily beautiful three-dimensional paintings. In this technique, you can make postcards and even a topiary.
The content of the article:
Paper gives immense scope for creativity. They draw on it, fold it, making unusual crafts. You are already familiar with many of them, but not everyone knows about facing. This needlework technique is quite simple: pieces of paper are twisted and glued or attached to the base. The result is voluminous and airy compositions.
Paper trimming: technique, master classes

This needlework is of several types:
- contour. When twisted pieces of paper frame a drawing along a previously applied contour. This technique is sometimes used in conjunction with scrapbooking.
- On the plane. This is a facing technique in which workpieces are placed next to each other, filling the entire surface with them.
- When facing in layers parts are glued to each other. At the same time, the combination of elements of different shades helps to create interesting effects.
- Volumetric trimming most often made on the basis of plasticine. Twisted parts are attached to the molded workpiece, which allows you to make complex compositions.

To make such a violet, take:
- corrugated paper;
- a sheet of cardboard;
- simple pencil;
- scissors;
- bottle of glue with a spout.
To fold paper elements, you need to use a special stick for trimming. If you don’t have one, you can replace it with a pen case, sharpened with a pencil.
- With one of these tools, press a small paper blank in the center, wind it around a stick.
- Roll with your fingers without removing from this tool. Lubricate a small section of the contour with glue, attach a twisted blank here directly on a stick, carefully remove this tool.
- Create the second element in the same way, glue it next to the first. Having drawn up the contours, proceed to filling the inside of the petal.
- When blanks are glued to all the petals, twist the same elements from squares of yellow corrugated paper. Glue them to the center of the flower.

To make this work, take:
- bright napkins;
- scissors;
- a sheet of cardboard;
- gouache;
- stick for trimming.

On a white sheet of cardboard, draw the outline of a tree. Apply glue to a small area so that it does not have time to dry.

At this time, take a square from a napkin, wind it around the tip of the trimming stick, glue it to the smeared contour. Then glue another one and others.

Take napkins of different colors to make the tree bright and cheerful. Fill the entire crown, paint the trunk with brown gouache.

Since you made the foliage of the tree from elements of different colors, make the picture frame from napkins of the same color.

Make a background out of blue napkins. Elements for this are also created using the facing technique.

You will get a wonderful picture that will surprise and delight everyone who sees it.

Using this technique, children and adults can do many other amazing jobs by doing flat or contour trimming.

For this, corrugated paper of yellow, orange, lilac, green, white and blue color was used.
First, glue a sheet of blue paper on white cardboard, then draw the outlines of a fish, algae. After that, blanks for trimming are twisted from yellow squares, fill the tail of the fish with them. From orange make her body, from lilac head. And white and blue will create the eye of a fish. It remains to fill the algae with similar elements and admire the wonderful work.
See how you can make interesting crafts using another trimming technique.
Templates for volume crafts made of paper and plasticine

Such flowering cacti will also help create trimming. For these crafts, take:
- well-sharpened pencil;
- plasticine;
- corrugated paper;
- toothpick;
- packing tape or satin;
- a pin with a bead;
- colored cardboard.

Stick a toothpick into the cactus and the other end into the pot. Attach the flower base to the cactus. Fill his body with beautiful voluminous blanks. To do this, put a pencil in the center of the paper triangle, wrap it around the rod, stick it into the plasticine base.
Complete the first row, placing the elements close, then move on to the second and the next.

To make the petal the desired shape, leave its tip free, twist only the part that you will attach to the plasticine.

To decorate a flower, you need to make 1-2 such petals, then make its middle with triangular blanks of orange paper.

See how the pot is made. It must be wrapped with a strip of colored cardboard or wrapping paper and tied with a ribbon.

A cactus made using crepe paper trimming has been created.
Look at the process of making another work using volumetric technology. It will help the child develop creative thinking, fine motor skills, imagination. Children show interest in working with paper, as a result of which such wonderful models appear.

Prepare the following:
- corrugated paper;
- scissors;
- album sheet;
- pencil.

Spreading small areas with glue, let him attach squares here to make a fabulous rejuvenating apple.

You can draw a branch or glue a thin strip of brown paper instead.
You can glue one workpiece of a different color into an already attached one, thereby obtaining the effect of trimming in layers. The next two works are devoted to this technique.
Plans for trimming corrugated paper in layers
Not far off the New Year. Children together with their parents will certainly prepare for this holiday. They will be able to make a postcard by laying out a Christmas tree on its front side.

Prepare with children:
- corrugated paper;
- Christmas tree pattern;
- glue and a brush for it;
- pencil;
- thick sheet of paper.
First, the child will fill in the contours of the Christmas tree with green squares wound on a pencil. Then, in some places, blanks of other colors need to be glued on top of them. They will decorate the Christmas tree.
But you can do not trimming in layers, but on a plane. Then you will first need to glue the colored squares that will become toys, and then fill the surface with green.

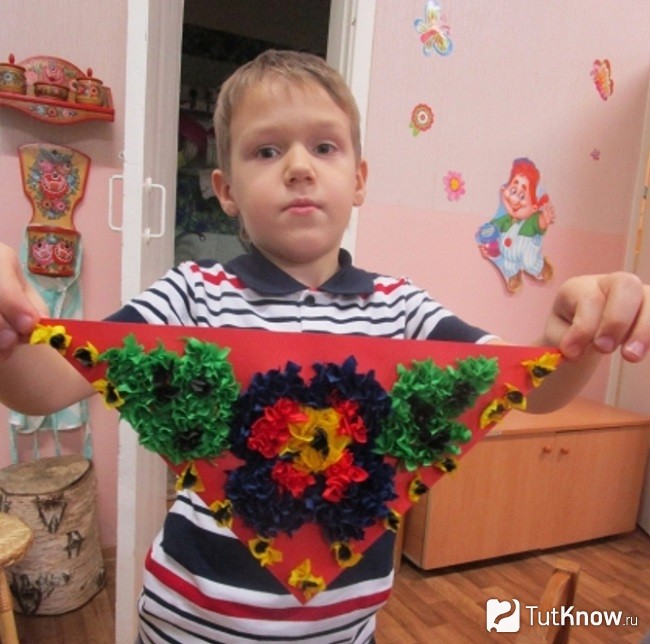
Mom or grandmother can be presented with a souvenir scarf. They will certainly be delighted, especially since such work was done by their beloved child.
To make a scarf, you need to take:
- a sheet of red cardboard;
- corrugated paper of different colors or napkins;
- glue with a brush;
- scissors;
- pencil;
- drawing template.

Starting with small areas, have your child fill in the drawing with squares of different colors. They will need a lot. If the child does not have the patience to twist the crosscuts, help him with this so as not to reduce his interest in work.
The result is such a wonderful scarf. The next work was done together with the child by his mother. A great example to take on board. The result will be mushrooms and autumn leaves, made by trimming in layers.
To create an autumn forest, take corrugated paper in red, orange, yellow. You can also make blotches with brown, green.

For crafts, take:
- colored paper, cut into squares with a side of 2 cm;
- application templates;
- stick for trimming or pencil;
- glue;
- scissors.

You can take your favorite mushroom and leaf templates from the Internet or use the ones presented. You can draw them yourself on thick cardboard, cut them out.

The most painstaking work is cutting out squares and forming twisted blanks. To give the desired shape, place a square of paper on your left index finger. Hold it with your thumb. Place a pencil in the center of the workpiece, twist it.
As you can see, this is another option for forming parts. We will also glue in another way, so that you choose the most suitable for you.
Pour the glue into the bowl. Dipping the trimming here, attach it to the leaflet template. After gluing the red one, attach the yellow one directly to it with the help of PVA. The result is an interesting effect. Yellow is also glued to the orange blank, use green and brown squares as a base.

To make the mushrooms, line the stem with white trim and the hat with brown, yellow, or red.

Children's pictures from corrugated paper

The trimming technique will also help to make them. Such children's pictures turn out to be very cute and touching, they will remain for a long time, decorate any corner of the house.
If the child can, let him draw a round lake, reeds along its banks, swimming ducklings. He will depict where the birch, the rainbow will be, draw the horizon line. If it is difficult for a child, then adults will help.
For such work, you will need squares of corrugated paper with a side of 1.5 cm.
The larger the size of paper blanks for trimming, the higher the pile of the finished work.
After cutting them, you need to start gluing. In this case, it is best to fill the space on the left side. First fill the rainbow with colorful stripes, then make the grass around it, glue the green trimmings. Also decorate the sky from this side, fill it with twisted blue squares. Leave a place for clouds, glue white blanks here.

Also on the left side, start gluing brown details in the form of reeds, make chickens yellow, lay out the lake in blue.
Gradually moving to the right, decorate a white birch trunk with black patches twisted from paper of this color. Fill the entire space with voluminous blanks, after which you can enjoy the view of a colorful picture. For kindergarten, this craft will be an ideal option. Bringing it there, the child will certainly take first place in the competition.
But there are more complex works that schoolchildren can do.
These violas were created by students in grades 1-8. Such joint work unites children.

On a piece of drawing paper, you need to draw a viola with a pencil or transfer another image here. Then each of the guys will fill the flower with twisted trimmings of a certain color.
By the New Year, you can make winter pictures.

If you draw well, draw the future art on cardboard with a pencil, if not, then just redraw it. Embroidery patterns are a good template. They are transferred to a sheet, decorated with twisted paper pieces of a certain color.
Please note that the outlines of the Christmas trees are made of blue elements. This technique allows them to keep their shape and look fluffy, snowy.

In conclusion, see how to make a New Year's garland, which the trimming technique will also help to create.

For her, on whatman paper or white cardboard, draw the letters of the future inscription, cut them out. Now each one needs to be framed first with a white trim, glue the red ones inside.
For the base, take a satin ribbon. Using a glue gun, letters are attached to it to make an inscription. Remember to keep the distance between individual words.
That's how many interesting and necessary things will help to do trimming. But this is not all that can be made in this technique. If you want to create a three-dimensional snowflake, check out the visual master class.
Another will teach you how to make a heart topiary using the same technique. You will give this to your loved one for his birthday, on Valentine's Day.
Paper crafts for kids
Paper crafts using the trimming technique
Master class with a step-by-step photo "Doves of Peace" using the facing technique
Performed: Lapteva Svetlana Khristyanovna, educator of the state budgetary institution of the Novosibirsk region "Social and rehabilitation center for minors", Tatarsk
Purpose: can be used as a gift to veterans on Victory Day, it will be a wonderful decoration for the interior of a group room.
Target: make crafts "Doves of peace."
Tasks:
- to acquaint with the technique of performing facing;
- to improve practical skills of working with paper;
- to inculcate the skills of work culture and accuracy;
- develop a caring attitude towards the objects of their work.
Facing is one of the types of paper needlework. This technique can be attributed both to the method of application and to the type of quilling. With the help of facing, you can create amazing three-dimensional paintings, mosaics, panels, decorative elements of the interior. Still little known, this technique is very quickly gaining new fans and gaining popularity in the world of needlework. Such a rapid growth of its popularity is explained by the unusual effect of "fluffiness", which gives the facing and a very easy way of execution.
This technique is based on the creation of images and objects using three-dimensional paper elements. The volumetric element of trimming is called "trimming" or "butt". It is a piece of soft paper compressed in the form of a funnel or cone. It is from these elements that the intended product is created. Each such “cutting edge” is like one brush stroke in creating a picture, like one loop in knitting or one bead in beading.
Facing is not a difficult job, but painstaking. It requires not only perseverance, but also accuracy, attention and a certain dexterity.
To perform crafts in this technique, you need a minimum set of materials and tools: paper, glue, scissors and the so-called "cutting" tool.
Not all paper is suitable for trimming. Typically, this technique uses corrugated paper or otherwise crepe paper. In addition to corrugated paper, ordinary paper napkins are also suitable for trimming. From corrugated paper, “end trims” are made directly. Scissors and glue will be needed to cut and glue these trim pieces to the base of the craft.
A wide variety of materials are used as the basis. Corrugated paper can be “downed” on any surface to which this paper is glued. Well, the main tool for trimming is a long thin stick with a blunt end. A pencil, rod or body from a ballpoint pen, rods from gel pens may well suit the role of such a tool.
Like Angels, but only Earthly…
A work of unparalleled beauty...
Dear souls of my part...
Beautiful like May flowers ...
They certainly have a lot of advantages ...
Not enough fingers to count...
After all, the dove is a creation from God ...
The Lord put light and grace in them.

To work you need:
- crepe paper in white, blue and red colors;
- PVA glue;
- scissors;
- cores from gel pens;
- packaging cardboard;
- stationery knife;
- plastic jar;
- building gypsum;
- sticks;
- dove templates.

We lay out the pigeon templates on cardboard and circle them. We need two large and two small doves.

Using a utility knife, cut out the doves.

Glue together large and small pigeons. This is necessary in order for the craft to be more voluminous.

Cut strips of white paper 2 cm wide. We make cuts on both sides along the length of the strips.

We begin to seal the open sections of the pigeons with stripes.

We completely seal the open sections of a large and small dove.

We fix the pigeons on sticks.

From rolls of corrugated paper we cut strips 2 cm wide

From strips of paper we cut squares with a side of 2 cm (the larger the size of the square, the higher the pile)

For further work, we need to prepare a tool for facing. We use a gel pen refill.

We put the end of the rod in the center of the square.

We crush the square and roll the rod between the fingers. We will get a tube-end.

We apply PVA glue to the end of the tube. We press the trimming on the base and take out the rod.

Each next trim, glue next to the previous one. We try to put the trimmings tightly to each other so that there are no gaps. We make the dove's beak with red trimmings, and blue eyes.

Thus, we fill the entire workpiece. We highlight the wings and tail of the dove with blue trimmings.

We completely fill one of the sides of a large and small dove.

In order to fill the second part with trimmings, we fix the pigeons in a plastic jar with plaster. We continue to fill the blanks of pigeons with trimmings to the end.

Wrap the sticks on which the doves are attached with white paper and tie a bow from a small strip of red paper.
This is a fairly new paper craft technique. But even despite its young age, this technique already has a lot of fans. But paper crafts made using this technique turn out to be very beautiful and unusual. The Land of the Soviets invites you to find a new hobby for yourself - paper trimming.
The cutting technique is very simple: the prepared template is glued with special paper. You can take different templates: these can be small blanks in the form of hearts (such a craft can be presented to your loved one), snowflakes, flowers. But also the paper trimming technique makes it possible to perform large multi-colored paintings.
Also using paper trimming, you can make various decorative elements. So, you can frame small cross-stitched or satin-stitched pictures in decorated with trimming frames. And to make the frame look very gentle and neat, you can additionally decorate it by gluing small beads, flowers or beads to it.
For trimming paper, use corrugated paper or napkins. On the one hand, trimming corrugated paper may seem more difficult just because such material is more difficult to work with. But on the other hand, trimming from napkins has its drawbacks. So, sometimes it is very difficult to find plain napkins of different colors, and they are more expensive than corrugated paper.
To make paintings using the trimming technique, you will need certain materials: paper, cardboard, scissors, glue and a small thin stick. Some people like to trim paper with a bamboo stick (kebab skewer), which has a thin tip on one end, and a flat, blunt part on the other side. The thin tip is good for touching up paper. But with a thick tip it is good to trim the paper. But you can also trim paper with a pencil, knitting needle, the blunt end of a crochet hook, a pen rod, etc. Remember, the thicker your paper trim base, the rougher your work will look.
From a fairly thick cardboard cut out a shape for trimming. It is also necessary to take into account that for the base they take cardboard of the same color as the paper for trimming. Thus, if you have a cardboard base showing through the paper, it will not stand out in a different color. If you are thinking of making a two-color shape, such as a red heart with white wings, cut out two templates from cardboard. The main template will be a red heart, which is made without wings. But from white cardboard, you should already cut out a heart with wings. In this case, the size of the white heart should be slightly smaller than the red one. A red blank is glued on top of a white heart. And already on the finished template, you can do the trimming of paper.
Of course, you can get by with one piece of white cardboard, but then the template will have to be pre-painted in the color you need. Similarly, they do with large-sized paintings, which require paper of various colors. On the workpiece, the borders of one or another element are preliminarily drawn and painted over in suitable colors. And only after the paint has completely dried, you can start trimming the paper.
How exactly is paper trimming done? To begin with, corrugated paper or napkins are cut into small squares. The size of the squares will vary depending on the thickness of your trimming stick. The thicker the stick, the larger the square. Accordingly, the larger the square, the rougher your craft will look.
Take one square of paper and put it on your finger. Attach a stick for trimming (pencil, pen rod or knitting needle) to the center of the square and wrap paper around it. Be careful not to damage the paper. Spread a small part of the surface with glue and apply your stick to it with a square of paper wound at the end. When you remove the stick, the paper will remain on the template. If the glued square has moved a little, you can immediately correct it with the other thin end of the bamboo stick. In this way, continue trimming until the entire template is covered with paper. The finished product is allowed to dry thoroughly, after which it can be hung on the wall or decorated with your other works.
Paper trimming is so easy to do that even kids can do it. Try and you can do a few crafts using this technique.
