Crepe paper flowers mk. A bright fairy tale with your own hands - corrugated paper flowers
The products that will be discussed in this article have unique characteristics. Their excellent appearance is useful for memorable gifts,. Beautiful do-it-yourself crepe paper flowers are not difficult to create without mistakes after studying the instructions below.
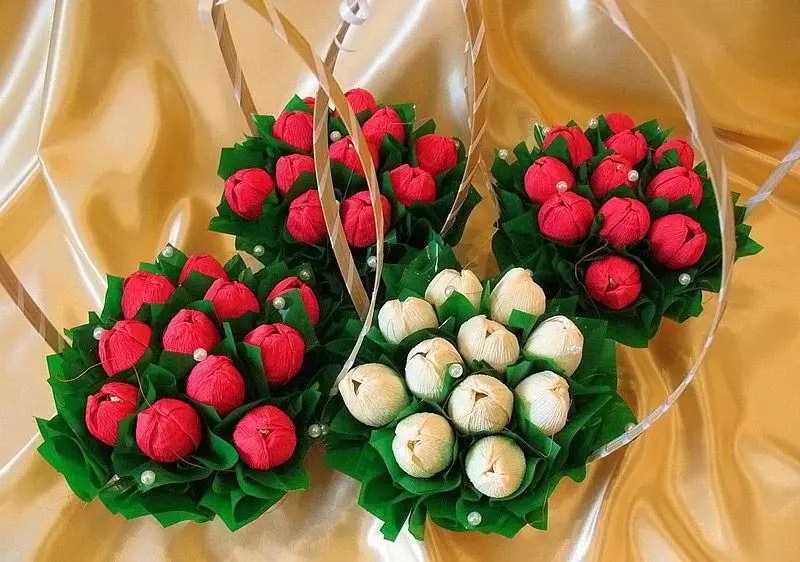
Experienced craftsmen hide delicious sweets in tulip petals
Creativity helps to reveal one's own talents and, at the same time, to create products with truly exclusive characteristics. But some methods are characterized by excessive complexity, excessive duration of technological processes. Sometimes the high cost of components scares away.
These and other disadvantages will be eliminated if corrugated paper is used:
- Its cost is not great. Therefore, you can work without significant restrictions on large-scale projects. Repeated experiments and samples will not be accompanied by high costs.
- Such materials are offered by many commercial enterprises. They are purchased in classic stores, or on specialized sites, with convenient delivery to the desired address. The corresponding catalogs support a wide range of colors and textures.
- For the correct reproduction of technology, inexpensive adhesives and simple tools will be needed.
- When making mistakes, you do not need to create products again. Most algorithms provide for the attachment of individual parts, so the problem is fixed quickly, without loss of time.

How to make DIY crepe paper flowers
In addition to the basic materials, in certain color options, the following products must be prepared:
- Strong and elastic wire of the desired length. A power frame of the stems is created from it, so it must correspond to the expected loads.
- To separate the wire into certain segments and bending, you will need wire cutters and pliers.
- Sharp scissors (large and manicure) are useful for cutting large and small workpieces.
- medium density create templates.
- With a simple pencil mark the contours of the structural elements.
- For their fastening use (type PVA). You should make sure by experience that it does not change color when it hardens.

DIY crepe paper roses: step by step instructions
This table describes a more complex method. It will require all the components listed above.
| A photo | Sequencing |
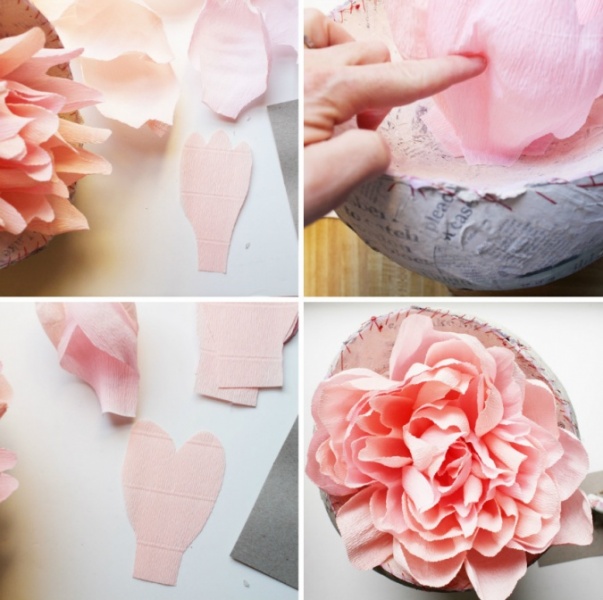
 | Petals are drawn on cardboard in the form of "hearts". Several change the value to get 4-5 different patterns. |
 | For accurate cutting of blanks, use scissors of a suitable size. |
 | To simplify the subsequent assembly, the petals are stacked one on top of the other, taking into account the order of fastening on the stem. |
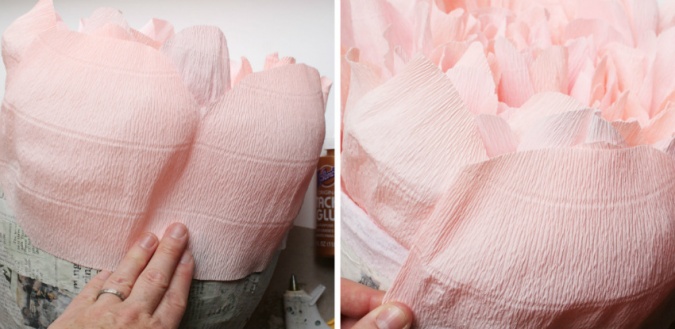
 | Create the optimal shape. To do this, the areas with roundings are slightly pulled to the sides and the middle part is deepened. |
 | Next, you need to prepare the stem and leaves. They can be formed in advance, like petals, or during attachment to the supporting structural elements. |
 | To obtain gentle stiffness, connect two wires with green tape. A small upper section (1-2 cm long) is bent. For this procedure you will need pliers. |
 | Begin the formation by attaching the smallest petal. |
 | Further, larger elements are sequentially fixed. Instead of a ribbon, you can use a thread of a suitable color. |
 | Small leaves are attached to the bottom of the bud. |
 | Large leaves are glued to the stem. |
 | After the assembly of the entire product is completed, the petals and leaves are given the final shape. The rose is then placed vertically in a vase. |
Important! This technology of attaching leaves and petals is used to make various flowers from corrugated paper. It is supplemented with special techniques for creating stamens and other plant elements.
The next way is faster. In it, the bud is formed from one blank. First, cut off the tape of the required length (50-60 cm) and height (4-5 cm). One end is folded in. Further, this part, which is denser than the rest of the paper, is bent in the form of a flattened spiral. Corrugated material is fixed in position without glue or other devices. The blank is formed in the form of a bud. The lower part is attached to the stem. Leaves are attached at the bottom.

Features of creating tulips and other flowers
For manufacturing, it is necessary to prepare similar components, tools and materials. You will need paper of different colors, matching the appearance of the tulip petals. It is necessary to purchase three types of wire (with different diameters). It is used to create frame elements with different stiffness and thickness.
The sequence of actions is given in the table:
| A photo | Technology Description |
 | Petals can be cut into blanks, as in the manufacture of roses. But to simplify the process, such a blank is used. It is created from a strip 5-6 cm high. After folding, a square 4-5 cm wide should be obtained. |
 | All the petals are cut out of it at the same time (8-10 pieces). The lower part of the workpiece is made elongated. |
 | It is rolled up in the form of a cord. The petal itself is stretched over the edges and a depression is formed in the center, as in the first method of making a rose. |
 | The created petals are set aside and the production of stamens begins. They are made from small diameter wire. The upper parts are made of corrugated paper. |
 | Individual elements are attached to the stem with a ribbon or thread. |
 | The leaves are cut according to the pattern. These parts will turn out to be long, so they will need to be reinforced with a wire of medium thickness. |
Do-it-yourself corrugated paper is supplemented with pearl beads, fabrics and other decorative items to create beautiful compositions. In the following examples, features of the manufacturing processes of other artificial plants are noted. In lilies, the stamens are large. They are made from thick wire wrapped in white paper. To imitate pollen, the upper curved parts are smeared with an adhesive solution. Next - dipped in semolina. To dry, such blanks are inserted vertically into a piece of plasticine.


Sunflower leaves and petals are cut out, shaped and attached using the techniques discussed.

In chamomile, you will also have to pay enough attention to the core:
| A photo | Actions |
 | You will need thick yarn. |
 | Such a knot is created from it and fastened with a thin yellow thread. |
 | Having cut off from above, they get the necessary workpiece. |
 | It is attached to a wire. |
 | For a strong connection, use a green tape. |
Making flowers from corrugated paper with candies
Delicious treats inside the buds are a nice addition to the wonderful appearance of the products. This technique can be studied using the example of making poppies:
| A photo | Description of actions |
 | Petals are cut from blanks with or without application. |
 | Poppies have many stamens. Therefore, the preparation of such a product from corrugated paper is useful. |
 | Candy is wrapped in it. |
 | The finished block is installed on a thick wire and secured with a strong green thread. |
 | Candies can be hidden in partially blossomed buds. |

What else can be made from corrugated paper?
They form from flowers. Such elements are used to create paintings and original design compositions. The following are the features of DIY corrugated paper:
| A photo | Description of actions |
 | For a large product, you will need a sufficient amount of consumables. Rosebuds are created in the right amount using one of the above technologies. |
 | The ball base is created from crumpled paper, which is fastened in the desired shape using a thick, strong thread. You can purchase a ready-made styrofoam ball of suitable size. |
 | A foam cube with a rod is installed in the cache-pot. It is wrapped with corrugated paper tape, which is attached with adhesive in several places. |
 | Roses are fixed on the ball (with PVA glue). It is advisable to pre-create a hole in it for subsequent mounting on the rod. |
Corrugated paper is a lightweight material that holds a given shape well. These properties are used to implement various creative plans.


If necessary, a fantastic background with the desired parameters will be created quickly and at no extra cost. The only significant limitation is suitable weather conditions. With a strong wind, during rain, openwork compositions will not withstand destructive external influences. For this reason, they are more often used indoors.

Bright unusual products made of corrugated paper like kids. They joyfully perceive the amazing transformations of the surrounding space.

Other instructions can be used to figure out how to make crepe paper flowers. The advice of experienced craftsmen, the study of current market offers in the relevant product groups will come in handy. But in any case, the following facts and recommendations should be taken into account:
- The cost of a standard roll of paper is from 60 to 120 rubles. From it you can make several bouquets of flowers. To save more, find direct suppliers.
- The first experiments are carried out on relatively simple structures. Choose products with large components, the manufacture of which does not require special care. As skills are acquired, they move on to complex compositions.
- This hobby is not just for adults. The creation of functional and beautiful objects is used for the harmonious development of children. With its help, fine motor skills of fingers are improved, good taste is formed, a careful attitude to things is brought up.
Corrugated paper products are unique. They will be used to solve various domestic and commercial problems with minimal time, financial resources and labor resources. The video of the master class of corrugated paper flowers is presented below:
YOU MAY ALSO BE INTERESTED IN:
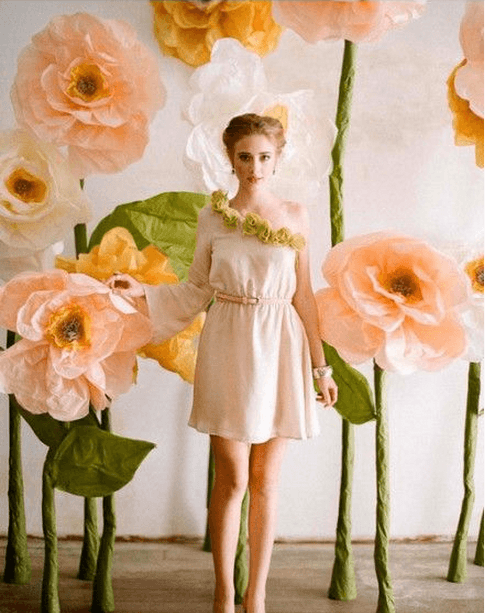
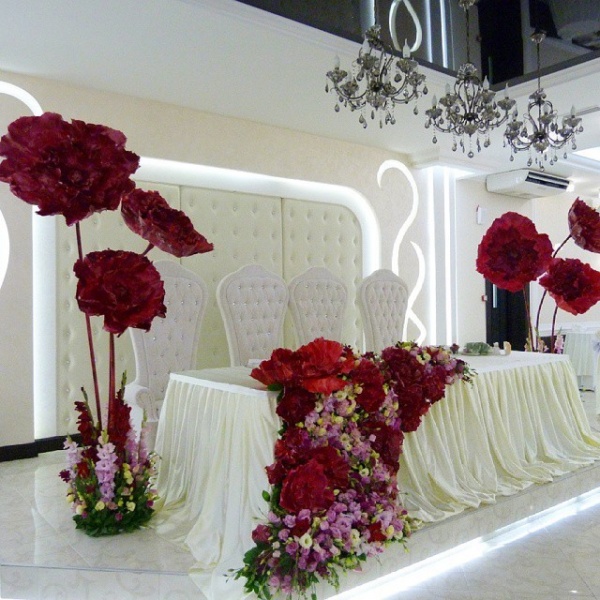
Interior decoration in floral style is gaining popularity: giant peonies, roses, sunflowers, poppies are used to decorate weddings and themed parties, romantic photo shoots and create unusual shop window designs. Even for hats and suits, you can make large flowers with your own hands - it's no more difficult than assembling a small bouquet or.
Let's talk about materials
When it comes to growth flowers, it is not immediately possible to believe that this beauty is made of paper. But corrugated has unusual properties - in the article on the manufacture of small flowers, we examined them in detail. Recall that crepe paper with a density of at least 120 g with A and B flutes (folds 1.6 and 3.2 mm deep) is most suitable for growth giants - this will allow the petals to keep their shape.
But! Not all growth flowers are made from thick corrugated paper. There are models whose petals should freely bend, curl or fall. For such colors, thin paper is used.

To make large flowers, also prepare auxiliary materials and tools:
- thick cardboard for the base;
- scissors or a knife for cutting blanks;
- thermal gun - large petals are easier to connect with hot glue;
- wire for the stem frame;
- wire bending pliers;
- fabric, thread, cotton wool for stuffing the base or for combining materials;
- foam balls or plastic containers as a base.
And you will also need: fantasy, good mood and a little magic ...
Basic techniques and secrets of creating growth flowers from corrugated paper
The whole decorative effect of the finished product depends on the beauty of the flower head. The process of its formation is similar to the manufacture of flowers from isolon, but adjusted for the properties of the material. Let's learn how to create big ones!
Method "accordion"
This funny hat can be made with children - the flower is assembled according to the accordion principle.

We will need several sheets of thin corrugated paper 20–25 cm wide. The length and their number depend on the desired splendor of the finished flower. Before starting work, the sheets must be laid one on top of the other and the edges aligned.

Stages of work:
- Fold the sheets with an accordion and scissors to give a semicircular shape to the edges.
- Mark the middle of the prepared strip and tie with a thread or clamp with floral wire, forming a loop for subsequent assembly.
- Disassemble the accordion, smoothing the edges.

- Alternately lift the layers, straightening each sheet.
- When all layers are separated, the flower is ready.
- You can make several flowers and connect them through prepared loops.
According to this principle, hanging balls from the previous photo were created. To create these colors, you can combine paper of several colors.
The difference of this design is that the inner part of the flower is cut with a fringe separately, and then both parts are combined into a single flower.
And here are some more flowers made in the same technique.

detailed way
You will use this method if you decide to collect giant flowers from corrugated paper with your own hands. To do this, it is necessary to cut out individual petals and leaves according to the templates. Patterns of large flowers differ from small ones only in size, so you can use those that we suggested in the article.

Since you will need a lot of blanks, it is better to make patterns from thick cardboard or pressboard - this way they will last longer. You can cut the petals with scissors or a clerical knife.
Tip: unfold the roll, fold it several times and then cut it out - you will get several blanks at once.
Next, the most creative stage in creating a flower begins - shaping the petals. Smooth bends and detailed elaboration of the edge are obtained by straightening the folds with your hands, stretching the workpiece with a metal ruler or the blunt edge of scissors.
First, using a pencil or stick, twist the edges of the petal, press firmly to secure the bend.

The volume is created by straightening the corrugations: slightly stretch them in the upper part of the petal and almost completely straighten the middle.

In conclusion, you can give the edges a waviness in the same way.
Important! When applying the template to the sheet, it is necessary to ensure that the folds go along the petal - then it can be correctly formed.
In this type of MK, the process of making peony petals is described in detail:
If you are just learning to collect large paper flowers with your own hands, many of the nuances may seem incomprehensible. Let's look at them with an example.

This chrysanthemum is assembled from separate parts, fixed on a branch and placed in a flower pot stand. We will talk about these assembly details a little later.
For the flower head we need:
- corrugated paper;
- cardboard circle with a diameter of 30 cm;
- glue gun.
Cut out the petals and leaves according to the pattern, process the edges and give them a shape.

You will need at least 30 petals of each size, 6 blanks 20 cm high for the sepals and as many leaves as your fantasy and stem length tells you.

Assembly is carried out on a cardboard circle. Let's analyze the nuances, thanks to which the flower will look realistic:
- Petals should be directed strictly to the center, thanks to this we will maintain the symmetry of the flower.
- Filling is carried out in circles, with the displacement of each subsequent layer to the center by 1.5 - 2.5 cm. This will ensure a smooth decrease in the diameters of the arrangement of the petals, without the formation of voids. Approximately three rows should be obtained from each type of part. If necessary, you should add certain blanks.
- The closer to the center, the stronger the petals should be folded up, and the smallest petals are bent almost vertically before gluing, thereby filling the middle. This principle is laid down by nature - the petals open from the bud.
After the front part of the flower head is ready, glue a piece of cardboard tube to the back side, suitable in diameter for the future mount.

The reverse side is decorated with six sepals. They should be glued in a spiral, with the approach to the next one, in order to cover the entire surface of the cardboard base.

Tape method
Flowers made in this way differ little from the previous ones. The whole feature is that the petals are not cut out separately, but are formed on the tape: the profile of the petal is formed in the upper part of the paper strip, and the lower part remains uncut.
Peony, made in this technique:
And another fantasy flower resembling a dahlia:
Leaves and stem
If you are making growth flowers with your own hands, then you will definitely need a stem and leaves. To realistically reproduce the structure of the leaf, make veins and create a relief:
- lay a wire in the middle of the sheet,
- arrange the corrugations towards the top of the leaf,
- reproduce the wavy edge.
Making leaves for growth flowers, see the video:
The next element of the growth flower is the stem. Depending on the purpose, the stem can be made to hold the flower in the hands or as a stand.

In these colors, the stem can be made from a cardboard tube, for example, from foil or cling film, or you can also cut off a piece of plastic pipe. This leg is multifunctional - such a flower is freely mounted on a rack of metal rods.
For the design of spectacular photo zones, a flower on a stem would be an excellent option, as in this photo:
The stem is made of wire frame. The secret of its stability is in a plastic cup filled with cement mortar.

Advice. A plastic cup can be replaced with a small flower pot, and cement mortar with any building mixture: gypsum, alabaster and the like.
The resulting rack should be wrapped with thick paper, then decorated with green corrugated paper. Using any technology convenient for you, make leaves and screw them to the trunk on a wire.
Also, a metal-plastic tube can serve as a stem, and even a real branch - for beauty, they must be decorated with green teip tape.

Metal-plastic tube securely holds the flower
and looks great in the interior
Stand
Guests of the holiday will be very surprised when they find out that you made life-size flowers from corrugated paper with your own hands. And for the design of everything, you will need that stand. It can be metal, wooden or a weighted flower pot.
It is especially important to make a stable stand if you plan to install not one flower, but a whole branch or a giant bouquet.

For options for making stands for growth flowers, see the video:
Important! Take care of stable coasters when decorating wedding ceremonies. Flat supports perfectly disguise themselves as a layer of artificial grass.

Compositions of large flowers on the wall
If you need not a single flower for a photo shoot, but a whole photo zone, you need to decorate the wall. There is no need to do a permanent fastening, because the flowers gather dust over time, they can accidentally break or you just get bored, so you should use simple options:
- Double-sided tape - tapes or ready-made mugs are sold. This method is not suitable for a wall in a room, as traces remain on the surface. As a way out, use a portable smooth plastic surface as a base and lean it against the wall, reinforcing it so that it does not fall.
- Hooks - are commercially available ready-made with Velcro, but you can attach homemade wire hooks to the back surface with hot glue.
- Velcro - ordinary sewing is used, which are attached to the surface with a construction gun, and on the back of the flower with hot glue. Glue-based Velcro is also sold, which for reliability is also better to reinforce.
All these methods are united by the fact that a special surface is needed for mounting flowers.

But to create an original design, it is not necessary to hang the decor on the wall. You can tie a ribbon with a couple of hooks, to which you can attach flowers and threads with petals, as in this photo:

Or stretch the strings under the ceiling, to which the decor is attached, creating a magical atmosphere.

Video with illustrative examples of attaching paper flowers:
However, large corrugated paper flowers can be used not only for photo zones. They can serve as an amazing costume for a theatrical production or a themed party.


To create these costumes, the designer combined paper with fabric.
For boundless imagination, nothing is impossible! You can even make a chandelier out of corrugated paper. The only condition is that there are no problems with the electrical wiring and that the lamps do not come into contact with the flowers.

And this charming corrugated paper cabbage will be an excellent entourage for a children's photo shoot. It is made according to the principle of flat flowers - on a cardboard base. To make the baby comfortable, there is a pillow in the middle.

There are a lot of ideas for using giant corrugated paper flowers - fantasize, create beauty and delight yourself and others with your creativity!
CategoriesFlowers are used to decorate most holidays. They can be huge for party decor, delicate for a bouquet, or with a sweet surprise inside. Such flowers can be made with your own hands from crumpled paper, which will not fade for a long time.
How to make crepe paper flowers for a party
Large flowers, also called pompoms, will become a bright decoration of the party. When choosing such a decor, consider the color scheme of the holiday.
For huge peonies, prepare:
- corrugated paper 7 colors;
- stationery clips;
- thin wire;
- scissors and thread.
- Unroll each roll of paper completely. Then fold in the form of an accordion, starting from the narrow part of the sheet. In this case, the thickness of the fold should not exceed 5 cm. Do not try to make the folds even, for this flower it does not matter.

- Secure the folded paper with paper clips on one side. So the edges of the paper will be in the same position.


- To create volume at the flower, it is necessary to cut the blanks. Arrange the colors in the desired order and cut each one 2 cm shorter than the previous one.


- Make the ends of the strips pointed or rounded. The more careless the cut lines are, the more natural the flower will become. Move the clamp to the center of the workpieces.


- Form petals. To do this, cut the fold lines on all four sides, but only to the middle.

- Remove the clip and unroll the paper rolls. Arrange the blanks on the table according to size. Lay the largest sheets first, then the medium ones and then the small ones on top.

- Wrap the paper together as a roll so that the smaller size is on the outside of it. Tie the wire in the center of the workpiece.

- Fix the wire on the roll with several turns around the axis. Fan out the edges of the paper.


- Lift one edge of the petal and press it to the middle. At the same time, slightly spread the workpiece in width with your hands.

- Bend in this way all the petals of the same color. Only then proceed to another shade.


- As you move on to the next circle of petals, lightly pinch all the leaves at the base where the wire is. This will give volume to the finished decor.

- If you find wide strips, you can cut along with scissors. But do not make petals too narrow, they will not hold their shape.

- Peony ready!

- You can decorate trees with them if the holiday takes place on the street.

- Or decorate a room for a celebration.

How to make crepe paper flowers for a bouquet
More delicate flowers are obtained for a bouquet. They have a small bud and stem. For crinkled paper chamomile you will need:
- yellow woolen and silk threads;
- white and green crepe paper;
- floral wire;
- stationery clips;
- green teip tape;
- glue, scissors.


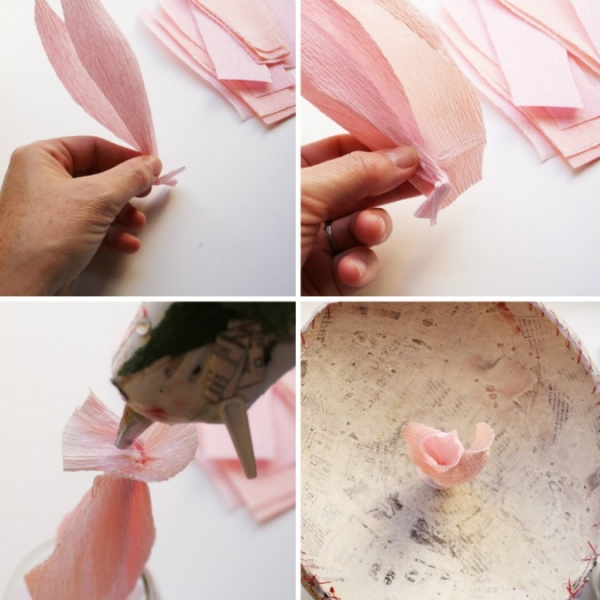
- Place two fingers together and wind yellow yarn around them. The more layers you make, the more magnificent the center of the flower will be.

- Remove the threads from your fingers and tie them in the center. Use thin or woolen thread for this.

- Cut the yarn on one side. If necessary, trim the ends with scissors.


- Cut the wire into stems of the desired length. Apply glue to one end of the wire and fix the threads on it. Glue the part of the core that is not cut.


- Hide the junction of the threads and wire with teip tape. Wrap it around the workpiece several times.


- Cut white crepe paper into rectangles. Fold the workpiece to the height of the figure. Its length will correspond to the volume of the flower, and its height will correspond to the length of the petals. Clip the paper on one side. On the other side, make cuts in the form of strips.


- Give each strip an oval shape. Cut out the flower template carefully as the paper is thin.


- Expand the strip along its entire length and slightly spread each petal in its widest part.


- Attach the solid edge of the workpiece to the middle of the threads. Gradually begin to twist the paper around the wire.

- Continue winding the petals until you use the entire strip.

- Cut off a small piece of teip tape, cut it into narrow strips from one end. Then twist each part into a tube. Attach the resulting blank to the back of the bud.


- Decorate the white paper on the bud with green tape. It is not additionally fixed, since it has an adhesive base.


- When the flower is ready, slightly spread the petals and form a bouquet.


- Cut the green paper into narrow strips and wrap them around the skewer.


- Make several flowers in this way and collect them in a bouquet.

Making flowers from corrugated paper is quite easy if you follow these master classes clearly.
For another way to create flowers, see the video:
Content
Have you just celebrated a friend's birthday, is it already a colleague's anniversary at work? Celebrated the anniversary, you need to go to congratulate the boss? The boss was congratulated, no idea how to surprise a picky aunt / grandmother / mother-in-law / mother's friend / neighbor? Come on, come up with a gift for someone who has everything. You just need to surprise this person with your skill and a gift made with your own hands from the heart! And for this, large paper flowers are suitable. By the way, if you still have a gift, then the box in which it probably lies can be decorated with paper flowers instead of the usual packaging.
corrugated flowers
Large, voluminous DIY flower installations can be done very quickly and at minimal cost. Corrugated paper is not very expensive, it is sold in rolls and is enough for many products. So get ready:
- paper;
- glue gun;
- scissors;
- a skein of thread;
- wire.
To make large flowers, we need a petal template. It can be cut out of cardboard and attached to corrugated paper.
Now you need to think about the core: it may consist of many small petals or you will need to prepare the stamens. Also, before assembling, consider whether the flower is meant to be wall-mounted or whether it will be on a stem. If the latter, then wrap the wire with green paper and start assembling the flower from the middle, i.e. from the smallest petals, using glue in the form of a gun.
The core can also always be a delicious chocolate candy. It is attached to the wire and only then decorated with petals. It turns out a very original and useful bouquet.
In a similar way, using a stencil, you can create large interior roses that are placed in glass vases. There may be several such vases in the apartment.

giant peonies
How to make large peony flowers from crepe paper? In the interior, they look just gorgeous. By the way, you can even make a very interesting headdress, so take the following:
- several rolls of corrugated or crepe paper in suitable colors;
- glue;
- thread and needle;
- a balloon the size of a head;
- newspaper for papier-mâché.
First you need to make a base from a newspaper and a papier-mâché ball. On the ball you need to stick squares or strips from newspapers. There should be a lot of layers so that the base is dense. Leave the base for 24 hours until it dries, then gently deflate the balloon and cut the base.

Now you need to put one half into the other and sew them along the edge. It is also desirable to glue the edge of the halves.

Now let's start making petals. They should be of different shapes, prepare a stencil so that it is convenient to cut them out.

There should be really a lot of petals and they should be diverse.

Each petal must be cut in an amount of at least 10 pieces. Now each petal needs to be well stretched, and the base bent a little to the side so that you can later glue it to the base. The petals should be voluminous, this is the main point in the question of how to make high-quality large flowers from corrugated paper.
The thinnest petals go to the center, place a little more petals around the core, there may be a small distance between the rows. The edge of the workpiece also needs to be pasted over with paper of the same color.

Continue to fill the space with petals. Take your time before gluing, attach the petal, see how it will look.
Now you will need to prepare several very large petals, which will go to the external design of the workpiece.
As a result, you should get such a chic peony that can be used as a headdress for the holiday.

You can present such a flower as a birthday gift to a child. The birthday girl has never had such a charming gift.
In addition, such flowers can be used to decorate a wedding venue.

The master class of large paper flowers continues, the giant dahlia is next in line.
Such a flower can be made using a ready-made pattern, or it can be made from many petal details. So we will do. These do-it-yourself paper flowers are very easy to make. What we need?
- thick double-sided colored paper;
- PVA glue;
- scissors.
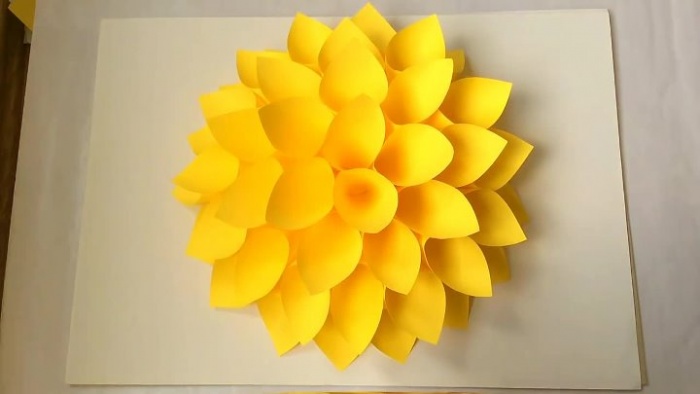
Cut out a circle for the base from the same paper. Then you need to cut a lot of squares for future petals, the larger the square, the larger the flower will turn out. Then each klaptik needs to be folded into a paper envelope, rolled up in the shape of a horn.
After that, all the horns need to be glued to our base, following the order, so that you get such a beautiful flower made by your own hands.

growth flowers
Large crepe paper flowers can be made even easier, with little to no stencil and lots of detail. Using this method, you can make growth flowers. These decorations are perfect for decorating a festive interior and will be the subject of attention for photographers.
To do this, you need to cut out a lot of circles from corrugated paper, they must be of different sizes: from huge to the smallest. The edge of the workpiece can be slightly processed with scissors - cut off with a wavy line. After that, all the blanks must be folded one into one, fastening the layers with glue.
In general, on our website you will find a lot of interesting workshops on large paper flowers, including full-length flowers.
There may be several such paper flowers around the room, but do not overdo it. Let fresh flowers be placed on the table. A huge rose can become the queen of the holiday.
Today I want to show you the idea of using large flowers in interiors, such decorations are also called full-length decorations, meaning that their size matches the height of a person. Of course, it is not necessary to make giant roses, but to decorate a large room, small buds will not look as impressive as giants.
This design can enliven the space above the bed, sofa or ordinary corner. And also it is often made for significant events - for a birthday, St. Valentine's or March 8th.
Let's start getting acquainted with this beauty and figure out how to make several popular types of flowers yourself.
We have long known the idea of decorating with volumetric elements, most often shelves perform this function, but sometimes you really want romance and new elements.
More often, a place is allocated in the hall where there is no extra furniture, a composition of buds and leaves is created and guests are invited. After all, you already have a photo zone ready at home. Believe me, elegant guests will appreciate your idea.
But in any decor there is always an idea. For example, using monochrome shades of paper, choose different color depths and textures. And if you want to create a stylish composition, then I advise you to look at and after that decide on the color.

Compositions with buds of different sizes look beautiful. This is how completeness appears in the decoration.
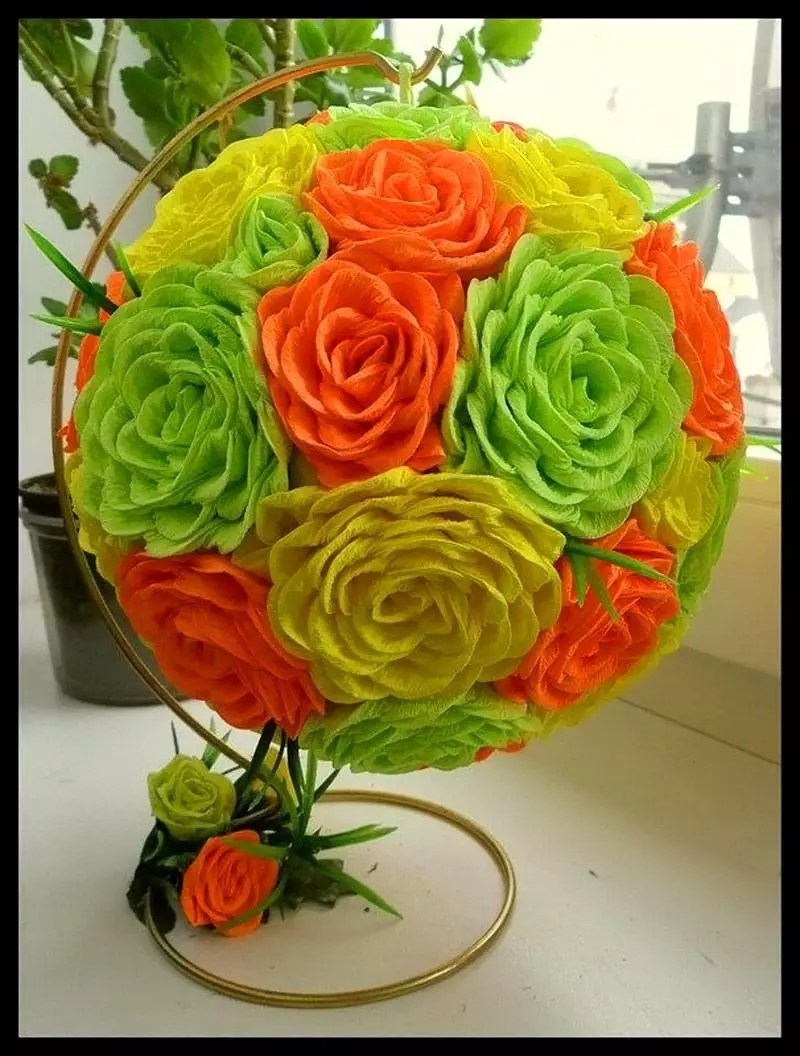
Now let's get down to how we make large paper flowers. I propose to start with such a bright and iridescent composition - a ball that can easily be hung on a dining table in the living room or in the corner of the hall.
I suggest using A4 double-sided paper for the flowers. Also make some buds from velvet colored sheets, this will give more realism.

To form a circle, take a large object, you can use a dessert flat plate.

It is more convenient to bend the petals with scissors, just do not press hard, otherwise you will tear the paper.
And now flowers on a leg are very popular. They are just huge! The leg is formed by a coil of wire, but I know that some craftsmen have adapted to make it from PVC pipes.

A large composition of buds of different types of flowers will be an alternative to clocks or paintings. This is not yet a very popular phenomenon - to decorate the walls with such a bouquet, but it looks just amazingly springy and gentle.

Another example of home decor, when the screen is decorated with roses of the same shade. Here you can take a selfie and just fence yourself off from the outside world and dream.

Any craftswoman makes each type of flower in her own way. For example, peonies can be made very simply using thin corrugated paper, as shown in the master class.

And also make an interior rose that looks beautiful in floor vases.

I gave an example of small sizes, the more you need a flower, the larger number multiply each of these values. The main thing is that there is enough paper)))

The entire strip of paper must be folded with an accordion, attach a template and cut it out. Before cutting, check which part stretches best and lay the template so that the stretching side is horizontal to it.
Important! do not cut the bottom folds!

Expand and admire the resulting garland.

We take a stick or a thick wire. Lubricate the lower edge of our resulting garland with glue and start wrapping the paper around the wire.

As shown in the photo.

The bottom must be properly fixed so that the wire does not fall out of the bud and the petals themselves do not turn around. The edge can also be smeared with glue.

And I also thought that it would be more convenient for many, just print out the finished petal schemes and get creative, so I give three templates of parts of different shapes.

Maybe you will like this kind of petals more.

Or do you want to try using such an ornament.

Of course, it takes a lot of time to create huge compositions, but this will serve as an unusual replacement for boring balloons and posters.
Giant peony made of corrugated or crepe paper on the wall
Peonies, like roses, are popular. I think that this is the king of all colors, because it looks elegant and smells amazing. Craftswomen have different approaches to its creation, but the effect is always beyond praise. I think that not everyone will be able to create such a flower right away, so I picked up a short video that tells in great detail how to roll the simplest peony.

It is really done very quickly, but it looks no worse than that created using other techniques. I invite you to view.
I also liked the idea of the base that is used in this video. because such a flat circle will perfectly attach to the wall even with double-sided tape.
How to make voluminous paper flowers for beginners?
Those who create giant buds go through many paid and free master classes, constantly improving their skills. But not everyone immediately becomes a professional, everyone started somewhere. I want to give you step-by-step master classes, where the photo very clearly describes the progress of work.
For example, the idea to create such a rose. No, it's not difficult, it just takes a lot of material.

We take a roll of paper, you can use design sheets, but for beginners it is better to take a corrugated roll. It is easier to work with it, it takes different forms well, and the color scheme of such paper is very diverse.

Cut out a sheet in the form of a drop, stretch it in width, so the leaf will wrap a little and take a concave shape.
If you want to make an unblown bud, then take fewer parts, a blooming one will need more of them.
From simple colored A4 sheets, make asters. This is one of the easiest flower options. Each petal will need to be folded inside, but if you want to turn them inside out, then use scissors. Passing them along the outer edge.
For this aster, you need to use layers of petals of different diameters. The top one is the smallest. I would remove about 8 mm from each subsequent row.

Here is another master class on creating a flower arrangement - a ball. Depending on the selected diameter of each template, the size of the ball will depend. If you want to use it for assembly halls, for a wedding or a birthday, then feel free to take the diameter of the plate.


I found the idea of making fluffy flowers out of toilet paper interesting. This material is easy to work with because it is soft and easy to cut and roll. Modern toilet paper is now presented in different colors - from white to blue. Can you imagine what composition you can create?

The strip must be folded in half and start making a cut to the middle of the strip. Do not cut to the edge, leave at least two centimeters.

Now start spiraling this blank, periodically gluing the turns so that the flower does not fall apart.

Of course, there are so many ideas for creating these giants that I offer you one more video to watch. I really liked the simplicity and elegance of these crafts.
To make these decorations more like real ones, look for paper with a gradient, when the sheet has a smooth transition from light to dark. The dark one is usually used at the bottom of the petal, because there is a shadow, and the lighter side goes to the tops.
How are large paper flowers used for home decor or photo zone?
Oh, any fashionista dreams of capturing herself next to such a gentle photo zone. Giants are used for photo shoots at weddings, anniversaries and other important events. After all, it is important to create a beautiful background. By the way, for magazines and even clothing collections, this composition is also popular. I think that such paper florists are in brisk demand.

See how one of the online stores revived its stand. Gentle, original and very feminine, isn't it? Maybe you have your own business, then this idea can be adopted to create an image.
 And so simply our compositions look in the interior of an ordinary apartment. Very unusual and bright.

An unusual idea of using the origami technique to create giants. See how fabulous it is. The girl seems to be just a fairy or an inch against their background.

When there is not much time, you can create such fantasy flowers in the shape of the sun yourself. Use a regular landscape sheet for small fragments, and Whatman sheets for large ones.
You can make such a decor as follows. Along the length, fold the sheet into an accordion, bandage the middle and unfold each side. We glue the edges of one side with the edge of the other.
Cover the center beautifully with a paper circle.

Paper dandelions won me over. By the way, the top of the inflorescences can also be made using toilet paper, as I described above.

Decor idea for a children's party.

See how you can combine several types of petals. Light and pastel colors are almost all combined with each other. The main thing is to take all the tones of the same saturation so that a single whole is created, and not so that one bright element draws all the attention.

Make an imitation wisteria. It comes in such different shades that you can choose almost any color, but I would prefer pink and lilac tones. They are more natural and natural.

Try to pick up paper of the same tone but different saturation, from dark to lighter.
First we need to make blanks. To make it faster, fold the strip of paper several times.

Cut out a drop.

Wrap the base of the workpiece.

Now bend this tail inward. To keep it better, you can fix it with glue.

Here's what we got. You need at least 20 blanks of each shade.

We string the workpiece on a strong thread at the base, wrapping each subsequent one in the other direction.

Now these petal threads can be tied to the warp you decide to use. If you will have a suspension, as in the photo above, then select the hoop of the desired diameter for the base.
Master class on making a large decoration
Let's take a detailed look at how to make these huge iridescent asters. To create them, you can choose corrugated or crepe paper. The main thing is to correctly determine the shade. The entire roll will go into action.

Let's roll the paper into an accordion.

Paper clips and clips will help you hold all the workpieces in the right position.

Now we give each strip the desired size, remove two centimeters from each subsequent workpiece.

We shape the petals on all rolls.

Now we unfold the rolls and form layers, laying the blanks on top of each other from largest to smallest.
In order not to get confused, you can write its length on each roll.

We turn the accordion and fix it in the middle.

We begin to straighten each layer.

That's how easy it is to make your own decor. The main thing is to be patient and have plenty of material at hand.
Corrugated paper anemones
Anemones are also often used for decoration. They are incredibly beautiful and realistic.
I want to show you another video that gives detailed instructions on how to make them. You don’t have to make decor of incredible sizes right away, start with the usual ones in order to understand the essence of the process and fill your hand, and save on materials, because each small bud can then be reproduced in large sizes.
I really wanted you to get acquainted with this idea of \u200b\u200bdecorating and decorating walls and other surfaces. Bookmark this article to quickly find when you need to decorate your room for the holidays.