Knit a hat with long ears for a girl. Children's hat with ears
And also to all those who want to learn how to knit on their own (on their own)
Once I went to the next needlework forum, they asked how to knit a baby hat with ears.
And at that moment I already knitted such a hat for my friend for her three-year-old daughter Lisa for her birthday.
The customer asked me to knit two hats at once from threads of different yarns.
That's what I did. Two hats in one pattern and pattern. I share my experience.
I knitted them in a couple of days. It took me longer to take pictures to post it here.
Both hats are knitted with front stitch - the easiest pattern for beginners.
How to take measurements for a hat?
The laces of the hats are made using the macrame technique. It may not be very visible in the photo, but in the description I will talk about it.
Description and knitting pattern for a baby hat with ears.
1. Knitting with a garter stitch: the front row with front loops, the back row with purl loops.
2. Be sure to knit a sample with those knitting needles and threads from which we will knit a hat. And the sample is performed by the person who will knit the hat. And then, for the sake of experiment with the customer, we did this: she is a beginner knitter and knits very tightly, like all beginner needlewomen. And I have free knitting. That's when she knitted the sample, and then I calculated the loops for knitting a hat and started knitting, the hat was larger than we needed.
Therefore, you must not be lazy and knit the sample yourself.
Taking measurements

3. For a three-year-old child, the head circumference is 52-50 cm.
For knitting, you need to dial loops for the volume of the head minus 2 cm for the tightness of the cap.
I took 50 cm for the calculation - the volume of the head. 
4. For the sample, cast on 20 loops on circular needles. And I knitted a pink hat on 5 stocking needles. tied 15 rows in height, which corresponds to - 6 cm. Then I measured the length of the sample in 20 loops - it turned out 12 cm.
On the red hat I dial 82-84 loops.
I knitted a pink hat on 5 knitting needles. I knitted a red hat on circular needles and both with a seam on the head.
Since I think that this way the hat sits better on the head and can be taken in if necessary.
I also want to add this photo to the lesson - loop calculation

How to make a drawing diagram of a product?
I took a sheet in a cage, a felt-tip pen and began to draw. I know that I need 9 cm for the width of the ears, 12 cm for the back of the cap. If the entire volume of the head is 50 cm, then 20 cm remains on the front of the cap.

5. In addition to the sample, I always make a drawing of the product, so that it is easier to knit and more visual. I never use calculated loops indicated in a book or magazine. Since the yarn is different, the thickness of the needles may be different for me than indicated in the magazine and the density of knitting for each master is different. Therefore, it is easier for me to calculate everything on my own model. It will be more accurate and faster. And I recommend you do the same.
In the drawing, I indicated on the left all measurements in cm, and on the right - the number of loops corresponding to these cm
6. So, according to the drawing, it can be seen that I need 9 cm for the ears, in length, which corresponds to my sample - 15 loops; at the back of the head only 12 cm: 6 cm to the left and right of the seam. Which corresponds to 10 loops to the left and right of the seam.
On the forehead, or the front of the cap, 20 cm remains, which corresponds to 34 loops.
Is it clear where it comes from? These distances and sizes are a matter of taste.
7. I started knitting from the left ear with three loops in garter stitch, adding one loop to the right and left after the edge in each row, or through the row. I looked so that the height of the ear was about 6 cm and go 15 loops wide (horizontally).
Always check your theoretical calculations with what you get when knitting. There may be errors.
Be oriented in time so as not to bandage the entire product later.
When I knitted the left ear about 6 cm high and 9 cm long or 15 loops on the front side to the left, I scored 15 loops on the back of the head (left) and left this knitting. The thread can be cut off, leaving 5 cm, then to hem.
8. I start knitting the right ear in the same way. I collect 3 loops, leaving the tip of the thread about 30-35 cm, for a tie.
(Since I made the tie using the macrame technique. But this is not important. You can also tie the ties with a crochet or in another way.)
After I have 15 loops of the right ear on the needle, and the thread is on the right, I pick up additional 10-12 loops of the back of the cap along the front row. Then I turn the knitting to the wrong side and knit the wrong side.
9. So that when casting on additional loops (for the front of the cap and the back of the head), the first row (edge of the cap) does not twist up, make sure that additional loops are dialed along the front row. That is, on the front side, I did this: I knitted the left ear - 15 loops, scored an additional 10 loops on the front side for the back of the hat and left knitting. Then she knitted the right ear, on the front side from left to right (that is, on the same knitting needle) she scored additional 10 loops for the back of the hat.
Having knitted the front row of the right ear, she scored an additional 34 loops on the third knitting needle for the front of the cap. See diagram. And she attached the left ear, continuing to knit with facial loops on the front side. Then, I turned the knitting and on the wrong side I knitted all 82-84 loops with the wrong side.
10. I knit with a garter stitch in a height of 11-13 cm. This is a matter of taste.

Assembly of the product. Weaving of strings.
When I knitted 11 cm in height, I began to decrease.
11. Reduced loops every 10 loops, knitting two together, in each front row. It turned out 8 reductions. The reductions were made in the same place. But you can reduce the loops in different places. I reduced both hats in different ways.
12. When 8-6 loops were left on the knitting needles, I threw all the loops onto circular knitting needles, closed the row, pulled it into a circle and left a thread of such a length from the ball that it could be used to sew a seam.
13. To sew a seam on the back of the hat, I took a hook and sewed a seam. Can be stitched with a needle.

14. Ties.

In the first hat (pink), I wove a chain of square knots - I got a ribbon. And in the second (red) hat, she made a cord with a Chinese “lotus” knot.
15. Pompon. I made a pompom from the same threads that I knitted a hat and sewed on. It turned out beautiful!!! We haven't had time to decorate the hat yet!! But we will definitely do it!
If you want to make a hat with ears more open from the side of the face, then accordingly, increase the number of loops from 34 to the desired length, then the width of the ear will decrease from 15 loops to the width you need.
But my customer asked for exactly this: to cover the forehead of the child and the neck. That is, as warm and closed as possible.
Knitted hats for girls. Types, features, diagrams and descriptions.
The period of motherhood is a responsible and amazing time when a young mother discovers or returns to forgotten hobbies and hobbies. One of them is knitting for their children.
With the approach of cold weather, I especially want to create a warm and cute hat for my daughter with my own hands.
And how not to drown in all the variety of models and patterns for the future headdress for your princess? Let us consider in more detail the nuances in the continuation of the topic about for
How to knit a hat with ears for a girl for beginners?
ready-made knitted winter hat with ears for a girl with snowflakesBeginning needlewomen worry before the first step and are afraid of complex descriptions of knitted hats. Once you decide to pick up the knitting needles and have already bought a beautiful yarn, get down to work boldly.
First, pay attention to the preparatory stage:
- tie a sample of the canvas with the pattern that you have chosen. Cast on 30 stitches and work 20-25 rows
- try not to over-tighten the loops,
- using a ruler, measure the density and height of knitting, that is, the number of loops / rows in 10 cm of fabric
- stretch the bound work slightly before measuring,
- determine the volume of the daughter’s head in centimeters by changing it with a soft meter or thread, which you then attach to the ruler,
- write on the sheet the required number of loops for the future hat, based on one part for the ears and the back of the head and two for the forehead. If you have an odd number of stitches, round them up. For example, instead of 17 loops, dial 20,
- choose knitting needles equal in thickness to the threads of yarn.
Consider the workflow for knitting a double hat with ears. This method will be most understandable for beginner craftswomen. It consists in knitting two hats that differ in size. That is, the inner one lies well on the girl’s head, and the outer one is 2-3 more loops.
Operating procedure:
- Cast on 7 sts on 2 needles and work in garter st, inc 2 sts on both sides in each RS row. Continue until you reach the desired number of loops, equal to 1 part that you counted on a sheet of paper, and cut the thread,
- repeat the same steps with the other eye, but do not reverse the thread, but pick up air loops in the amount of 1 part and connect to the finished eye. You got the back of the head and sides of the future hat,
- knit further all together for another 8-10 rows, depending on the size of the girl's head. Continue to add a loop on both sides in the front rows for rounding,
- get the right number of loops for the frontal part of the cap, taking into account the loops added for rounding,
- knit the whole fabric at least 10 cm up on circular needles,
- divide all loops into 7 wedges and at the beginning of each surprise with one loop in each row,
- pull the final 7 loops together with a thread.
Repeat all the steps for knitting the outer hat, only increase the number of loops in each part.
Sew both hats by folding the inner one face down, crochet all around the edges.
On top of the hole on the headdress, either crochet or attach a pompom.
Hat cat with ears for girls knitting

 cute cat hat with ears on a girl
 Depending on the skill and individual preferences of needlewomen, a cat-hat for a girl can be knitted in several ways:
- hat with ears plus cat ears sewn to it
- canvas sewn along one or two seams or knitted in a circle with highlighting / pulling the ears with bobbin threads
- hat-cap with cat ears sewn on top
Let's consider the first option. The basic work on knitting a hat is similar to that discussed in the previous section.
The only difference is that form not 7, but 6 wedges to decrease at the crown. Then it will be easier for you to mark places for sewing on cat ears.
Bind the cat attribute like this:
- cast on 17 stitches and knit 4 rows with knit and purl rows alternately
- decrease on both sides one loop through the row
- shape the sharpness of the ears to your taste. If you like protruding corners, cut the loops until one remains, if softer lines - up to 5-7
Sew on the ears on the top of the hat with a hook and process their edges over the entire surface.
How to knit a fashionable beautiful hat with knitting needles for a girl: new models, patterns
 beautiful knitted hat with a flower on a girl
 In fashion for girls there will always be classic models of knitted hats:
- berets
- hats with and without ears
- earflaps
However, their attractiveness and practicality were also proved by:
- hoods
- helmets
- hoods
All of them have common features:
- plain canvas or with an embroidered / knitted pattern
- jewelry in the form of beads, beads, ribbons, patterns
- additions in the form of mittens, scarves, snoods
Below we insert several examples of descriptions and diagrams of new models of knitted hats for girls.
 fashionable knitted hat for girls, example 1
 fashionable knitted hat for a girl, example 2 fashionable knitted hat for a girl, example 3
 fashionable knitted hat for a girl, example 4 fashionable knitted hat for a girl, example 5
Warm knitted children's knitted hats for girls winter: diagrams and description

 warm yellow knitted hat on a girl
 In winter, it is important for you to keep your child warm, so choose a knitting hat model wisely.
Pay attention to a number of points that affect the preservation of heat inside the headgear:
- yarn - natural threads protect the head from the penetration of cold
- the thickness of the thread - the larger it is, the warmer the head
- lining, or inner layer - can be fleece or a second hat sewn on
- extensions in the form of ears, lapels on the neck
- pattern - for example, multiple weaves of braids always remain in the trend of winter hats
Below are a few drawings describing knitting winter hats for girls.

 warm knitted hat for girls, description 1
 warm knitted hat for girls, description 2 warm knitted hat for girls, description 3
 warm knitted hat for girls, description 4
 warm knitted hat for girls, description 5
 warm knitted hat for girls, description 6
  warm knitted hat for girls, description 7
Beautiful fashionable hat for a girl with knitting needles for autumn and spring: diagram and description

 pink knitted hat with a flower on a little girl
 For cool, but not frosty weather, put on a thinner hat for the girl. Tie it from a thread in one addition and without lining.
From the patterns, select any, except for the openwork. For example, a simple 2x2 or 3x3 elastic band with a cute decor of flowers and leaves crocheted beautifully rally on the girl's head.
To knit it, prepare:
- knitting needles and yarn of the same thickness
- hook
- flexible meter
- scissors
Operating procedure:
- having measured the circumference of the head and tying the control sample of the fabric with an elastic band, dial the required number of loops,
- tie the first row with facial loops, then with an elastic band,
- at a height of 10 cm, depending on the size of the head, start decreasing the loops at the beginning of the wedges,
- determine the number of wedges yourself. It is convenient if there are 5 or 7 of them,
- pull the last loops in an amount equal to 5 or 7 with a thread. The hat is ready.
- Next, crochet 30 air loops. The second row is single crochet, the next is double crochet, the last is double crochet.
- Roll the finished openwork cord into a spiral and lay it out in the form of a flower.
- Attach it with a hook or a needle and thread.
- Repeat the steps for crocheting openwork laces and shaping flowers/leaves.
An alternative version of a knitted spring / autumn headdress for girls, see the picture below.

 diagram and description of a knitted spring hat for a girl
Knitting beautiful fashionable hats for teenage girls
 fashionable knitted hat for a teenage girl
 Teenage girls are especially picky about headwear. They like original and beautiful things, and mothers are worried about warmth and convenience. Knit a headdress for your daughter that she will wear with pleasure.
In fashion for teenagers hats:
- with ears and long ties, at the ends of which pom-poms are attached
- fur
- from thick threads
- fishnet berets and with a lot of pigtails
- hoods
- helmets
- hoods
- in the form of a cap, for example, like Little Red Riding Hood
- open-top hair sock
- with oblique fields, the widest part of which is decorated with a large original button
- cap-shaped
- with visors
- with a simple pattern of thick threads and with fur pom-poms on top
We will consider knitting features of almost all of them below.
Beanie hat for girls knitting
 the girl is wearing a gray fashionable knitted beanie hat
 Beanie won the love of girls for its convenience and the ability to wear it with almost any outfit.
If you have good knitting skills, then creating it yourself will not cause difficulties. Novice needlewomen should carefully read the description of the work a couple of times and carefully follow each item.
Features of knitting beanie hats:
- it is longer than normal
- consists of wedges that are knitted alternately without breaking the thread
- the first two rows are carried out on an additional thread, which, upon completion of work, dissolves
Operating procedure:
- dial loops with an auxiliary thread along the length of the cap, for example, 50 pieces
- Knit 2 rows in garter st and cut yarn.
- go to the main thread and also work 2 rows of facial / purl loops
- knit the next row according to the pattern, but leave the extreme 6 loops on the left knitting needle
- thread through the sixth loop and turn the work to continue knitting
- go to the end of the row, tighten the edge tighter
- turn work and leave 5 sts loose
- repeat the steps until you get the thread over the last loop
- knit a row. You get a wedge with a tapered side. She will be the crown
We continue to knit a new wedge from the front side according to the scheme described above. In total, you need to form 12 wedges.
Unravel the auxiliary thread and connect the edges of the product using the loop-in-loop method. If you feel more comfortable crocheting or needle and see the seam, bind off all stitches before joining the hat fabrics.
Decorate with a pom-pom, large button or brooch if desired.
How to knit a hat for a girl with knitting needles?
 finished original hat-helmet, knitted
 We suggest using the “heel” technique for knitting a hat-helmet for a girl.
The order of work is this:
- dial loops in the amount of a quarter of the volume of the girl's head and knit facial in the front rows and purl in the purl,
- at the level of the crown on both sides along the finished fabric, lift the edge loops and go to three knitting needles,
- continue knitting the same patterns to the level of the chin,
- on the fourth knitting needle, dial as many loops as at the beginning of knitting a hat,
- continue working in a circle with an elastic band 1x1 or 2x2 to the height of the neck,
- for a shirtfront, expand the canvas by adding a loop to each purl,
- then 4-6 rows, knit in a circle,
- close all loops.
To decorate the helmet, use:
- beads
- brooches
- threads with lurex
- beadwork
- pompom from a knitted fabric 7 cm high, collected in a rosette at the crown
- a braided braid of yarn in a contrasting color or under the shade of the girl's hair
An alternative version of a knitted hat-helmet, see the figure below.

 knitted hat-helmet for girls, description
Beautiful hat and snood for a girl with knitting needles: diagram
 smiling girl in a knitted hat and snood
 Snoods are more comfortable to wear than a classic scarf due to their ability to stay in place and cover the neck. This is extremely important for girls.
Knit a beautiful set of hat and snood for your daughter using the same technique and patterns as suggested in the pictures below.
 pattern for knitting hats and snood for girls
  description of knitting hats and snood for girls
 Warm double knitting hat for girls

 beautiful white double knitted hat for girls
 After completing the preparatory steps that are listed in the first section, and choosing the yarn for the future hat, get to work.
We propose to knit a double warm hat with a braid pattern with a cross on its front part. If the thread of yarn is thin, fold it in two before creating a headdress.
To calculate the number of loops, knit a sample of elastic and a pattern. For this:
- cast on 20 sts on auxiliary yarn
- 1 row - knit 1, 1 yarn over - repeat to the end of the row, but do not knit yarn before the edge,
- 2 row - remove the hem and purl without binding, 1 front, purl remove - repeat until the end of the row
- 3-12 row - repeat 2 rows
- 13 row - remove the edge, two together, two together, purl, front - so repeat until the end of the row
- 15 row - edge, 7 purl each, between which 12 facial
- 16 row and all further even ones - according to the figure
- 17-21 rows - according to the drawing
- 23 row - on the front loops, cross 2 in different directions
- 25-31 rows - according to the drawing. Next, knit repeats of the pattern
- dissolve the auxiliary thread from the sample and determine the knitting density of the cap on the elastic and pattern
The order of knitting the outer layer of the hat on 2 knitting needles:
- cast on and knit a double rib as in the sample
- remove the auxiliary thread and proceed to the drawing
- for a girl of 5 years old you will get 5 rapports
- at a height equal to 4 crossings and 3 rows, begin to decrease the fabric, closing a loop on both sides of each braid
- repeat decreasing stitches after 4 rows, continuing to follow the pattern
- keep doing this for 2 more braids
- decrease the number of loops after the edge 2 front, 2 together, 4 front, 2 together, 2 front and then repeat to the end of the row
- decrease in every second row until the front inserts are rounded
- last row - three loops together
- pull the loops with thread
Do the following for the inner lining:
- pick up the loops from the top row of elastic
- first row - purl, then alternately front and back
- knit a straight fabric, applying to the main
- repeat dec sts on inner lining in mirror image
- pull the final loops with a thread
- connect both parts of the cap
The decor elements of a warm hat will be ears connected by raised loops of the upper row of elastic on the inside. For this:
- 14 stitches, work 12 rows in a straight piece
- decrease in every second row on both sides of the loop
- crochet laces on the final 2 loops, 15 cm long
Attach a ready-made or custom-made pompom to the top of your head.
Hat knitting for girls 2 - 3 years two-color
 two-color knitted hats for girls 2-3 years
 Universal and feminine colors for a hat for the cold season are white and pink. The little princess will especially love the headpiece with tie-down ears, on the front of which you can embroider a snowflake, for example.
In this case, the ears that knit first, knit on 11 loops. Make them in white and pink stripes through 2 rows.
Leave the rest of the hat white and the snowflake pink. Instead of drawing, make a pom-pom from both colors so that they occupy half of its circumference.
See the diagram of the "snowflake" pattern below in the picture.

 snowflake pattern for knitting on a children's hat for a girl
 The knitting process was presented in detail in the first section of the article.
Let us dwell only on the estimated number of loops for a guideline.
- ears start knitting on 11 loops, reaching 21,
- go to the main knitting - cast on 17 loops, add one eyelet, cast on 44 loops, add the second eyelet, dial 17 loops again and close the edges in a circle. Total 120 loops.
Make ties from 3 threads a little more than half a meter long, threaded in the middle of each ear at the bottom. Fold the threads in half and braid the pigtails along the entire length.
Hat with earflaps knitting for girls

 cute knitted earflaps on a little girl
 According to the knitting technique, a hat with earflaps is similar to a hat with ears. The difference is in a few points:
- ears - knit them initially wider and add loops for expansion in 3-4 facial rows. Above, knit a straight fabric of the desired height,
- the back of the head is higher, therefore, after collecting the ears and lifting the loops for the back of the head between them, perform at least 10 rows,
- insulation is a must. And not only inside the cap, but often outside on the forehead. Fleece and artificial fur have warming properties,
- ties - they are thinner and longer.
Examples of a knitted earflap for a girl are below.

 description of knitting hats with earflaps for girls, example 1
  honeycomb pattern description
 If you like the absence of seams, knit a hat with garter needles. If it is important for you to have identification details in the form of a seam, - on two.
Please note that the pattern attracts attention with its originality, so do not decorate the hat with it with anything.
Hat bonnet for girls knitting

 knitted bonnet with ears on a girl
 The order of knitting the hood is as follows:
- first make a strip framing the face. Usually this is a garter stitch on 11-17 loops 120-150 rows long,
- knit the main part on the number of loops equal to the length from one earlobe to the other. In the crown area, divide the fabric into 3 parts and knit only the central one, picking up alternately one loop in each row of the other two. According to the technique, the work is similar to knitting heels,
- form a strip on the neck from the loops of the main and first part of the cap. Some craftswomen lengthen this strip by 15 cm on each side. These will be the ties on the hood.
Knit a hood for the cold season with patterns:
- corn
- braids with garter stitch inserts
Decorate the seam of the main cap above the face and at the crown with knitted ruffles. To do this, lift the loops in the designated places, knitting from one to two. Work 9 rows in stockinette stitch and bind off all stitches, pulling them together tightly to keep the ruffles in shape.
We knit a hat hood for a girl with knitting needles
 bright hood-hat for girls
 Features of this type of hats:
- their width at the bottom of the neck is half that at the top of the head,
- the area of the cap on the neck can be solid or separate, connected to buttons or a brooch,
- space that is suitable for lush hairstyles,
- comfort when the hat falls on the shoulders.
Interesting models of hoods:
- two-tone, when a lighter tone is present at the end around the face,
- with weaves of braids, zigzags, rhombuses, cones,
- made with three-dimensional patterns, for example, pearl.
Start knitting a hat-hood from the narrow part, gradually adding loops according to the previously selected pattern.
- In the peak position, continue knitting and decrease the number of loops in a mirror sequence.
- Sew the hat along the back of the head.
- Either knit the neck part of the hood separately from the main fabric, and then sew it on. Or think of loops along its entire length and knit on circular needles.
We add that this attribute is appropriate to add for any model. Ties serve as both a fixer on the head and a decorative element. In the second case, their ends are decorated with pompoms made of yarn or natural / artificial fur.
For clarity, see the order and pattern of knitting a hat with ties below.

 knitting pattern for a hat with ties for a girl
So, we examined the features of knitting various models of warm hats for girls. It's getting colder outside, which means it's time to do needlework.
Inspiration for you and original hats for daughters!
Video: knitted warm double hat for a girl
The trends and fashion trends of the coming season allow you to collect an amazing zoo in your wardrobe. Animal hats and wolf hats are for adults. And for kids, designers have prepared cute cats, dogs, bunnies and Mickey Mouse.
Fashionable hats with ears in the winter of 2019 will be popular with both a very young audience visiting a nursery garden and teenage teenagers who are striving to imitate adult ladies in everything. They can be purchased ready-made, or you can experience the throes of creativity and create a headdress from woolen yarn, felt or insulated fleece with your own hands. A beautiful hat with ears can be quite simple. It is enough to tie two square full and sew them in such a way that ears form on the sides.
Easy to sew, even easier to knit or crochet. The ideas suggested in the photo will help you choose the right model and make it a reality. A standard knitted hat with ears for a girl will need 100 grams of wool yarn with a thread length of 250 m / 100 gr. For an adult model, 50% more of the same yarn will be required. A children's hat with ears for a girl can be pink, dove, lilac, white or gray. For boys, it is recommended to choose rich blue, green, brown and chocolate shades. With the right choice of color, a baby hat with ears will go well with other types of baby outerwear. The responsibility for this lies entirely with the parents. So be careful and try to dress your children beautifully, stylishly and fashionably.
Look at the children's hats with ears in the photo, which shows styles for girls and options for women's hats for teenage girls:

Knitting hats with Mickey Mouse ears are suitable for both boys and girls.


Hats with ears for babies can be bright and rather strict, but in any case soft and pleasant to the touch.
Cozy and warm: children's knitted hats with ears (with photo)
Any knitted hat with ears can be both an accessory and a warm headdress. It all depends on the manufacturing technique. If you take a thin hook and threads of the "Iris" type, you get a wonderful summer panama hat that partially protects from the sun's rays and nothing more. Therefore, please note that a children's knitted hat with ears must correspond to the season and climatic conditions, primarily from the selected type of yarn. Cotton is recommended for spring. For the summer, you can knit openwork patterns made of silk and acrylic. But for autumn and winter, you need to choose either natural wool or angora with a small percentage of added synthetic fiber, which allows you to better keep the shape of the finished product.
Look at the photos of children's hats with ears - all ideas are quite simple and can easily be translated into reality with the help of an experienced craftswoman: 


THE BASIC SCHEME OF KNITTING A SIMPLE HEADGEAR OF THIS TYPE IS IN THE FOLLOWING STEPS:
- measure the girth of the head, positioning the centimeter tape in the way that the cap will “sit” in the future ”;
- dial 10 loops on the knitting needles and knit several rows;
- measure the resulting sample, divide the resulting head circumference by this number of centimeters, and multiply by 10 - this will be the required number of loops for knitting a hat with ears;
- dial this number of loops on the knitting needles with fishing line;
- knit 7 cm with an elastic band with alternating 2 facial and 2 purl loops;
- then knit with a simple front surface or a pattern you like to the height that is needed;
- finish knitting by closing all loops;
- sew the hat on the back with a hidden seam;
- sew milestones, forming ears.
According to this scheme, you can knit both a children's and an adult hat with ears of various types. Then it remains only to decorate the product with pompons, tassels, embroidered or glued eyes and antennae. 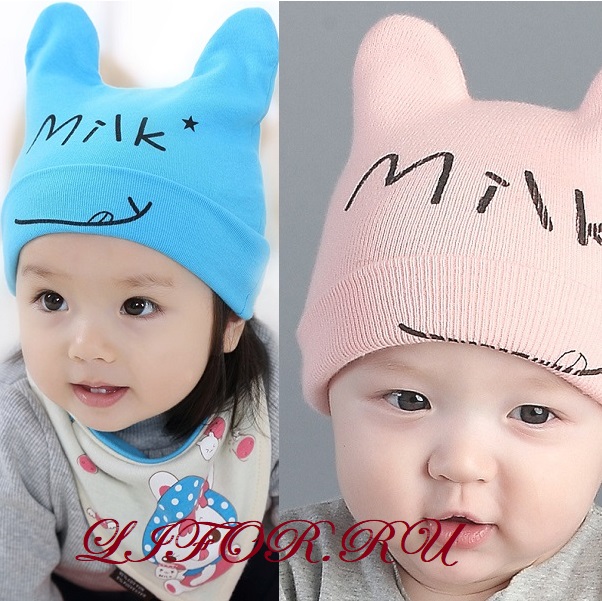


Knitted women's hats with ears for teenage girls (with photo)
A fashionable women's hat with ears is in demand among modern youth. Animalistic moods dominate not only on the catwalks in the form of luxurious coats and prints on all types of clothing. A suitable hat with ears for a girl can be fur and leather, suede and felt, fleece and knitwear. But the most important trend still remains handmade. Therefore, knitted women's hats with ears in 2019 will be especially popular, especially since hat manufacturers offer them for sale today in a huge variety of models and styles. 


You can puzzle a teenager with needlework, buy a ball of thread of the color you like and knitting needles, or a hook for a girl. A few evenings of creativity developing fine motor skills of the hands and a beautiful headdress in an individual style will be ready. The general knitting pattern is detailed in steps above on the page.
It is worth noting that hats with ears for teenagers must be designed in a certain color palette. So, pink and blue are completely excluded. In teenage fashion, purer shades with deep content dominate. These are all shades of gray, white, black, brown. Yellow should be used with caution, because although it is in fashion in the winter of 2019, it is not for everyone. 


Look at the photo of knitted hats with ears in various colors - among them, you will surely inflate those models and styles that you can take into service when planning a seasonal wardrobe for a teenage girl: 

Another current trend of the current fashion season is the large-scale use of decor with the help of three-dimensional embroidery, appliqué and patches of various plastic and wooden parts. This can all be used to decorate the finished product.
Look at the women's hats with ears in the photo of models for teenage girls - they allow you to choose a hat for any urban look: 


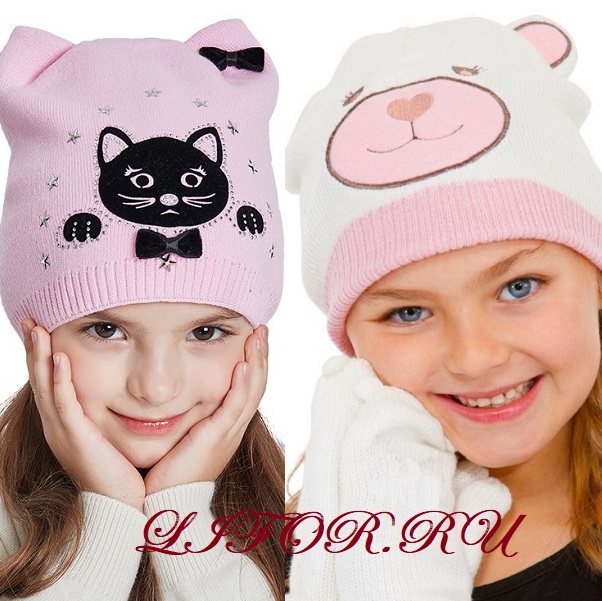
Hit of the season for girls - winter hats with cat ears
Style trends are changing. Children's fashion does not stand aside either. The hit of the upcoming winter 2019 season is animal prints and animal images wherever possible. Hats are no exception. A stylish winter hat with ears for a girl can be in the form of a funny little animal and at the same time reliably protect from the cold and frosty wind.
The most popular animals for girls are bunnies, cats and bears. In second place are foxes, squirrels and Mickey Mouse.
A black hat with cat ears is more suitable for teenagers. It can be fur or knitted from fluffy yarn. There are also simple knitted models of the beanie style (fitting the head) and decorated with sewn on cat ears. You should also pay attention to felt bowlers with small rounded cat ears and an appliqué in the form of a Cheshire cat smile.
Bright multi-colored (pink, blue, yellow, beige, salad) hats with cat ears are suitable for preschool girls or elementary school students. They will be happy to wear such hats if voluminous scarves and soft fluffy mittens are matched to them.
A warm winter hat with faux fur ears is the trend of the coming winter. A high-quality internal filler in the form of a heat-insulating material will serve as an excellent protection for the head. These hats for children are presented in a wide variety. We recommend choosing for the winter such hats that are securely fixed (at least this requirement is relevant for children under the age of 10 inclusive), and close the line of the back of the head and neck. 


Fur hats with ears for the winter
Hats for the winter with ears can be different in their cut. If you take hats for very little ones, then you should pay attention to the long ears, which can be easily tied under the chin and thereby save the ears from the icy wind and prickly snow. For older children, it is worth choosing thicker hats that are securely fixed on the head and do not move out at the slightest turn of the head. Looser fit hats can only be recommended for children over 10 years of age.
note that a fur hat with ears is not always the best choice for babies. An allergic reaction may occur to fur microparticles. Therefore, for babies under the age of 3 years, it is better to choose hats with ears exclusively from quilted materials. Inside should be hypoallergenic insulation.
A wider selection of fur hats with ears for teenage girls. There are a huge number of models of animal hats. Thanks to a well-chosen headdress, a girl can look like a real Amazon. As an additional detail of a casual bow, you should choose fur vests that are stylish to wear in combination with a wide leather belt with a massive decorative buckle.
Fur hats with ears can be made from fluffy fox or smooth-haired mink. But it is much more humane to teach a child to respect nature from early childhood. Moreover, modern artificial furs are not much inferior in their consumer characteristics to natural ones. 


Simple hats with pompom ears for kids
In fact, any knitted, fleece or fur hat can be turned into a stylish designer item in no time. This season, stylists suggest using various pompoms to the maximum to decorate hats, accessories and outerwear. For kids, it's a real treat.
Even the simplest hat with ears will help make the image of a child memorable and extraordinary, standing out from the crowd of children. A beautifully designed beanie with pom-pom ears pairs perfectly with down jackets, quilted overalls, ski jackets and sheepskin coats. In general, this is a universal thing that should be in the wardrobe capsule of every modern child.
Look at the various hats with ears for children in the photo, which offers a lot of different models and styles: 


Models of hats with ears: scarf, snood, beanie and others
A variety of styles allows you to solve the functional problems of providing reliable protection of the head and neck of the child from frost and blowing cold wind. Models of hats with ears cope with these tasks better than other hats only if the style is chosen correctly. So, a stylish felt cap or a baseball cap for a teenage girl will not solve the problem. It will be purely decorative in nature. But a beanie hat with ears for a girl will be an excellent headdress for late autumn and early winter. At least some kind of headgear. Indeed, for the most part, it is very difficult to force teenagers to wear a hat.
For younger students, a snood hat with ears will be an ideal everyday option - it is both fashionable and beautiful and very warm. Moreover, the choice of such snoods today is very large. A craftswoman's mother will be able to tie such a model in a couple in the evening. Yes, and you need quite a bit of thread - 150 grams.
A practical scarf hat with ears is suitable for both preschoolers and girls who adhere to a certain style in everyday streetwear. The scarf is suitable both for the look on the meringue of a fashionable parka, and on the platform of a quilted jacket. For a sheepskin coat or a fur coat, it is better to choose a different style of headdress, for example, a beanie. 

Hats with ears of an owl and a bear, a bunny and a fox, Mickey Mouse and a cat
A hat with bunny ears, popular among toddlers, gradually becomes less relevant by the age of 3-4 years. At this time, the child is already beginning to be interested in the world of animation and he has completely different heroes, ideals and role models. You shouldn't resist it. It's just a process of developing your own taste.
A hat with the ears of Mickey, a funny and nimble mouse from the Walt Disney cartoon, enters the stage. The choice here is great. Manufacturers offer hats with Mickey Mouse ears for every taste, color and budget. It can be a very simple fleece or knitted hat. For the cool season, a knitted model is suitable. And for a harsh winter, you can recommend a fur style. 

The addiction to Mickey Mouse passes by about 5 years. At this age, the child begins to imitate adults and prefers more strict and realistic forms in the patterns on clothes. A hat with fox ears with the appropriate decor in the form of appliqué or embroidery would be appropriate. The realism of the image can be complemented by an appropriate scarf that imitates the tail of a fox.
Closer to the age of 7-8 years, the child begins to give preference to slightly different directions. He becomes interested in new types of animals, and at the same time he strives to be like his classmates. And this season, certain images will be in fashion. Therefore, with a high degree of probability, we should expect that the child will ask to buy a hat with owl or bear ears, since this is a real trend of the season.
A hat with cat ears is a dream for middle school girls. Teenage girls in the winter of 2019 will unconditionally prefer animalistic trends. This will apply to both makeup and the choice of prints for everyday wear.
Winter is coming, and first of all, you need to think about the children. Cute children's hat with ears Kitty will warm your child in cold weather. There are many hats for children in stores, but most of them are made of artificial materials. Our hat will be made of wool. And if there is enough wool for the same scarf or mittens, then you will get a whole ensemble. Hat size fits 46 head size. For a 2-3 year old child. can be worn under a hood, for more warmth we sew in a fleece lining. We knit in two threads.
We will need:
- yarn 100% wool (220m 100g.) - 2 skeins (enough for a hat and mittens or a scarf)
- knitting needles, number 3
- large needle
- button
Getting Started
Sample: 18 loops = 8 cm, so 1 cm = 2.2 loops. The total number of loops is 103 p.
After taking measurements, it turned out:

Knit hat ears
Cast on 9 stitches. 1 row purl loops. Then in each 2 rows we make an increase of one loop. We knit until there are 25 loops on the knitting needle. Cut the thread and set aside. We also knit the second ear, only we do not break the thread, but we collect the loops of the back of the head (17 loops), we attach the first ear, the next row is the wrong one.


Cast on the loops of the suprafrontal part (31 loops), close the circle and then knit in a circle 34 rows without additives.


Next, we begin to subtract. To do this, we divide the product into 6 parts. We mark the 7th loop. Next, mark every 17th loop. As a result of this, we will get a convenient arrangement of the wedge line, ears will be sewn along one wedge.

Decrease as follows: the loop that is marked is the central one, and the loops on both sides of it are reduced by knitting 2 together in every 3 rows. It turned out like this: we transfer the remaining 8 loops to the needle, tighten and fasten.
We knit cat ears
Cast on 17 sts, purl 1st row, knit 2nd, purl 3rd. Starting from the 4th row (front row), we decrease one loop on each side in every 3rd row until 7 loops remain on the needle. The remaining loops are pulled together and fastened. We knit 3 more ears. Sew over the edge, sew. Sew on a bow and a button.
Fleece lining
Cut off a rectangle with sides 47 cm, height equal to height. We put our hat on the fabric and circle it.

We cut and grind the side seams on the machine or by hand. Sew the lining to the hat. In the future, when you wash the cap, after washing, dry it by pulling it over a 2-liter jar so that it does not lose its shape.

In cold weather, it is especially important that the child's ears are warm. A warm and beautiful knitted hat with knitting needles knits quite simply. There are many schemes - you can choose an acceptable option. It is important to remember that the child should be comfortable in a knitted earflap, so we choose soft yarn, not “prickly”. To correctly calculate the number of loops, first we knit a sample from the selected yarn. According to it, we count - how many loops and rows in 1 cm of knitted fabric.
Knitted hat with ears for a girl up to 6 months
This simple model is designed for a head circumference of a child of 34 cm. The density of knitting with garter stitch knitting needles is 27p. by 10 cm.
For work you will need:
- wool yarn 50g with a length of 170m;
- circular sp. Number 3;
- direct sp. No. 3 and No. 2;
- pin;
- needle;
- button in the color of the yarn.
Description of knitted hat
On direct sp. dial 6p. We start from the front side.
From the 1st to the 3rd p. -1 edge, 4 persons., 1 edge;
4 p. - knit a loop for a button: 1 cr. 1 l., 1 yarn, 2 p. together faces., 1 l., 1 cr.
From the 5th to the 11th p. - 1 cr. 4 persons., 1 cr.;
12 p. - 1 cr., from one - knit two faces., then - faces., until there are two loops - from the penultimate - two faces., 1 cr.; it turned out 8p .;
13, 14 p - like 12 p.;
15 rubles -1 cr., facial, 1 cr.;
16, 18, 20 p. - make increases on both sides, as in 12p. It turns out only 20p .;
We knit the second ear in the same way, but without a hole for the loop.
When the ears are ready, we will continue to knit the cap directly. Cast on 11 sts on circular needles, then we knit the left ear (20 sts) with the front side towards us, we collect 34 more sts, then the right ear (20 sts), again -11 sts. Total -96 p. Continue with a garter 4 cm, finishing out. beside. We turn to facial knitting and knit 9 cm.
From the next row, we begin to make a decrease on the crown of the cap.
1 row - * 2p. – one person., 6 persons*. Repeat from * to * 12 times. It turned out 84 p.
2p and all even - facial sts;
3r. - * 2p. - 1 persons., 5 persons *. Repeat from * to * 12 times. 72 sts remain.
5 p. - * 2p. -1 persons., 4 persons *. Repeat from * to * 12 times. 60 sts remain.
7 p. - * 2p. -1 persons., 3 persons *. Repeat from * to * 12 times. 48 sts remain.
9 p. - * 2p.-1 persons., 2 persons *. Repeat from * to * 12 times. 36 sts remain.
11 p. - * 2p. -1 persons., 1 persons *. Repeat from * to * 12 times. It turned out 24 p.
13 p. - 2p. - 1 person. - repeat 12 times. It turned out 12 p.
15 p. - cut the thread, stretch all the loops through it, bring it out. side, fasten.
Hat bow with ears
54 row - every 2 loops together - facial. Received 12 p. Cut the thread, stretch through the remaining loops, bring to the wrong side, fasten.
For a beautiful design, a knitted hat with ears can be crocheted:
1st row: on the front and back of the cap, knit 3СБН between each two l. item on an elastic band;
2nd row: knit only for ears and ties. On out. side 1 conn. column, 1 air. n. in each column of the first p.
To make a winter knitted hat with ears warmer, you can knit it double. To do this, first the lower hat is knitted with knitting needles according to the same dimensions, but in one thread, with smaller knitting needles - stocking stitch. Then - a cap according to the description. Crocheting is done through two layers of cap fabric.
Knitted earflaps for a boy
Loops - transfer 49 pieces to a pin. The second is tied symmetrically to the first. Then unite both parts on circular needles and then 3 cm with front stitch.
Following the river subtract 24p.: 2l., * 1p. remove the faces., knit the next st., stretch the removed st through it, 2 faces. * Repeat from * to * 24 times., 3 faces. It remains 74p.
We continue with hosiery - 6p.
Track. R. - 3 persons., * 1p. remove the faces., knit the next p., stretch the removed p., 1 persons through it. * Repeat from * to * 23 times, 2 persons. It remains 51p.
Trace river. - evenly decrease 16p.: 2 persons., * 1p. remove faces., knit the next p., stretch the removed p., 1 persons through it. * Repeat from * to * 15 times, 1p. remove persons., knit the next p., stretch the removed p., 2 persons through it. Remains 35p.
Then - 4r. stocking knit.
Trace river. -1 knit., all loops knit 2 together. We get 18p.
Then -2 p. stocking knit.
Trace river. - all - two together. Remains 9p.
For the ponytail we knit 8r. stocking knit. The knitted hat is sewn with a knitted seam, we pass the thread through the remaining loops on the tail, pull it together, bring it to the wrong side and fasten it. Knitted earflap is ready!
We hope that our article will help you knit a warm and beautiful hat with ears for your baby. Happy knitting!