Boot on the fireplace made of felt with your own hands. New Year's boot: the best ideas
print Thanks, great tutorial +1
No winter goes by without boots. Therefore, we suggest you make boots out of colored paper. However, they will not be simple, but New Year's. After all, they will have the classic colors - red and green. Also, to give a New Year's mood, we use sequins in the form of snowflakes and white half-beads.

- Red and green double sided paper
- Curly scissors
- Snowflake sequins (at least 2 pieces)
- Half beads of different sizes in white
- Stationery glue
- Scissors
- simple pencil
- Ruler
Step by step photo lesson:
On red paper, draw the silhouette of the boot. First, we determine its size, and then the shape. Cut out.

We put it on the corner of a green sheet of paper. Circle the toe of the boot.

We remove the red boot. Draw an arc on green paper to the circled lines.

Cut out along the contour and glue a green detail on the toe of the boot.

Also measure the size of the upper part of the boot. Let's transfer the size to green paper. We get a rectangle.

With scissors with a curly blade, we will make beautiful wavy edges at the bottom and top.

Glue the piece to the top of the boot.

Decorate the green elements on the boot with white half beads. If you have them of different sizes, then alternate in size through one.

Then add beautiful sequins in the form of snowflakes to the main part of the boot. The more of them there are on the craft, the more beautiful and brighter the New Year's paper boot will look.

This ended the creation of a New Year's boot made of colored paper. If you need to make a second to a pair of boots, then repeat steps one through nine in a mirror image.

Video lesson
A New Year's boot for gifts can be made with your own hands in many ways. Check out some of them and choose the most beautiful one. The sock for gifts in Russia is not as popular as in the West. However, we are increasingly using it not only for its intended purpose, but simply as a decor.
We have selected for you three simple workshops on sewing a Christmas boot. The first is a simple decorative sock. The second is denser, it is suitable for gifts. The third is a boot from a plastic bottle (you can put sweets or pleasant things in it). Browse all and choose any. In the article you will also find the necessary patterns and stencils.
patterns
A New Year's boot can be sewn from felt, fleece, as well as from quilted or any other dense fabric. Whatever you choose, you will need a pattern. Below are the sock templates for Santa Claus (print or just draw them).

With a small heel

The classic version, for the Victorian Santa and for the elf

New Year's sock pattern with sizes

Convenient boot template with cell markings

Ready-made pattern of Santa Claus's sock for printing and cutting
Choose the template you need. You will need it for two of the three workshops below.
Method number 1: decorative sock
This New Year's boot is not intended for gifts. It can be made single or double and be sure to decorate with appliqué. Felt sock looks best. Fleece is softer, so you can additionally seal it with cardboard or a double layer of fabric. You can also use velvet, velor, thick cotton fabric.
To decorate a New Year's boot, take felt, fleece, floss threads or yarn, beads, and ready-made stripes.
We advise you to look into our section "Stencils" - in it you will find selections of different templates with New Year's heroes. They will be useful for you to create applications. They can simply be printed and cut out first from paper, and then from fabric. Or take it as a basis and just draw.
Watch this simple video tutorial showing how to make a decorative Christmas sock with your own hands.
Use it as a support, and come up with your own design.
Here are some ideas for different DIY Christmas boots. Use them for inspiration or just repeat.
Use acrylic paint and white thread to embroider and pattern the sock.

Fold two patterns with each other and make a decorative seam along the edge (mark up in advance). Decorate the boot with pompoms.

Cut out a few decorative elements from felt or fleece according to the templates, sew them to the outside of the Christmas sock. Complete with beads, rhinestones and decorative buttons.

Make a sock pattern using an unnecessary sweater or scarf. Decorate with Santa Claus, made from a cotton pad, a piece of felt and a hat (use the same fabric for it). Do not forget to make a white border and sew on buttons. You can decorate the sock with embroidery.

These are just a few options, you can choose any of them. A decorative Christmas sock does not have to be doubled at all - a single one will do just fine.
Any of these crafts can decorate a door, a Christmas tree, windows, or simply hang on the walls on the eve of the New Year.
Method number 2: a sock for gifts
The New Year's boot for gifts needs to be sewn tighter so that it is reliable. Use the patterns above. Take them as a basis, but the sewing technique will be a little more complicated than in the first master class.

Choose a suitable thick fabric (in the departments for creativity you can find interesting decorative options). Choose your filler. Batting, thin synthetic winterizer or even fleece will do.
We cut out two identical blanks for the New Year's sock according to the template. Also make two parts for the lining using these stencils (the ones from which you will sew the inside of the boot).

The filler can only be sewn to the front of the sock, because the decor will be located on it.

Sew the loop right away. First, cut out a rectangular piece from the fabric, then wrap the ends inward, iron and fold in half.
Fold in the front of the sock and the filler. Sew back about 0.5 cm from the edge.
Place the lining piece right side up. Sew on the loop, stepping back about 2-3 cm from the edge on the heel side.

Then repeat the procedure for the second inner (a loop is sewn to it) and the second outer part of the sock. Fold them right sides towards you, and then sew along the top (the seam must also be inside).
Take two blanks and straighten them so that the outer (the part that will be visible when the sock is ready) is inside.
Sew the details around the perimeter on a typewriter. Step back from the edge about 1 cm. Do not forget to leave a hole in the lining so that the sock can be turned inside out.

On the rounded parts of the toe (or around the entire perimeter), make small serifs in the form of zigzags or triangles. This is necessary so that the turned-out boot does not puff up due to the gathered fabric.

Turn the Christmas sock inside out and mend the hole you made it through. Then tuck the lining into your boot. That's it!

Decorate the resulting New Year's sock with any stripes, appliqués or voluminous figures of Christmas characters - sew or glue them on. Complete the craft with fur, pompoms, sequins, rhinestones and other decor.
Method number 3: a boot from a plastic bottle
Santa's boot can not be hung from the fireplace or on the wall, but simply placed under the Christmas tree. Put a gift or something tasty in it. In addition, this stable sock can be put on the festive table and made into a vase, a napkin holder or a "hat" for forfeits.
We offer you to watch this simple video master class, in which the author talks in detail about how to make a New Year's slipper from a bottle with your own hands. Repeat the step-by-step workflow using the same materials. Everything is shown very clearly, so you can't go wrong.
The approach of the fabulous New Year, which we have been waiting for all 12 months, is already felt. In preparation for the celebration, do not forget to make templates for New Year's boots with your own hands. As you know, this tradition migrated to us from the West. However, the Russians are happy to support this fad and are happy to hang these products in their homes.
The fact is that, according to the traditions of the Western people, Santa Claus should leave presents in this particular product, although if the gift is very large, then the Wizard can leave the gift nearby. But be that as it may, having entered the house, Santa Claus will look for the boot, and if he does not find it, then the owners of the house may be left without a New Year's gift. And in order to prevent such a situation, it is necessary to prepare for the arrival of the Good Wizard.
You can draw a New Year's boot template yourself, or you can take it from the Internet. When you have selected the necessary model, now you should prepare the right tool for the job.
For this you will need:
- the material from which the product will be prepared;
- threads;
- a piece of thin soap or chalk;
- threads matched to the color of the material;
- scissors;
- decoration accessories;
- thin rope for hanging the product.
Christmas boots are easy to make from felt. Multi-colored sheets of this material are easy to buy in stores with goods for needlewomen. The size of one sheet will accommodate half of the boot. After everything is prepared, you can get to work.

Therefore, using the selected template, you need to make a pattern. After attaching the stencil to the material with chalk or soap, circle it, transferring the outline to the base. Thus, the silhouette of the boot will turn out. If the material is folded in half and not displaced, it will be possible to cut out two parts at once. After that, these details need to be ground.

We got what we wanted. For beauty, the edges of the boots can be carefully trimmed with curly scissors. Surely many have seen when products have a beautiful outline, for example, in the form of small triangles. If this is not possible, then you can use a bright thread with a needle to overcast the edges, but so that the colors contrast differently. This is done for originality. Then fasten a loop from the rope and you can hang the finished product wherever you want.
On New Year's Eve, of course, almost every mother is heavily loaded with chores and, well, there is no time to do needlework. Therefore, you can use the simplest option for making such crafts, that is, make it out of paper. And for this, it is necessary to call the children and shift such an easy task to them.

But first you need to prepare the necessary material and show how to do it. So, for work, prepare paper of different colors. Then make a template. To do this, draw your boot on a cardboard sheet with a simple pencil. You can depict it with a rounded end. This is how anyone wants it.
After that, cut out a dense stencil with scissors and transfer it to colored paper, for example, red. From white paper, the product can be made top and bells. To do this, cut a wide strip of white and glue over the red boot.

Then, from the same white paper, make 3 small circles. Glue 2 of which on the side of the product in the form of cherries on the tail, and glue one on the rounded toe of the product. You get such a cute boot, which you can additionally decorate with sparkles to create a snowy effect.
To do this, thin lines of glue need to be drawn where it is planned to apply a shiny base. For example, along the contours of the top and at the tip of the boot. Then apply glitter with a brush until the glue dries. Thus, they will not crumble, and the products will look beautiful, shimmering from the light with their “snowflakes”.
With the help of fabric mini-boots are made. Usually such products can be presented as a gift or decorate the house and office. To do this, a stencil of the product is drawn with the size of a matchbox. Then transferred to the fabric. The edges of both halves are sewn. After that, the product is turned out and made out.
For decoration, you can use appliqué or embroidery. After all, the boot is small, so it's all done pretty quickly. Also, with the help of yarn, make a few pompoms that will decorate the product. You can attach a lace on which to apply sparkles.

Using an ordinary paper clip, make a skate boot that will look original on this product. You can sew beads or buttons in a chaotic manner. It is also easy to stick other pieces of fabric in small squares. Not infrequently, many craftsmen stick beautiful snowflakes on the side of such New Year decorations. The edges can be decorated with rhinestones, which will shimmer beautifully in the light.
I made this felt boot for my daughter for Christmas. The idea of the drawing is taken from the net, but, as usual, I could not repeat everything exactly. Therefore, I offer you my modified version. It took me two whole days to work, as I embroider very slowly. At the same time, I was distracted only by cooking and lessons with the child.
I attach the boot pattern in .jpg format. When printing, try to print each sheet at the same printer settings so that the details match. You need to print on A4 sheet in the book layout of the sheet.
For work you will need:

Pattern of a New Year's boot from felt - applications

Pattern of a New Year's boot from felt - the basis
- felt of medium hardness (2 sheets of A4 blue and trim white and blue);
- blue and silver sequins;
- small beads transparent and blue;
- large black beads - 2 pcs. for the eye;
- black bead 5 mm for spout;
- threads for sewing and embroidery - white, blue, blue, black;
- needle ordinary for sewing and beaded (thin with a thin eye);
- synthetic winterizer for stuffing;
- blue satin ribbon 5 mm wide - for hanging.
How to sew a New Year's boot from felt according to my pattern:

- Print the boot pattern on two A4 sheets in a book arrangement.
- Cut out the pattern of the boot from the blue felt along the perimeter, including the toe and the top edge.
- Divide the boot base template into 3 parts along the lines separating the toe and top.
- Cut out the central part of the boot from the blue felt, and the sock, the top of the boot, the details of the Christmas trees, the snowman and the strips of snow for the hat, as well as the snowflake from the white felt.
- From blue felt we cut out 2 mittens, 3 elements of a scarf, 2 elements of a hat, two figured borders.
- We dock the white sock with the blue central part of the boot and sew it back to back with oblique stitches. The stitches should be small and completely overlapped with a curly strip of blue felt superimposed on them.

- Put a blue curly strip on the border between the white and blue parts. Sew with uniform stitches with matching thread.

This is what the sewn on sock looks like from the inside
- Sew the top of the boot in the same way.

- Then we make alternately the left and right Christmas trees. We begin to sew them from the bottom up, since the upper parts partially overlap the lower ones. Do not be too lazy to first lay out all the elements of the Christmas tree, clearly aligning their location, and then only sew on one element.
- After the Christmas trees we sew elements of a snowman. The lower part should completely cover the gaps to the Christmas trees. In order for the snowman figure to look relief on the boot, do not forget to lay out a small layer of synthetic winterizer under the application and distribute it evenly.

- Then we sew on the sleeves (they should also close the free space to the Christmas trees), and the hat cylinder. The sleeves are stuffed with padding polyester, but the hat is not.

- We sew on the brim of the hat, the scarf collar, the ends of the scarf and mittens. In the collar and mittens we add a gramulechka of synthetic winterizer.
- Now let's start embroidery. To sew a sequin, we pierce the felt with a beaded needle from the inside out to the face, put on the sequin so that the bulge is on top (otherwise you can cut yourself on sharp edges), string the bead to match the sequin, pierce the felt with a needle from the face to the inside through the center of the sequin and tighten the thread. So we make out the edges of the Christmas tree tiers, the lower ball and the left hand of the snowman, the curly strip.
- On the face we embroider a mouth, instead of a nose we sew a black bead. For the eyes, we take large black beads, put them on the fabric with a hole up and make 4 stitches from the center of the bead with a black thread - short down and elongated up, up to the left and up to the right. This is how the eyelashes came about.

- We embroider arbitrary patterns on mittens, a hat and a scarf.
- We decorate the toe and top of the boot with rhinestones on the grid. To do this, we stretch the parallel threads, first in one direction, then across. It is convenient to check the distance between the threads with a strip of cardboard 6 mm wide. The stretched threads will sag, so we sew sequins at the crosshairs of the threads, alternating their color in a checkerboard pattern. When sewing sequins, we make the first puncture on one side of the intersection of two threads at a point, and the second on the opposite side of the first puncture. So the threads will be drawn to the fabric with a single stitch.
- On one half of the snowflake we embroider the name of a loved one (in my case, the name of my daughter), and then we sew the two halves of the snowflake together, not forgetting to fill it with padding polyester in the process. We sew a satin ribbon to one of the rays.

- Now the final stage - we put together the two parts of the boot facing out and sew around the perimeter with overcasting stitches (of course, without touching the top 🙂). I sewed so that the stitches were not visible from the front side. This can be achieved by inserting the needle diagonally (see diagram).
- We sew the second end of the satin ribbon, on which the snowflake will hang, and the suspension. Work is ready!
Shared the master class
Anastasia Kononenko
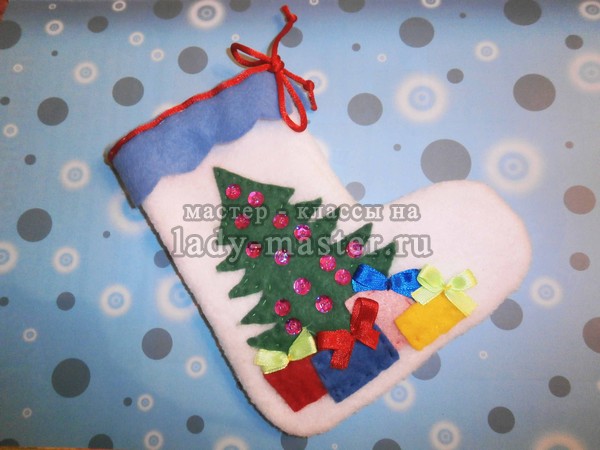
It is much more pleasant to receive a New Year's gift in an elegant boot than in ordinary paper packaging. Making such a boot does not take too much time.
To make an elegant New Year's boot, we need:
- - colored fabric with a pattern for lining, for example, pink;
- - white soft fabric for the outer part of the boot, for example, fleece;
- - blue, green, blue, red, pink and yellow felt;
- - satin ribbons of different colors;
- - red decorative lace;
- - sewing threads of different colors;
- - bright sequins and beads;
- - a needle;
- - scissors.

The procedure for making a New Year's boot
1. Draw a boot on paper. According to this pattern, we will sew our gift boot. Next we will draw a Christmas tree - according to this pattern we will make an ornament for the boot. Cut out the details of the boot and Christmas trees from paper.

2. According to the pattern of the boot, we will cut out two parts of the lining from colored fabric with small allowances for the seams.

3. According to the same pattern, we will cut out two parts of the boot from white fabric, also adding allowances for the seams.

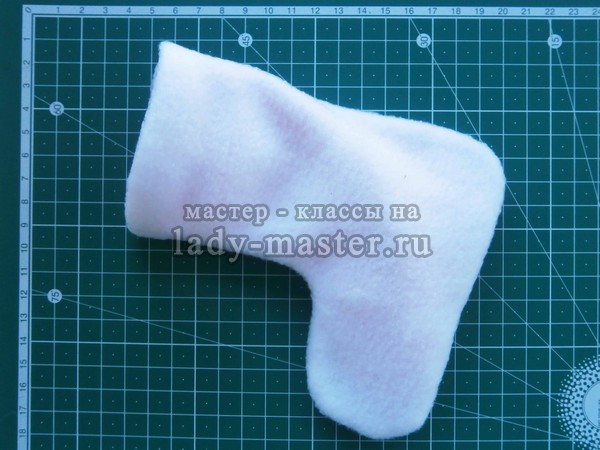
4. Fold the details of the white fabric boot with the front sides and sew by hand or with a sewing machine.

5. Now we will fold the details of the lining from colored fabric and also sew it by hand or on a sewing machine.

6. Turn the lining inside out and straighten it.

7. We will not turn the part sewn from white fabric. We put the lining part in it in the order shown in the photo.

8. Sew the lining of the boot and its outer part along the upper edge, leaving a small segment unsewn. We turn the boot through the unsewn hole and straighten it.

9. Tuck the lining into the outer part of the boot. Sew up the unsewn area using a hidden seam.
10. On a paper pattern, cut out a Christmas tree from green felt. And from the blue felt we cut out a decorative strip 17 cm long and 2.5 cm wide. Cut one edge of this strip so that we get a wavy line.
Now you need to sew these details to the boot. To make sewing more convenient, you can cut out the cardboard part of the boot according to the paper pattern and insert it inside. It is more convenient to sew small parts with a cardboard piece - this way you do not accidentally sew the back of the boot to the front.
With green threads, sew a Christmas tree to the front of the boot. And with blue threads we sew a decorative strip at the top of the boot.

11. Cut out small rectangles of arbitrary shape from blue, yellow, pink and red felt. From them we will make gifts under the Christmas tree.

12. Sew the felt rectangles to the front of the boot. It is better to arrange the gift rectangles so that they slightly overlap each other. We will sew with a basting seam, small stitches.

13. Take narrow satin ribbons of different colors and cut them into small pieces. Fold each segment into a bow and secure with a few stitches. Sew a bow to each gift.

14. Let's decorate our Christmas tree - sew bright sequins to it, and sew a bead in the center of each sequin.

15. Take a red cord about 45 cm long. Tie a knot at the ends of the cord. Sew a lace in the upper part of the boot with red threads. You need to sew in small stitches so that they are invisible.
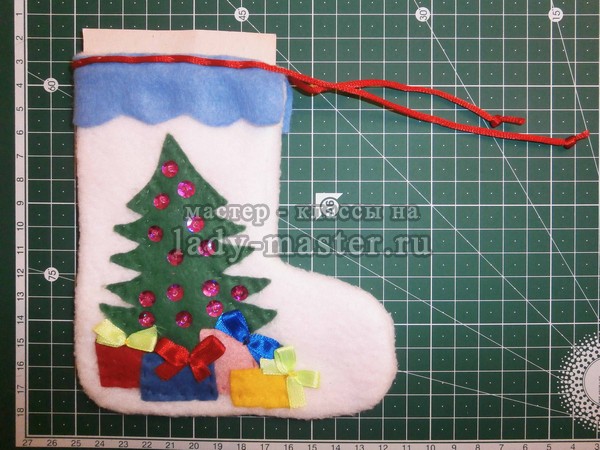
16. We take out the cardboard part from the boot - we no longer need it. And we'll tie the string into a bow.

An elegant New Year's boot is ready. It remains to hide a gift in it and put it under the tree. And if your gift is large, then the boot can be sewn more.