The most beautiful postcards made of paper. Do-it-yourself voluminous postcard
In the summer there are not so many big holidays, however, this does not mean that in the warm season there are no birthdays, weddings and anniversaries. It is for this occasion that I propose to make a very simple and positive summer card with a flowering tree, which you can make with your children so that they do not get bored during the summer holidays.
- a sheet of thick, double-sided colored A4 paper for the base
- brown paper for tree trunk
- colored paper for the crown
- scissors, simple pencil
- glue for paper

Making a summer postcard with your own hands
Unlike scrapbooking postcards, you won’t need any special materials or tools, so you can even make such a postcard in the country. To begin with, we decide on the color scheme of the future flowering tree: it is optimal to use 3-4 shades that combine with each other.
Advice: it will be interesting to make 4 such cards with a crown of different colors corresponding to different seasons.

We bend a sheet of paper for the base in half, if desired, slightly rounding the corners with scissors. Now we print or transfer the template to tracing paper. We will need to cut out a sufficiently large number of petals of different sizes. The easiest way to do this is to fold a sheet of paper in half and put a petal pattern on one side so that the fold lines (marked with a dotted line in the figure) match.

The number of petals and their sizes can be varied arbitrarily, given that one full-fledged flower will need 8 parts. Blanks can be immediately laid out on the basis, roughly planning the ratio of colors and sizes.

We glue the tree trunk in the center and lay out the finished petals around it, forming the final composition.
Please note that only the lower part of the petal needs to be glued, leaving the upper “wing” free. We start gluing first with the largest parts of the composition.
Advice: in addition, you can lighten or darken the core of the flowers with colored pencils to match, outline the bark on the tree with a black pen, easily tint the edges of the postcard and add any other details to your taste.
The summer postcard is ready, it remains only to sign and present to the addressee!
Gifts are an integral part of any holiday or memorable event, they help express your feelings and make a magnificent, unforgettable surprise for the hero of the occasion, giving memorable memories and a great mood. Gifts are complemented by bouquets of flowers and cards with congratulations, instead of them you can use bright and original greeting cards, which are offered in a wide variety by manufacturers on the market and are produced in huge quantities.
The individuality of each person is emphasized by creative skills, looking at a variety of photos of handmade postcards, you often want to make a hand-made masterpiece yourself and congratulate a close friend or family member.

To do this, just select an original sketch, turn on your imagination, and use various materials to realize any ideas, creating a thematic, greeting card dedicated to any holiday or solemn event.


Types and thematic styles of design
Conventionally, all greeting cards can be divided into several categories, choosing from them you can start the creative process, the most numerous are:
- postcard in collage style. On a decorated base with a congratulatory or solemn inscription, you can apply images cut out from photos and old postcards, flowers and figures of dear people;
- voluminous, stylish postcards. Inside a pre-prepared postcard, flowers are glued in a special way, connected and cut out of paper or soft cardboard, creating a volume effect when opened;
- postcards in the style of craft. The craft direction of decorating confectionery, gifts and postcards is gaining popularity due to its simplicity and presentable appearance, ease of implementation;
- decorated envelopes for money. Envelopes for money are a special type of greeting cards; they are used as an independent gift and are decorated with pleasant inscriptions or poems.

There are many master classes on how to make a postcard with your own hands, but first you need to decide on the design of this obligatory attribute of the holiday, which will help determine the further manufacturing process and the selection of materials.

What you need to make an original postcard
An original and exclusive postcard will turn out when a drop of imagination is added to ordinary cardboard or colored paper, the creative process of creation begins with the choice of an idea and the selection of materials for its implementation:
- the cardboard used as the basis for the postcard is better to choose dense and high-quality;
- basic decorations, strips of paper, cut out flowers or bright pictures, colored foil;
- additional decorations, which can be beads or beads, paper flowers and ribbons;
- paints and colored pencils, felt-tip pens and other coloring agents used for paper.

Having studied in detail the step-by-step instructions on how to make any postcard, it will become clear that for creativity you will need a set of simple tools, which include a needle and thread, scissors and a simple pencil, glue or a glue gun.

Step by step process of creating a greeting card
Self-made beautiful postcards will delight adults and children, they will be a great addition to a pre-selected gift, having picked up an idea for creating a masterpiece, you can start making it at home:
- base preparation. For this, light cardboard or craft paper is used, which must be bent into two even halves;
- creating a composition. Decorations can be placed on the prepared base, creating an elegant and stylish composition according to the idea;
- fixing jewelry. After adjusting and arranging, you can proceed to fixing the selected decorations on a cardboard base.


In the process of making a postcard, you can also decorate the inner surface of the congratulatory attribute, for this it is better to use elements of the main decorations, in accordance with the general design idea.

After that, it is worth putting a commemorative inscription, selected poems and congratulations, corresponding to the theme of the holiday or the upcoming celebration, a memorable date for which you can time the presentation of a holiday card.

When thinking about making a postcard at home, you need to carefully prepare, then the exciting creative process will become simple and easy, it does not take much time, but it will bring a lot of pleasure to everyone who participates in it.

Children of different ages can be involved in this activity, they will like this pastime, and relatives and friends will be especially pleased with the masterpieces created by the whole family, under the guidance of adults.

DIY photo postcards


On the eve of the celebration of a person dear to the heart, I want to make a gift that would impress and leave pleasant memories. We offer to make voluminous postcards with your own hands, they are also called pop-up postcards. What are these wonderful postcards? At first glance, these are ordinary postcards, opening which, suddenly a three-dimensional figure or a whole composition appears in front of you! Such postcards will not leave anyone indifferent! Especially if they are copyrighted and keep the warmth of your hands!
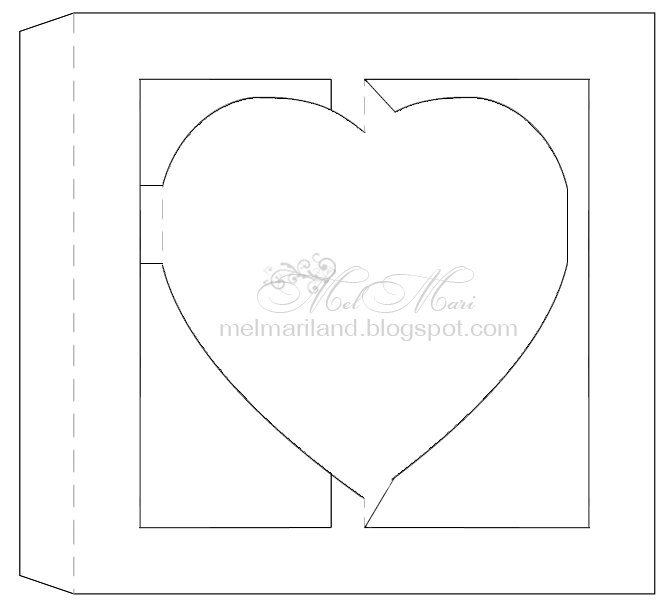
Do-it-yourself cards with flowers inside
Even a child can make a heart-shaped card with a three-dimensional flower inside:

YOU WILL USE
We do both simple and complex creation technologies.

A lush flower for the inside or outside of a postcard can be made from colored or even plain paper, painted with watercolors or pastel crayons. You can cut flowers according to this pattern:

We print out the flower template, paint it with paints. We fold in accordance with the marked fold lines and glue the resulting flower onto the base of the card.

Undoubtedly, such a lush and bright postcard with flowers inside, made by hand, will surely please the recipient.

How to make it tells in his master class TheJulianaHappy:
The option with gentle, pastel colors, flowers looks very nice. Stamens for flowers are not difficult to make!

The original master class is in English, so for your convenience we offer a short translation of the process of creating this flower card.

Materials and tools are standard: colored paper, cardboard, scissors, glue, plastic to simulate glass in the window.
We take thick colored paper, fold it in half. In one half we cut out a square window.

We make a frame from colored paper of a different color. Glass for the window can be made from a protective film for the phone or transparent plastic. Glue the resulting window frame to the base of the postcard. You can do without "glass" at all.


Glue into the hole
We glue a flower pot out of cardboard, glue it in the middle of the postcard on the fold line. We glue the sides of the resulting pot so that when the postcard is closed, the pot folds up.


Next, cut out green stems and all kinds of bright flowers from colored paper: crocuses, hyacinths, daffodils and tulips. Perhaps your bouquet will not be spring, but summer, which means that cornflowers, daisies, pansies, etc. will appear.


Glue the flowers into the pot
The height of the flowers should be such that they do not stick out of the postcard, but are visible through the window!


The window can be decorated with a cozy curtain.

Master class original
By the same principle, you can make a postcard with flowers from felt or colored cotton pads. Additionally, insert a concise but warm congratulation along with the flowers!

In addition to flowers, balloons, stars, bows can peek out from the card.

How to make a panoramic flower card along with a greeting envelope shows in his master class TheWorkshop:
We take thick paper - the basis for our postcard. Create a rectangle in the center of the card fold line. The width of the rectangle is 3 cm, the length is 7 cm.

We make cuts along the pink lines with a clerical knife. Then we fold the resulting rectangle inside the postcard. We attach the base of the postcard to another sheet, b about larger than the original base.

Then we make a floral design: a flower pot, the flowers themselves, fluttering butterflies and grass. We combine all this and glue it on the front of our postcard.


Masterclass original.
Using the same technique, you can make an original vase postcard. You can also make flowers in such vases with your own hands from paper or other improvised means.


We bring to your attention a master class on making a very delicate voluminous postcard, which will not only congratulate the recipient, but also fit perfectly into the interior, for example, of a children's room.

First, we make a frame-box. To do this, take thick blue paper and cut out a template for the box from it. We fold the edges of the template 4 times 5 mm on each side, thereby forming a frame. We glue the resulting frames.

On top of them we glue colored or scrap paper in a color suitable for your composition.

Next, we will prepare the elements of the future composition. We glue the balloon from paper circles. We fold the circles on the floor and glue them together. Waxed cord is glued to the base of the basket and directly to the mugs that form a ball.

We cut out the clouds from scrap paper, and the sun from yellow paper. Paste the elements of the composition into the frame. We glue the balloon as follows: we glue the base of the balloon on bulk adhesive tape, and the balloon itself on glue. We glue the clouds according to the same principle: one for glue, the second for voluminous adhesive tape.

We make green grass from a simple napkin. First we cut it, then we glue it. On the right side of the box we glue a tree made with a scrapbooking hole punch. The final touch - in the free places we glue the serpentine, butterflies and a congratulatory inscription! Glue a ribbon with embroidery or lace on the bottom of the box. The original voluminous postcard is ready!

Masterclass original.
3D postcards in the Kirigami technique
Kirigami is the art of cutting and folding paper figures and cards. This is the main difference between Kirigami and other paper folding techniques and is emphasized in the name: "kiru" - cut, "kami" - paper. The founder of this direction is the Japanese architect Masahiro Chatani.

For manufacturing, sheets of paper or thin cardboard are used, which are cut and folded. Unlike traditional 3D postcards, these paper models are usually cut and folded from a single sheet of paper. Most often, three-dimensional models of architecture buildings, geometric patterns and various everyday objects, etc. are developed.

It is better to start with a simple do-it-yourself voluminous birthday card. For example, using thick paper in two contrasting colors, you can make a birthday card-cake:

To make it, use this template:

Using various templates, you can make cake cards more complicated:


How to make a kirigami cake tells in his master class OksanaHnativ:
Using this technique, you can cut out various congratulatory inscriptions. The cake can be decorated and painted to your liking.

To create it, take this template:

White embossed paper will also make a spectacular postcard:

By combining two mirror parts of the “cake” cut from different sheets, you can make a whole voluminous cake in a postcard!


Use the following template:

There are a lot of options for creating volumetric postcards! Cut and fold your paper masterpieces!
Volumetric postcards in the technique of scrapbooking
Scrapbooking is the art of decorating photo albums, but its techniques are also very popular when creating postcards.
Using the elements of Kirigami, using the Scrapbooking technique, you can also make a voluminous postcard with your own hands. We cut out and fold from scrap paper "steps" for "pop-up" candles on the second half of the postcard. We glue the candles and stick the resulting blank on the base of the postcard.

You can make a simple but original greeting card from scrap or colored paper. We cut out the flame of the candle and decorate it with sparkles, then glue it on 2-sided tape. Glue the second part of the candle with glue. The congratulation itself can be tied or glued to an elegant satin ribbon. Simple and original!

From paper of a different texture, the postcard will look completely different)

By overlaying each element of the card on top of each other, again using double-sided tape, you can create such a voluminous bright cake!

Consider Tatyana Sadomskaya's master class on how easy it is to make a voluminous most delicate postcard using the Scrapbooking technique using ready-made pictures.

To create such a postcard, Tatyana used:
- ScrapBerry’s “Favorite Pet” scrapbook set
- scissors
- thick cardboard
It is better to use scrap paper with a lot of miniatures that can be cut from a single sheet, as well as colored stamp prints and chipboards.
Before creating a postcard, you need to decide on its plot in order to choose the color of the base of the postcard and its "characters". In this case, paper with a calm beige print is taken as the basis, the components of the plot are cut out of it: kittens, a puppy, flowers, a crown on a pillow.

Before starting this work, do not forget to decide what will be in the foreground and what will be behind it!
In our case, we put a larger kitten in the foreground, this will enhance the feeling that he is closer than kittens with a dog.
We make the necessary cuts. It turns out such a design with "steps". On the resulting "steps" we glue leaves of arbitrary size. These leaves imitate a wooden fence.

Next, gradually glue our elements, starting from near to far. We start from the foreground and glue the kitten. We glue it on beer cardboard, because it gives additional volume and casts a shadow. By the same principle, several other elements can be glued, for example, balls and flowers. When the inside is ready, glue it to the base of the postcard.

Outside, we also decorate the card with an elegant floral print.

For more elegance, we decorate the elements of the card with sparkles (we use glitter).
Masterclass original.
Check out this amazing 3D cake card for inspiration:

Volumetric postcards-dioramas
We present to your attention a master class on making a 3D postcard - a small three-dimensional scene. On such a stage, everyone can arrange various bizarre figurines and decorations)

To make a postcard, we take 4 sheets of thick cardboard, in this case we take cardboard of four shades of orange. You can also choose the colors of your choice.

On sheets of cardboard with a pencil, draw the outline of the frames and cut them out. We make the outline of the frame 1 cm wide.

From the remaining fragments of paper we cut out two strips, each of which is 10 by 4 cm in size. We line each one into 4 parts of 1 cm each. We cut off all the corners of the resulting strips. We fold the strips along the lines so that we get a paper zigzag. These zigzag pieces will support the diorama fragments. Glue the zigzags to the frame on both sides.

We glue the second frame clearly along the line on the other side of the zigzag.


The top of the zigzag should cover one side of the frame. The same must be done with the opposite side. Thus, the first scene of the diorama is ready!

By the same principle, we make the rest of the frames of the diorama.
It's better to pre-decorate each of the frames (especially the last one) than to try to squeeze the decor into the finished card.
The back wall does not have to be solid, you can make a transparent diorama without a back wall.

Decorate not only the "wall" of the diorama, but every frame. Use more voluminous decorations such as beads, bows, feathers, ribbons, etc. This will make the card look more voluminous and this will enhance the 3D effect!

Masterclass original.
You can come up with absolutely any plot! Create your own little theatre!
For example, waiting Assol!

Or a balloon in fluffy clouds.

Bright glade with lupins and butterflies!

Birdhouse with birds and flowers:

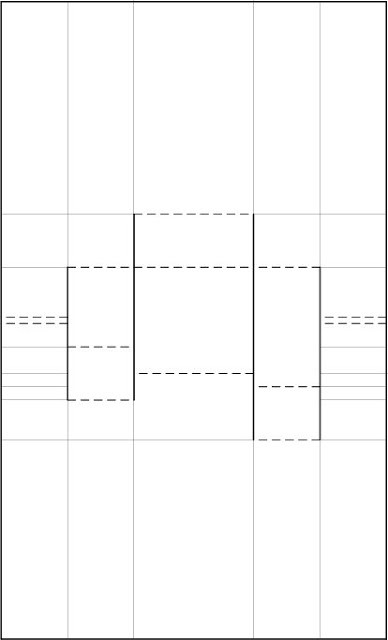
Postcard-accordion (schemes and templates)
Another type of voluminous postcards is an accordion postcard.
To create such a postcard, you will need: thick scrap paper for the base frame, a scrap-cutting knife or a clerical knife, transparent plastic for the internal parts, stamens, semi-pearls, etc. materials for decoration.
We take a template and make blanks for a postcard. From thick scrap paper we cut out 8 blanks for the base frame and 4 from transparent plastic.

Thick paper...

...and transparent plastic
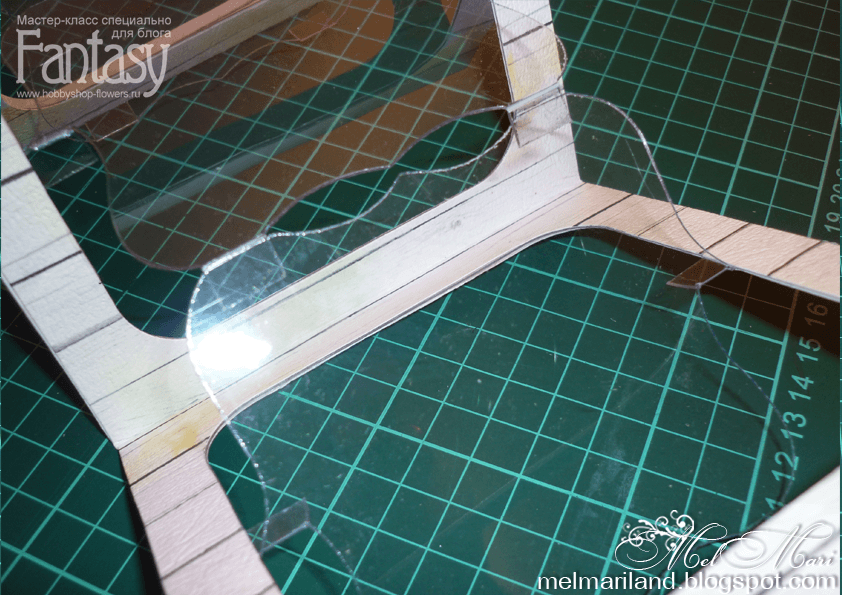
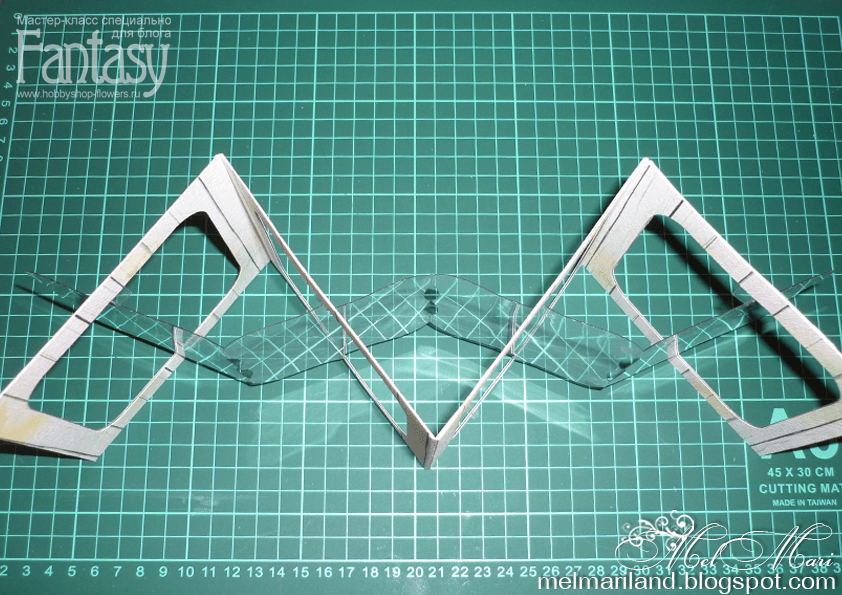
We glue the plastic blanks to the paper base. In order for the card to fold, we make a double creasing of about 2 mm on the outer folds. We connect the resulting 4 parts - glue them with glue or use 2-sided tape. Glue the remaining 4 frames on the opposite side.

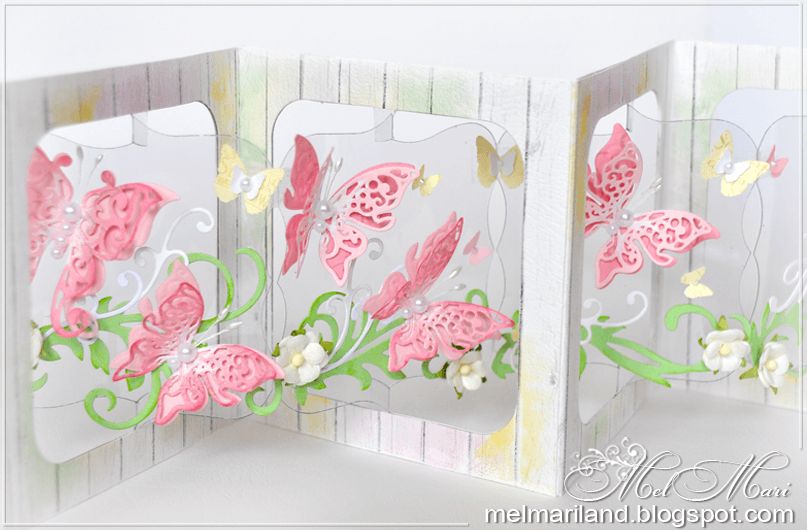
Now you can start the most creative part of creating a postcard - decorating it! We glue fluttering butterflies and twisted greenery to the plastic. Postcard is ready!


Master class original
Various templates for making the bases of such postcards, see below:


Using imagination, you can create all sorts of options for such folding cards. For example, with a predominance of children's topics. The number of components may vary.


Birds, flowers, butterflies - they always look very light and airy on postcards!


Postcards for all occasions
We have already seen that handmade postcards are more original than those that you can just buy.
YOU'LL LIKE IT!
Let's give, and sometimes for no reason at all! 🙂

An ordinary postcard does not surprise anyone. Therefore, I had the idea to make a 3D postcard with flowers. It is not difficult to make it, but it looks unusual and interesting. This card will be remembered for a long time.
To make a postcard, we need:
- a sheet of double-sided colored cardboard (postcard base) of any color;
- double-sided colored paper (for flowers) of any color;
- pencil glue;
- scissors;
- pencil;
- markers.
Step 1. Cut out 7 squares of 10x10 cm from double-sided colored paper.

Step 2. Fold the square 3 times to make a triangle.

Step 3. Draw a petal.

Step 4. Cut and open.


Step 5. Thus we make all 7 flowers.

Step 7. With a blue and blue felt-tip pen, draw small strokes from the middle, also along the edges of the flower. Set aside two petals unpainted!

Step 8. We also color the rest of all 7 flowers.

Step 9. Cut out one of the unpainted petals. We do the same with the rest of the colors.

Step 10. The remaining unpainted petal is smeared with glue and connected to the adjacent petal. It should be voluminous. We do the same for all other flowers.


Step 11. Take 3 flowers. Each flower is folded in half. On one of the flowers we mark crosses. We coat those places that are marked with a cross with glue and glue the other 2 flowers bent in half there.


Step 12. We coat those places that are marked with a cross with glue and glue another flower bent in half.

Step 13. We put crosses again, glue these places with glue and glue 2 more flowers bent in half.

Step 14. Again we put crosses, coat with glue and glue one flower bent in half.

Cardmaking or the art of making postcards with your own hands arose not so long ago, but, undoubtedly, many lovers of needlework and creativity have already managed to fall in love. After all, they can embody the most daring and original ideas, transferring their energy to the future gift during creation. It is this warmth of your soul that will be felt in all sincere wishes and kind words of congratulations. A handmade postcard will be a wonderful and very valuable gift.
Moreover, there are plenty of reasons to give it. With the advent of spring comes a touching holiday - International Women's Day. By March 8, you need a lot of gifts to congratulate all women from the bottom of your heart: why not make beautiful postcards for them that are perfect for mom, and grandmother, and sister, and teacher, and girlfriend. In the same way, you can congratulate loved ones on their birthday, and on Angel Day, and on any other holiday (for example, Mother's Day or September 1).
Postcards vary...
First of all, you need to decide what kind of card you want to make:
- the product can be ordinary (flat) or three-dimensional (including 3D modeling);
- single layer or multilayer;
- made using the quilling or scrapbooking technique;
- made in a certain style (for example, shabby chic);
- have a standard look and shape or be made in the form of a silhouette - butterflies, hearts, flower baskets, dresses, etc .;
- contain a lot of different decorations and decor or not.

Of course, the general appearance, format, color, and theme of the future product will depend entirely on who it is intended for. If you are going to make postcards for March 8 with your own hands, then you can stop at spring floral motifs: a bouquet of flowers in a vase or a whole basket of them, decorated with birds and butterflies using the quilling technique, will suit both mother and sister, and congratulate the teacher on On the afternoon of September 1, you can use a beautiful postcard in the style of shabby chic. Any woman will be pleased to receive a luxurious card-dress or a stylish or elegant handbag as a birthday present.
As you can see, the choice is very large, but the main thing is not to get lost in its diversity and stop at the most optimal option.
Such beautiful curls or good old quilling
If someone close to you has a birthday soon, or you urgently need gifts for the 8th of March, try to make a beautiful and uncomplicated spring card using the quilling technique.
To do this, stock up on paper of different colors (take either the one that is designed specifically for quilling, or just double-sided color) and prepare the most necessary tools for work: good scissors (you can also curly, if any), glue, tape (preferably double-sided), cardboard for blanks, a quilling stick, decorations.


And here is another interesting idea for a postcard using the quilling technique.

Scrapbooking, shabby chic style and other interesting ideas
On your mother's birthday, you can present a beautiful and original card-dress. It can be made using the origami technique, or you can make it in the shabby chic style using scrapbooking elements. If you chose the first option, then you just need to cut out and make a model of the dress according to the template and attach it to the base for the postcard, adding additional decorations.
The second option will have to tinker longer.
- There are several types of this product. You can take a cardboard dress template and decorate it. That is, glue this blank on the front side of the postcard.
 Then make a puffy skirt (you can take lace, cut it into small pieces and glue it to the base with an overlap), and corrugated paper folded in several layers is perfect for the top.
  Add a beautiful belt and decorate your dress and the space around it with beads, rhinestones and organza ribbon.

- You can also make an original dress from paper napkins. Here you will also need to first cut out a blank - a pattern for the future outfit.
 Then take two types of napkins - ordinary white and colored. A skirt will be made from them. Cut them into halves, fold them together and form a skirt, making it look like an accordion.


 Apply gathered napkins to the waist of your dress patterns (only the white background should be the front side of the dress).
 Then beautifully turn the skirt down and straighten it. Turn over and tie a ribbon at the waist.
  Glue the dress to the postcard and decorate to your taste with rhinestones, beads, sparkles.
- In the same way, you can make a handbag for your mother, and a nice apron for your grandmother by the 8th of March. It is also easy to cut it out according to a pattern, decorate it with ruffles, braid and ribbons, and put cardboard kitchen utensils in the pocket.
From paper napkins, you can also get a very beautiful, exquisite umbrella with flowers or butterflies, which can be presented to both mom and teacher by September 1st.