Do-it-yourself pencil case. How to make a pencil case out of paper
Again those ever-disappearing writing materials! One has only to be distracted for a minute, as a pen or pencil has already disappeared somewhere. And it's so annoying. Familiar situation? And there seems to be a pencil case, but only the majority of peers have the same one. Everyone constantly confuses them with each other, figuring out where whose. To help the student properly organize the workplace, teach him to be neat and distinguish him as an extraordinary person, you can jointly make a pencil case with your own hands.
Waste material options
An interesting and at the same time stylish pencil case can be made from various unnecessary or used things, such as empty containers and boxes, leftover yarn from knitting, old things.
Consider several versions of such crafts.
First option

A round pencil case with a secure clasp in a delicate lemon shade is easy to make with your own hands from ordinary cardboard sleeves from toilet paper or kitchen towels.
A step-by-step master class will tell you in detail about the entire manufacturing process.
For the pencil case you will need:
- Several toilet paper rolls;
- Masking tape or tape;
- Cardboard;
- Sintepon and thin fabric or dense fabric such as drape;
- Fastener "lightning";
- Threads, needles, scissors.
Work description:
- We divide one of the cardboard cylinders into 3 parts and cut off 1/3. We splice the toilet paper sleeve and the longer part of the cylinder together to make a long tube.

- Cut out the bottom of the future pencil case from cardboard according to the diameter of the sleeve. We make the same blank from fabric.

- We make a blank for a fabric cover. To do this, wrap the sleeve - this is the width of the workpiece. Don't forget to make a seam allowance. The length will be equal to two full cylinders. At a height of 1/6 of the length, we cut the part and insert the zipper.

- We sew a case for a pencil case. We turn it on the front side.
- We insert the tubes into the case, attach the bottom.

- Without any extra effort, the pencil case is ready.

Second option
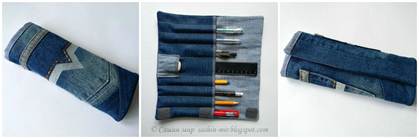
Old worn things can also be an excellent material for making a school pencil case, if you show ingenuity and imagination. Jeans make durable and functional organizers for writing instruments.
Third option
Weaving with rubber bands is very popular among children. They are addicted to both girls and boys. With the help of elastic stretching rings and a special fork, toys and decorations are created. Why not weave a useful thing out of rubber bands?

Fourth option
The most elementary way to neatly store pencils, which will not require financial costs. With minimal effort, a pencil holder can be made from a plastic bottle.

For lovers of sewing
Those needlewomen who communicate with a sewing machine on an equal footing can please their schoolchildren with interesting and unusual designer organizers for stationery.
A solid and durable pencil case is obtained from the skin, which will serve its owner for more than one year.

Only professional seamstresses can make such a product. If your level of skill is not yet so high, and you really want to please your child with an author's thing, there is a simpler option.

For such an organizer, you only need to make cuts on the leather base in the right places.
Another option for a leather pencil case, which is easy to make on your own, is shown in the next photo.


There are also a huge number of ideas for making fabric pencil cases. There are both simpler models of organizers that even inexperienced seamstresses can make, and more complicated samples. Below are examples of some of them.


Bright, voluminous pencil boxes that will keep their shape are made from felt. This material is durable and does not spill out, which allows you to make unusual designer things from it.


Such pencil cases not only fulfill their direct functions, but can also become part of the interior of a children's room.
Hastily
Children are very fond of things that are made with their own hands. But, as a rule, they still do not know how to sew and knit. The children will be happy to make paper pencil cases.

For this craft, you just need to decorate a box of a suitable size with wrapping paper or scrapbooking paper. Appliques and patterns cut from the pages of bright glossy magazines will look good on such a pencil case.

Such simple paper products can be made even by very little ones.
This craft serves not only as an organizer for pens, but also serves as a bookmark for books. By drawing your favorite cartoon character on the pencil case, you will elevate the pencil case to the rank of your favorite things.
Older kids will love the process of making a felt pencil holder without a zipper or using any sewing supplies.

A charming accessory is made with a glue gun and bright braid of various colors. Using the tips shown in the pictures, the guys will be able to make such a pencil case without much difficulty on their own.
It is difficult to do without a pencil case, if you want the satchel to be in order, the handles lay neatly. It is pleasant for a primary school student to hold in his hands a thing that reminds him of his mother at school. There is a large selection of accessories in stores, but they cost decently and do not always differ in quality. Try your hand at making a pencil case.
How to sew a pencil case with your own hands
Making a fun, beautiful school pencil case is easy, even if you don't own a sewing machine. There are a huge number of interesting ideas that not only mothers, but also girls can implement. For many crafts, you don’t even need a pattern - they have a simple manufacturing technology. You can make a pencil case using:
- cutting materials;
- felt;
- old jeans;
- tubes from paper towels;
- patchwork;
- Crochet.
High school students who can sew on a sewing machine can tailor an unusual cosmetic bag based on the scheme. The craft will be fastened with a lock, fixed with a contact tape or tied with a bow. To decorate the accessory use:
- elegant braid;
- embroidery;
- applications;
- buttons;
- lace;
- beads;
- decorative flowers, butterflies.
How to sew a pencil case for school with your own hands on a sewing machine? You can, using patterns, make crafts in the form of some animal, for example, a fish or a cat, but this will require certain skills. This is within the power of mothers or high school students, and it is better to watch the video master class in advance. A very simple and unusual case can be sewn using a fabric with a funny children's pattern.
You need to start manufacturing with the selection of material. You will need 2 pieces of fabric of different colors measuring 35x35 cm. To make:
- fold the blanks inside out;
- Sew all sides, leaving 4 cm unsewn;
- turn out;
- sew the remaining space by hand;
- iron;
- put the workpiece smart side down;
- fold the edge from the bottom by 15 cm;
- pin with pins;
- draw vertical lines with chalk on the bent part after 2.5 cm;
- sew along the markup and edges;
- sew on one side a double-folded tape 24 cm long;
- roll up, tie a bow.

Do-it-yourself felt pencil case
Very original pencil cases can be made of felt. To work, you need a ruler, a clerical knife, a bar of soap. How to make a pencil case for school with your own hands without a pattern? For example, try doing something like this:
For the manufacture of:
- take a piece of felt;
- measure the height of the workpiece 30 cm;
- the length will depend on the number of pencils you want to put, plus 5 cm from each edge;
- cut out the rectangle.
Pencils will be inserted into the weave of the strips. To execute cells:
- draw horizontal lines with soap from above after 5 cm;
- draw 2 strips, stepping back from the sides by 5 cm;
- cut with a clerical knife horizontal lines, between two vertical ones;
- mark the height of the middle on one side;
- take an elegant braid or ribbon;
- fold in half and sew along the mark;
- insert pencils;
- twist into a roll;
- tie a bow.
Girls who own a needle can sew a pencil case for school out of felt with their own hands. Using the same technology, you can prepare a case for glasses as a gift to your grandmother. Example:
For this you need:
- take 2 pieces of material of a different color;
- cut one 30x6 cm in size (you can take any width);
- the second - 20x6 cm;
- put on top of each other;
- sew over the edge with threads;
- cut a large part along the radius;
- sheathe the remaining edges with the same seam;
- decorate with appliqué, smart button or beads.

Do-it-yourself jeans pencil case
Old jeans are in any wardrobe of a thrifty hostess. How to sew a pencil case for the school with your own hands from the remnants of this material? You can do something like this:
Prepare the fabric - a square with a side of 26 cm, a zipper 25 cm long. For manufacturing you need:
- bend the edge of the material on the front side by 1 cm;
- sew one side of the zipper;
- repeat the operation for the opposite edge of the fabric;
- turn the workpiece to the wrong side.
Following actions:
- fold so that the lock is located in the middle of the product, fasten with pins;
- sew side seams;
- put the product vertically so that a platform appears below;
- place the side seam in the middle - corners are formed on both sides;
- they need to be swept and stitched to form a volume;
- turn out.

Sew to school an original pencil case that fastens with a zipper - and more than one:
For manufacturing, you will need 12 multi-colored locks, but the more you take, the larger the internal volume will be. To make this craft:
- sew together all the zippers in sequence;
- fold the resulting cylinder in half, measure its width - this will be the diameter of the bottom;
- cut out two circles with this size;
- cut with an allowance of 15 mm;
- turn the workpiece inside out;
- sew first one bottom, and then the other.
Try making a lined pencil case for school. If you choose elegant material, beautiful decor - you can sew a cosmetic bag using this technology:
You will need:
- 2 pieces of lining and main fabric measuring 26x13 cm each:
- lightning - 25 cm.
You need to sew like this:
- fold the main and lining material right side out;
- on the long side, bend 1 cm inward;
- iron;
- put a lock between the fabrics, baste;
- flash;
- repeat the operations for the other two pieces of material.
Further tailoring technology consists of the following operations:
- fold the main fabric with the right sides;
- baste, stitch from 3 sides;
- unzip;
- fold the lining in the same way, sweep;
- stitch, leaving 4 cm not stitched;
- unscrew the product through the hole;
- sew up the open seam by hand;
- put the lining inside.

Do-it-yourself fabric pencil case without a fastener
A very simple case-pouch can be sewn for a school by a girl - even without a sewing machine:
For decoration, use embroidery, appliqués, decorative flowers, buttons. To get the job done, you should:
- take a piece of matter measuring 30x15 cm;
- fold in half, wrong side out;
- sew 2 seams - long and short;
- fold over 1.5 cm;
- tuck the edge 0.5 cm;
- stitch, leaving 1 cm unsewn;
- turn out;
- stretch the string.
Video: how to make a pencil case with your own hands
, you can create a large number of different cases for pencils, felt-tip pens, pens and other stationery.
Here you will find the most interesting pencil cases that you can take with you to school, on the road or use at home, where the pencils will be neatly folded in one place.
Pencil case from a plastic container
You will need:
A suitable container with a lid (this can be either a food container or a container for juice / water or liquid soap)
PVA glue
Decorative paper (or thick colored/wrapping paper).

1. Cut off the required piece from colored paper.
2. Apply PVA glue to the container with a brush.
3. Glue a piece of colored paper and, while the glue is still wet, straighten it so that everything is even.
The pencil case is ready, but you can decorate it with glitter, stickers and other details.
How to make a felt school pencil case

You will need:
A piece of felt of the desired size (its width should be greater than the length of the pencil)
Stationery knife
Pen or marker
Ruler
Photo instruction:


Video instruction:
Beautiful do-it-yourself pencil case

You will need:
Colored tape or some washi tape
Any case or container that holds pencils (zipped bag, goggle case, goggle case).

With various rolls of colored tape and scissors, you can decorate any container or package.
Use your imagination to create a beautiful pattern.
How to make a DIY leather pencil case

You will need:
A piece of genuine leather large enough to fit several pencils or pens
* If you do not have real leather, you can use artificial leather, heavy felt, or any other suitable material.
Awl or hole punch
Scissors
Ruler

1. Make the necessary markings and cut out the desired piece from the leather.

2. With a hole punch or awl, make holes as shown in the image.
3. Insert a string into the holes and tie a knot.

Do-it-yourself pencil case made of fabric: pocket

You will need:
Notebook with hard cover
Pocket from an old shirt or t-shirt
Thread and needle
Button
PVA glue
Scissors.

1. Cut off a pocket from an old shirt or t-shirt. You only need the top of the pocket.
2. Trim the corners as shown in the image.
3. You can use red thread to decorate the pocket.
4. Sew a button to the pocket.
5. Bend the pocket - the left and right sides need to be bent, as shown in the image - and connect the bent parts with a thread and a needle. However, if you want to keep the pocket width, then you can skip this step.
6. Sew the pocket to the notebook. You can use PVA glue to keep the pocket in place.
How to make a pencil case with your own hands, which does not need to be sewn and sewn

You will need:
Sheet foam (porous gum) - in this example, 2 sheets were used measuring 12 x 17 cm and 7 x 17 cm, respectively
Colored tape (colored adhesive tape)
Velcro
Hole punch or utility knife
Tape (braid).
1. Lay out several sheets of porous rubber (sheet foam) on the table. The large sheet will fold over the small sheet.
2. Use colored adhesive tape to secure the ends of the sheets. Trim off the excess.

3. With a hole punch or utility knife, make a few holes in the top of the large sheet (which you folded) and thread the tape through the holes.
4. Attach Velcro - you can use PVA glue, superglue or double-sided tape.

Pencil case from DVD case

You will need:
Case from DVD
Cardboard (more dense or regular)
Scissors or utility knife
PVA glue
Super glue
A special mat or board on which you can cut without damaging the table or other surface.
1. First you need to cut off the part of the case that holds the disc. To do this, you need to open the case and put it on a special rug or board. Use a utility knife to cut out the circle.

2. From thick cardboard, cut out a rectangle that will fit inside the case.

3. Take the fabric, cut off the desired piece to wrap the cardboard with it. Use glue to secure the fabric to the cardstock.

4. Cut another piece of fabric (preferably thick) to make a pencil pocket. Measure so that the fabric can be folded in half and is no less than the height of the cardboard.
You can iron the fabric folded for the pocket.

5. Lay the wrapped cardboard on the table, print side up, place a few pencils on top of it, and place pocket fabric on top.
Wrap the pocket cloth around the pencils and secure the ends behind the cardboard with glue. You can also use adhesive tape.


6. Glue the cardboard with the pocket to the case as shown in the image.


7. You can print a colored cover for the case so that you can insert it and cover the hole in the case.

You can also make several compartments in the pencil case by stitching the fabric of the pocket.

Case for pens and pencils made of zippers (photo-instruction)


To teach the kid to order and make the process of drawing more fun, sew a bright pencil case for a little artist. It is convenient because in the process of drawing the kid does not need to pour out all the accessories from the box: just unroll the scroll and all the pencils will be in front of the kid's eyes. A divider pocket helps your child group crayons or markers by color, while a flap prevents them from falling out during storage or transport. Materials. From the materials you will need two cuts of cotton companion fabrics (in this case, yellow and green), interlining, synthetic winterizer, satin or rep ribbon, pendant, wooden buttons and threads in the color of the fabric.
Preparing details. According to the diagram, cut out one rectangle of 25x32 cm from yellow fabric and polka dot fabric.

The yellow rectangle will serve as the cover, and the green one will serve as the base for the flap and pocket.

To make the last piece of green fabric, cut a rectangle measuring 30x34 cm and bend it in length along the front side. The result is a blank for a pocket measuring 15x34 cm. For the valve, cut a rectangle 16x32 cm, which then fold along, but already on the wrong side and, stepping back from each edge by 1.5 cm, cut off the corners.

The result is an equilateral trapezoid with bases 32 and 29 cm long and 8 cm high. Assembly of parts. Take a ribbon 32 cm long and sew it to the cover piece.

Reinforce the pocket detail from the inside with interlining, fold it along the fold line and lay a longitudinal decorative seam.

Take the valve part and sew a straight stitch (a) along the sides and along the short base of the trapezoid.

Then turn the part inside out, iron it and again lay a line along the same sides, but already decorative (b). The top base does not need to be closed, since at the final stage of assembly two fixing seams will pass through it. With tailor's pins, pin the pocket piece to the base piece (green rectangle).

According to the diagram, the length of the pocket part was 34 cm, and the bases were 32 cm. The difference of 2 cm is necessary to create volume for the sections for pencils. Therefore, when attaching the pocket to the base, first trim the edges of both parts, and then evenly distribute the fabric. Now make pockets for pencils. To do this, lay straight seams along the width of the pocket with an interval of 1-1.6 cm. At the beginning and at the end of the lines, be sure to back-tack (a seam 0.7-0.9 cm long in the reverse mode of the sewing machine). Pin the valve part to the base.

Make ties out of fabric. To do this, cut out a rectangle 55 cm long and 4 cm wide. Fold it to the widow in the middle and fold it to the edge fold line. Sew along the edge with a straight or decorative stitch. You can also use a cord, ribbon or knitted chain as ties.
Sew the ties to one of the short sides of the base.

Reinforce the cover from the inside with interlining or ironed padding polyester. Cover the pocket and flap piece with the cover piece, lining up the edges of all pieces. Make sure that the front sides of both blanks are inside. Lay a straight line around the perimeter of the scroll case, leaving a hole on one of the short sides for turning.
It has already become an established tradition to purchase school supplies in stationery stores. But it is quite possible to make the most necessary attributes of a student - for example, a simple pencil case for pens and pencils - with your own hands. Such a product will compare favorably with the accessories of other children. And every time the child takes it in his hands, he will be able to feel the warmth of the care of mother's, grandmother's or sister's hands. There are different ways to make canisters from different types of material.
Let's get started!
Pencil case from the box
The simplest but most interesting do-it-yourself school pencil case can be made from an ordinary box. It is enough to put a velvet or leather lining on its bottom, and paste over the walls with beautiful paper. A box made of unpainted cardboard looks no less original and very stylish.

Pencil case made of cardboard cylinder and fabric
You can make a pencil case from a cardboard cylinder and fabric. For this you will need:
- one sufficiently wide and long cardboard cylinder or two shorter cylinders with the same diameter;
- piece of fabric;
- zipper;
- scissors;
- pencil;
- sewing thread and needle;
- stationery knife.

If we use one cylinder, then we cut it into two parts of unequal height - one should be shorter, the other longer.

If we use two cylinders, then we cut off half from one, which we use together with the second whole cylinder.
We circle the bottom of the cylinder in advance on thick cardboard and fabric. We make two cardboard and two fabric mugs.

We take a piece of fabric, the width of which should be enough to wrap the cylinder, leaving a little material on the edge. According to the height of the short part of the cylinder, we outline the distance from the edge of the prepared piece of fabric, make a cut. We sew a zipper between the resulting narrow and wide pieces of material.

We fold the resulting piece of fabric along the front side inward, sew along the edge.

We insert long and short cardboard cylinders into the resulting case, matching them with a zipper. (The side seam of the cover remains outside).
Below and above we substitute pre-cut cardboard and fabric circles. Along the edge, we sew a fabric circle to the cover put on the cylinder.

You can put a cotton pad between the cardboard and the fabric - for volume and softness.

After sewing, remove the cover and turn it on the front side. We put on the cylinders again. We glue.

Do-it-yourself cardboard pencil case
Watch the video on how to make a simple cardboard pencil case:
DIY leather pencil case
An easier option on how to make a pencil case for a school with your own hands is to use a rectangular patch of bright leather to create it. With the help of a clerical knife, along the ruler, in a checkerboard pattern, we make parallel cuts on it.

In each of these cuts, like rods in a basket, pencils or pens will be inserted.

Having rolled up the pencil case with a tube, we intercept it with a beautiful ribbon, the edges of which can be sewn to a leather flap.

Felt pencil case
A charming, soft pencil case for markers or felt-tip pens can be made from felt.

To make such a pencil case, we need:
- Braid
- glue gun

Cut out a rectangular piece. We can estimate the size by laying out markers on it. Apply glue between the markers, as shown in the photo. The gap between the markers will be 2.5 - 3 cm.

We bend the bottom of the fabric, gluing it between the markers.

We get markers. We apply strips of glue for ribbons.

We glue the ribbons. Cut off the excess.

We turn the pencil case over and apply glue for the ribbon with which we will wrap the pencil case. A strip of glue should not be more than 5-6 cm on the right or left side of the pencil case.

We glue the tape. Please note that the tape is not glued along the entire length.


We wrap it in a tube along with markers.


Watch the video on how to make a beautiful felt pencil case:
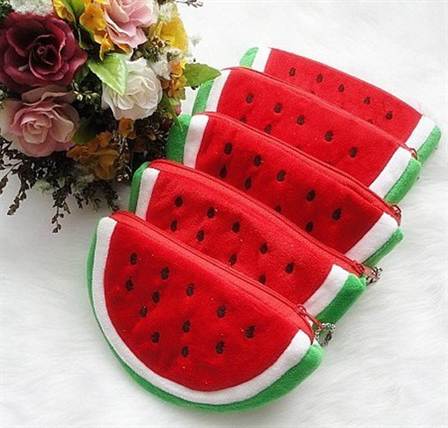
Watermelon pencil case for school (video)
Very gentle and very thoughtful pencil case for girls.
Felt pencil case for girls "Cat"
When I was looking for felt cases on the Internet, I really liked this gray cat. Let's try to make it. We cut out two parts of the craft from gray felt according to the model in the photo.

We cut one of the blanks into two parts. We sew a zipper into it.

On the front part we sew a mustache, nose and beady eyes.

We sew two blanks from the inside.

We turn out the craft. We sew the paws with a thick thread, making them look like cat claws. Pencil case-cat - ready!

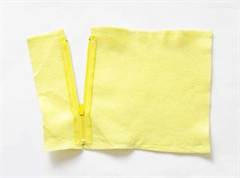
How to sew a simple pencil case from fabric or oilcloth?
This simple version of the pencil case can be made from both ordinary dense fabric and fabric-based oilcloth. To make a pencil case, we need the material itself, a zipper, scissors and pins.

It will be most convenient to make a pencil case based on the size of the zipper. We cut out two identical rectangles from our material along a length equal to the size of the zipper.

We arrange the material in relation to the lightning as shown in the photo.

We sew the material to the zipper with threads. This is a temporary stitch. After we make a seam on a typewriter, we will remove the temporary seam.

We make a line on a sewing machine.

We sew with a temporary seam manually the second part of the material in a mirror.

We make a seam on a typewriter.