Origami for the new year wreath. Christmas origami
It's getting closer, but I really want to plunge into the atmosphere of the holiday today. One of the surest ways is to decorate the house for Christmas. Together with the masters festival "Artos" We have prepared for you some photo instructions of bright and simple Christmas crafts.
origami christmas wreath
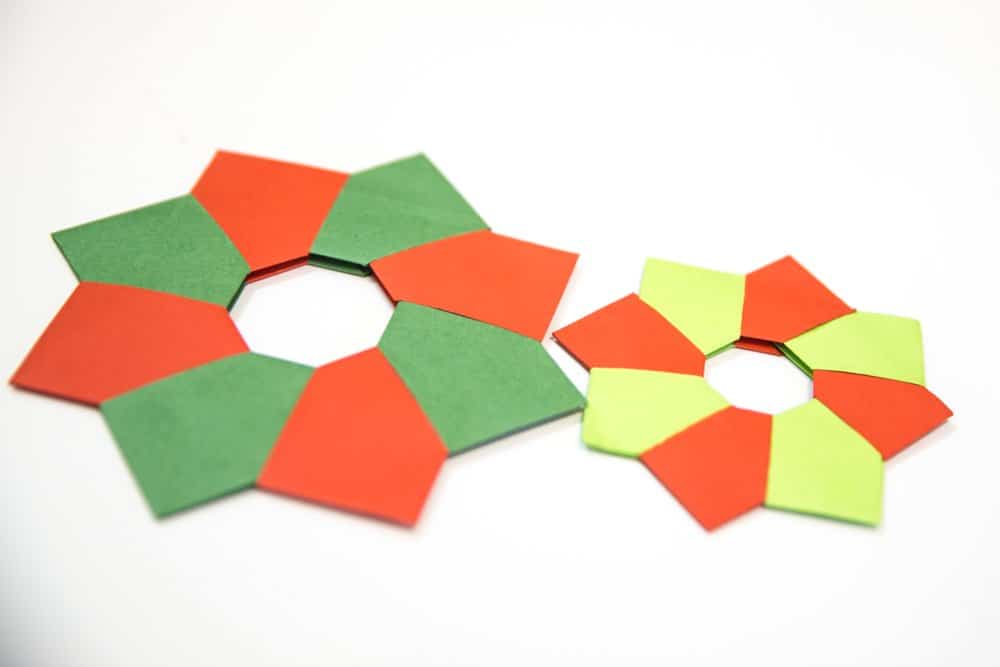
1. Now we will make a very simple and elegant Christmas wreath. We need eight identical paper squares. For example, 4 green squares will symbolize fir branches, and 4 red ones will symbolize a scarlet Christmas ribbon. Take a square piece of paper and fold it in half.

2. In order not to be mistaken, fold as in the photo - from the bottom up.

3. Fold the side corners as shown in the photo. And then try to fold the whole structure in half.

4. If you did everything right, you will get such a paper corner. This is one module of our future Christmas wreath.

5. Prepare all modules - 4 red and 4 green. Modular origami resembles a designer - now we will add a real work of art from these details.

6. Before proceeding to the final part of collecting crafts, carefully study how your module works. If you did everything right, you will see that it is easier to insert the parts into each other when you get into the "pockets" between the layers of paper. Look carefully how I do it in the photo.


7. The modules need to be folded in a circle, one into the other, then you do not need glue. The circular design will hold itself. If necessary, for strength, it can, of course, be imperceptibly glued.


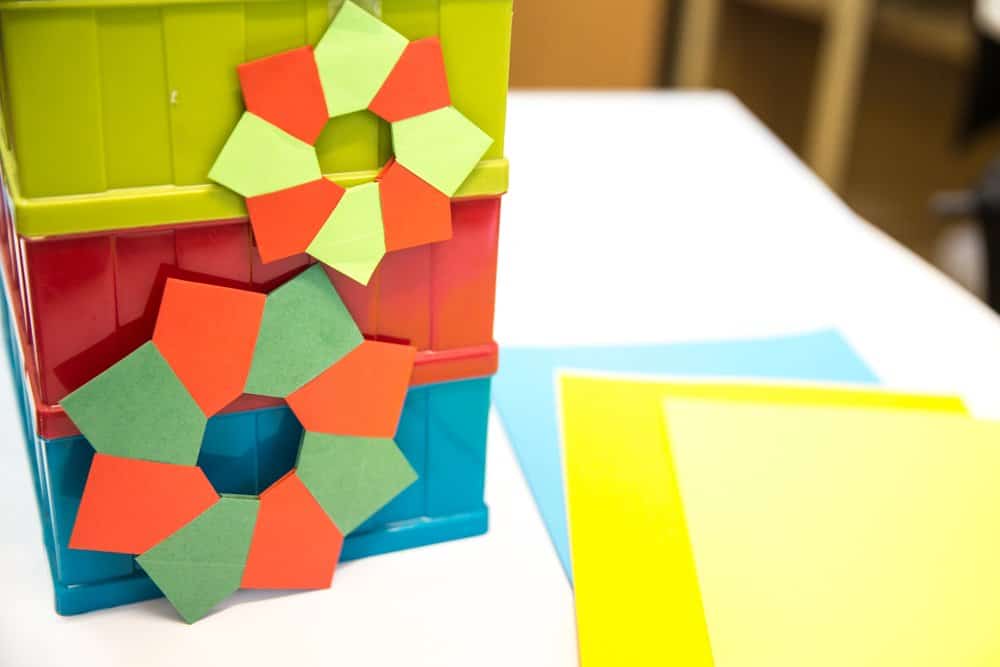
8. The resulting wreath can be hung on a door, on a Christmas tree, or simply hung on threads in your cozy home. Make a wish and wait, Christmas will come to your house much faster.


And if something didn’t work out, or you want to learn how to make other Christmas miracles out of paper, come to the Artos Festival. Show and teach. Merry Christmas!
Thank you for your help in preparing the material for the Artos festival.
There is such a tradition - to decorate the house for Christmas with Christmas fir wreaths with candles. Although the tradition is not entirely Russian, it is very beautiful, so we will support and make such a paper wreath with our own hands. Decorate it with confetti, ribbons and a paper candle.
Master class on how to make a paper wreath
To make a craft, we need: a disposable paper plate, colored paper light and dark green, red, white, yellow, scissors, glue.
Let's start by cutting out and removing the bottom of the plate, we only need the edges. We cut the paper of two shades of green into strips of 1 cm thick. Then glue the strips on the plate, connect the edges.

We glue around the entire perimeter, alternating light and dark stripes. Then we cut the ends.

Let's make a candle. Cut out 2 strips of white paper. We lay on each other perpendicularly, glue the ends. We first bend one tape to another, then the second to the first, and so alternate until we get a candle of the desired length. glue the ends.


It is better seen on the example of yellow and red stripes, by the way, a candle can be made multi-colored.

We cut out and glue the flame of the flame, decorate the wreath with a red bow, circles of red paper and cotton balls.
Bright holiday decoration for your home - Christmas wreath in engineering origami you can DIY to prepare your home for the new year. Involve children, friends, all family members in the creative process. Good mood guaranteed!
How to make a Christmas wreath
For crafts you will need:
- 8 red squares of paper measuring 10x10 cm;
- 8 green square sheets, same size;
- PVA glue;
- materials for decorating the middle of the flower (sequins, sequins, beads or rhinestones).
To begin with, we will collect individual parts from red and green paper, and then connect them together.
Leaves
Let's start making leaves from green squares. Take one and mark vertical and horizontal lines on it by folding the sheet in half in different directions.

Then fold each side towards the center crease. As a result, the sheet will be divided into equal squares. It remains only to fold it diagonally, and it is ready to assemble the figure.


Point each side to the center of the sheet, and fold the ends in half, directing one by one in the chosen direction. After folding all the sides, it will look like this.


One green part for the Christmas wreath is ready. Make 7 more of these and set aside.
Red flower
Now take the red leaves and fold each one as follows:

Connect the red parts to the green ones using glue. Decorate the middle of the flowers with rhinestones, sequins or beads, which is at hand.

Collect finished products in a beautiful wreath. Connect them in a circle, gluing parts in inconspicuous places. Eight colors form a perfect circle. We took shades just right for the New Year and Christmas.


With the help of this decoration, you successfully decorate an apartment or a hall for New Year's events. But that's not all. Complete the Christmas wreath using the origami technique. See links for step-by-step instructions.

Happy New Year and a magical Christmas everyone! Do not forget to subscribe to new articles to always be aware of interesting origami-style crafts!
A winter day, December, a day off… getting closer, but I really want to plunge into the holiday atmosphere today. One of the surest ways is to decorate the house for Christmas. Together with the masters festival "Artos" We have prepared for you some photo instructions of bright and simple Christmas crafts.
origami christmas wreath
1. Now we will make a very simple and elegant Christmas wreath. We need eight identical paper squares. For example, 4 green squares will symbolize fir branches, and 4 red ones will symbolize a scarlet Christmas ribbon. Take a square piece of paper and fold it in half.
2. In order not to be mistaken, fold as in the photo - from the bottom up.

3. Fold the side corners as shown in the photo. And then try to fold the whole structure in half.

4. If you did everything right, you will get such a paper corner. This is one module of our future Christmas wreath.

5. Prepare all modules - 4 red and 4 green. Modular origami resembles a designer - now we will add a real work of art from these details.

6. Before proceeding to the final part of collecting crafts, carefully study how your module works. If you did everything right, you will see that it is easier to insert the parts into each other when you get into the "pockets" between the layers of paper. Look carefully how I do it in the photo.


7. The modules need to be folded in a circle, one into the other, then you do not need glue. The circular design will hold itself. If necessary, for strength, it can, of course, be imperceptibly glued.


8. The resulting wreath can be hung on a door, on a Christmas tree, or simply hung on threads in your cozy home. Make a wish and wait, Christmas will come to your house much faster.

Thank you for your help in preparing the material