How to make a paper dress. Origami paper dress Origami paper dress scheme with a description
With the help of a paper dress, you can stylishly decorate a postcard for March 8, or use it to decorate a festive table, for example, at a bachelorette party. To create such a decor, it is better to take soft and thin colored paper, because thick paper will be much more difficult to bend, folding in several layers. In addition, it is desirable that the paper you choose is one-sided, that is, it has only one color side - so it will be more difficult to confuse them during work.
What materials, besides colored paper, are suitable for creating a dress?
Wrapping paper will also be good, especially if it is of some bright and unusual color. If you will decorate a postcard or a festive table with a dress, think in advance about combining colors and patterns, and then stock up on material for the production of paper dresses.

Step by step instructions for creating a paper dress
First you need to fold a square sheet of paper in 4 layers, and then unfold it. This will give you the folds. After that, fold the paper square on both sides and turn it over with the back side. The workpiece thus obtained will need to be folded again to get a narrow strip, the edges of which will then need to be opened. So, we see the wrong side of the future dress. Next, bend about 1.5 centimeters from the top, and then bend back the wrapped corners. So the contours of the future dress are already beginning to gradually emerge. The edges that were wrapped should now be unfolded, after which the blank is turned over and the hem of the dress is revealed. Bend the fold in half, then smooth and straighten it again.

Then begins, without exaggeration, "jewelry" work. You should beautifully and extremely carefully bend the “waist”, but at the same time, make sure that the folds on both sides remain even and also the same. Then, you should turn the workpiece over, since the dress is already ready. It is possible to stick it on thick cardboard, then you will have an excellent postcard.

Unusual, homemade dresses, made by hand not from fabric, but from paper, more precisely, from newspapers, are perfect for the role of a Halloween costume or for a party whose theme is related to environmental protection. For such an outfit, you will need several old newspapers, a belt and thin Velcro, as well as sewing accessories. To properly make a pattern, you will need a long ruler with a pencil.

Step by step instructions for creating a dress
Unfold all the newspapers completely, and then fold them in 2 pieces. Do pleating on each newspaper pair. It is necessary to bend the newspaper along the entire length, retreating from the edges by 1.5 centimeters. Then you should turn it over to make a fold about 2.5 centimeters wide. Turn over again, making the fold so that its fold runs just in the middle of the previous one, being close to the first fold. The entire paper structure must be turned over and a bend made on it after 2.5 centimeters.

Advice
It is necessary that the seam touches the previous fold. Next, carefully smooth everything. Continue doing this until the very end of the paper. Pleating is done on 4 newspapers.
Then mark the future waist line on the leaves. And so that your pleating does not diverge, sew it along this line on a typewriter. Take a couple of blanks and put them on top of each other by 1 centimeter, sewing together. Attach a couple of the remaining ones on the sides, slightly lowering down. It will be necessary to let go by 7-10 centimeters, no more. Try on the resulting workpiece, wearing a belt, on the line.

Conclusion:
To make a small, decorative dress out of paper, or to create a full-fledged, creative attire from newspapers, you will need accuracy and a certain perseverance. But, in the very process of creating a dress there is nothing complicated, so the technique can be mastered literally the first time.
Origami - how to make a paper dress
Newspaper dresses
Paper dresses
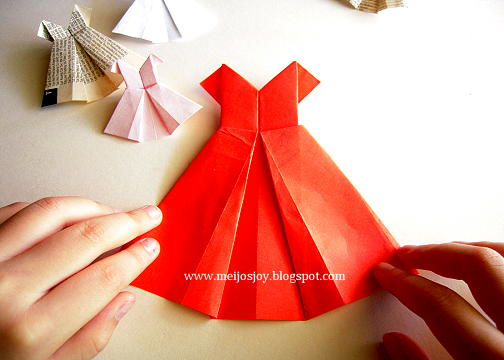
Origami dress is one of the most popular paper origami. If you do not know how to make an origami dress, then on this page you will find everything you need to assemble this simple paper figurine.
In the first photo you can see what you get if you follow the assembly diagram below. The second photo of the origami dress was taken by one of our site users. He got a dress almost the same as in the diagram. If you have photos of the origami you have collected, send them to the address This email address is being protected from spambots. You must have JavaScript enabled to view.

Assembly diagram
Below is an assembly diagram of an origami dress from the famous Japanese origami master Fumiaki Shingu. If you strictly follow the instructions, then assembling an origami dress will not take much time, and the result will be the same as in the picture. After doing what is described in the diagram several times, you will understand how to make an origami dress quickly and without peeping into the diagram.

Videos master class
Assembling an origami dress for beginners can seem like a daunting task. Therefore, we advise you to enter the query "origami dress video" on the largest video hosting site on the Internet, YouTube. There you will find many different videos about the origami dress, which clearly show the steps for assembling the dress. We hope that after watching the video of the assembly master class, you will have no more questions on how to make an origami dress.
This video will also teach you how to make a paper dress:
To consolidate the skills of making origami dresses, watch this video tutorial:
Symbolism
The dress is a symbol of femininity. A white dress is usually a symbol of the bride, but black is the epitome of fashion and style.
On the eve of the holidays, the minds of most people are occupied with the question of buying gifts. The people are preoccupied with the choice of the gift itself, without thinking about the form in which the present will be presented. But the overall impression of the offering depends on the packaging and presentation of the gift. It often happens that chic expensive gifts do not cause a storm of delight of emotions only because of the banal design. And vice versa. Simple cute little things, correctly and effectively decorated, generate a whirlwind of admiration. Origami paper dresses with diagrams, which are presented in the detailed master classes below, will help to make a surprise and turn an ordinary gift into a masterpiece.
Volumetric postcard
A paper dress made using the origami technique can give a unique sophistication and individuality to a postcard made by one's own hands. Such a stylish sign of attention will appeal to mother and grandmother, girlfriend and sister as an independent gift for no reason or as an additional compliment to the present for March 8th.
Depending on what paper will form the basis of the dress, you can create different styles and images. Therefore, the choice of material for crafts must be approached responsibly.
If a gift is planned for a colleague, then it is better to choose plain paper in soft or dusty shades, which will emphasize the business overtones of the gift. To make a decor element for a postcard that will be presented to mom or grandmother, preference is also given to soft pastel shades or cute wrapping paper with a delicate print. If you want to surprise a girlfriend or sister, then in this case a cheerful monochromatic base of rich colors is used.
It is also worth deciding on the style of the craft being made. It can be a flirty sundress or a strict sheath dress, a flying summer dress or an elegant evening dress. It is possible to make a huge number of different models, but not all of them will be appropriate for a particular gift.

Consider several popular schemes with which you can make an origami dress.
At first glance, it may seem that making such a craft with your own hands is not easy. In fact, with a certain skill, gradually performing all the steps described in the scheme, the work will not cause difficulties.
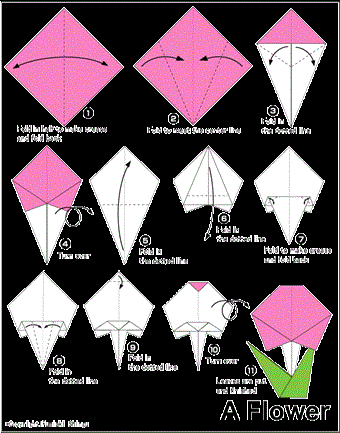
Let's analyze the scheme in more detail.
To work, you need a square sheet of paper. Fold it in half, marking the middle.

We bend the right and left sides of the square to the indicated axis.


We return the base to its original form and turn it over with the folds down.


We turn the workpiece over again and bend it, stepping back from the edge a distance of about 1 cm.

We make another fold in the center as shown in the figure.

We turn over the workpiece.


We turn the workpiece back.

We form a collar zone on both sides.


We bend the edges of the collar.


After that, turn the product over with the front side and decorate the craft.

With the help of several of these products, you can create a whole composition not only for decorating a postcard, but also for interior decor. Different styles of dresses pasted on a cardboard base and inserted into a frame will look interesting and unusual.

Schemes for the manufacture of such models are presented below.

Using this scheme, you can make a spectacular evening dress that will look organically on an envelope for money, making it clear for what purposes this offering is worth spending.
A few more popular origami dress patterns are below.


Children's fun
From childhood, every little girl is instilled with the idea that she is the weak half of humanity and decorates this world with her presence. That is why babies are dressed up in charming clothes. Children transfer this model of behavior to their toys, playing with them in daughter-mothers. It is not surprising that they, just like adults, strive to decorate their wards, making various outfits for them.
The little ones will love the idea of making a new voluminous dress for their favorite paper doll. You can help her in this event by choosing as an example a simple scheme for children, with which an origami dress is made easily and simply.

Consistently following the instructions below, the child will be able to make a wonderful outfit for his favorite doll with minimal prompting from an adult.

When the dress is ready, it remains just to stick it on the toy.
Video on the topic of the article
Various ideas for using paper origami dresses and detailed tutorials on how to make them are presented in a selection of videos.
We bring to your attention a master class with a diagram in which we will tell you how to make an origami dress out of paper with your own hands. Step-by-step instructions with a photo of the phased implementation of the work will help you do everything right.
Tools and materials Time: 20 minutes Difficulty: 4/10
- double-sided colored paper / scrapbooking paper;
- scissors;
- ruler;
- pencil;
- glue crystals, rhinestones, openwork ribbon and sparkles (for jewelry);
- glue or thin tape.
Step by step instructions with photo
Give your beloved mom or teacher a wonderful postcard with a decoration in the form of an origami dress made of paper on March 8! Undoubtedly, they will be delighted with such a present!
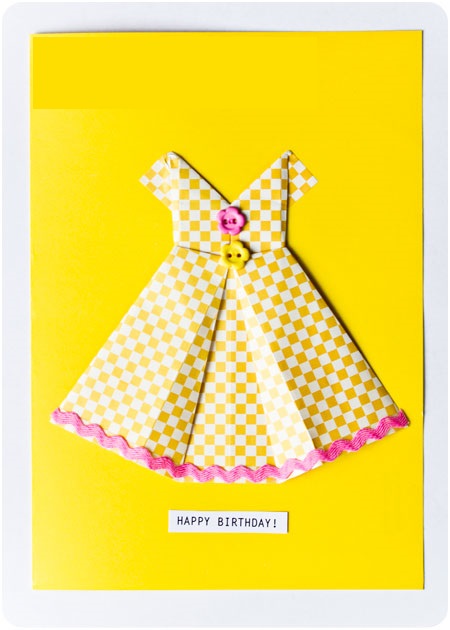
In addition to the fact that with this dress you can make an amazing handmade card, it can also be used as a garland element or a decorative decoration on a gift box. In special cases, according to this scheme, you can make an origami dress out of money and present it as such an unusual gift.

If you make this dress out of multi-colored scrapbooking paper and additionally decorate it with decorative pebbles, it will turn out to be truly luxurious!

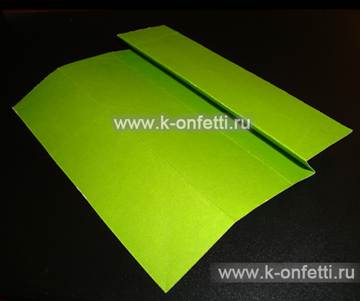
Step 1: cut out the square
Take a sheet of paper and cut a square out of it. The size of the square in this case does not matter - the larger the sheet of paper you take, the larger your dress will be, and vice versa.
Step 2: fold the paper
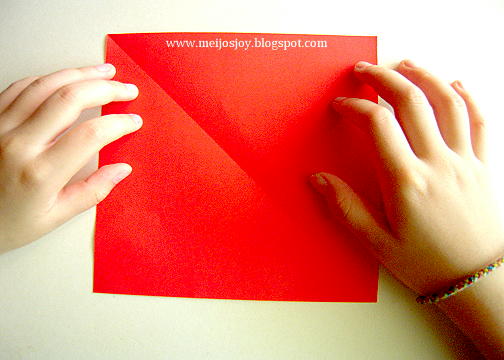
Fold the square in half horizontally. Unfold the paper.
Fold the left edge of the paper to the middle line, then fold the right edge to the middle line.
Expand. You should end up with a square with three horizontal folds.

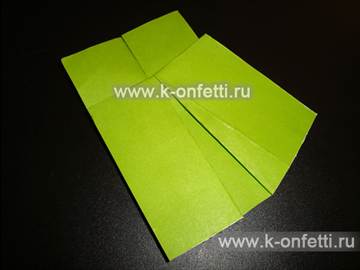
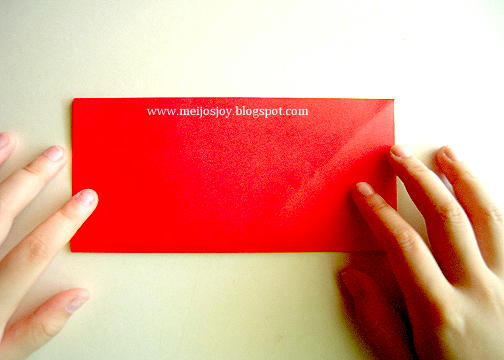
Step 3: fold the waist
Place the paper in front of you so that its folds stick up.
Fold the paper from the leftmost crease to the crease in the middle.
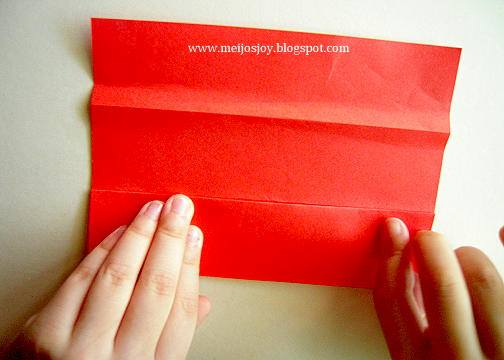
After that, fold the right crease to the crease in the middle. Iron the folds with your fingers. This will be the front of the dress.

From the top edge, count 2-3 centimeters and put a dot. Fold the paper down the middle on both sides to this point, forming the waistline of the dress.


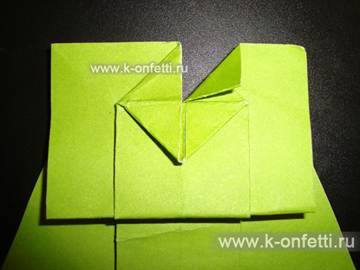
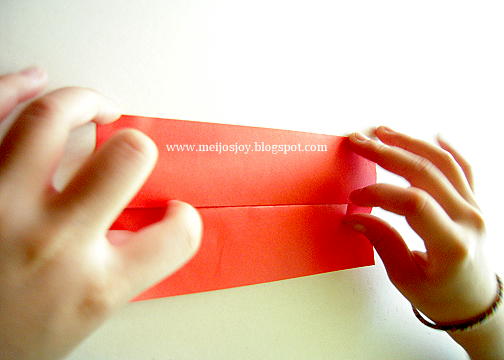
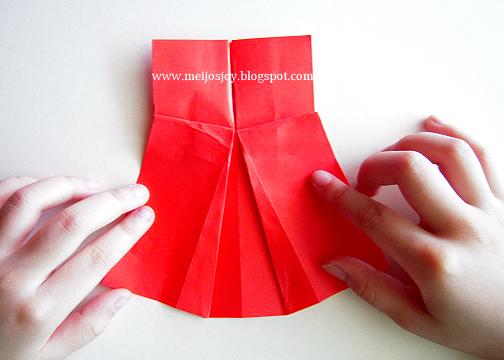
Step 4: make a skirt
From the point in the middle of the "cross" pull the pleat to the outer edge. Repeat on the other side.

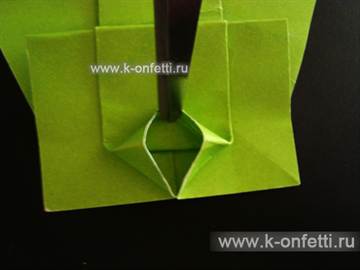
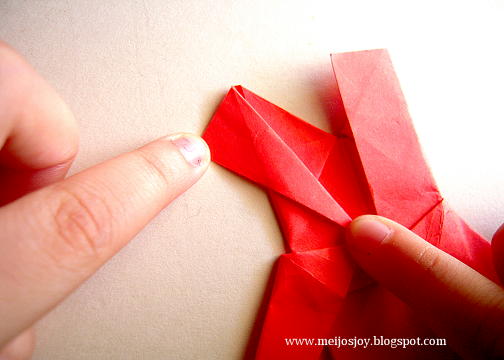
Step 5: Shape the Collar and Sleeves
At the top of the craft, wrap a small corner on the left side from the middle down. Repeat the manipulations on the right side.

We just need a hall, so open the collar back. Flip the piece. Pull the creases down from the center on both sides. Thus, you will make an origami neckline in a dress.


Do the same on the other side.

From the line of the middle of the "waist" to the top point, wrap the triangle. Do the same on the other side.
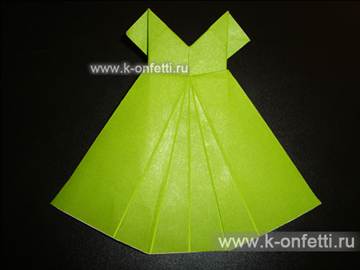
Glue the back of the dress together with duct tape or a small dab of glue.