Leaf applications for children 4 5. DIY leaf crafts
Children's autumn applications from leaves: step-by-step master classes and ideas for children's creativity. Photo of children's applications. Video for kids.

Children's autumn applications from leaves
Hello, dear readers of the "Native Path" and participants of our autumn week of children's creativity! Today in this article we will continue the theme of autumn leaf applications.
You already know from the previous articles of the site from the cycle about the application of the leaves:
- how to prepare leaves for application, what types of autumn leaf applications are, their manufacturing technology (see article).
- how to do applications - portraits from autumn leaves : portrait of the queen - autumn, girls - autumn and girlfriends - autumn (article),
- how to make a three-dimensional figure - a bird from autumn leaves:.
- And today you will learn from this article - the third article in the leaf appliqué series - what other autumn leaf applications you can make with children and how you can decorate a greeting card with a children's autumn leaf applique.
The idea is shared by a participant in our competition of children's crafts Tatyana Panova (Novomoskovsk, Tula region). Tatyana did all the work together with her daughter Varechka Panova (4 years 2 months). Tatyana is happy to share with you the joy of joint creativity :).
No. 1. Children's autumn application of leaves: postcard "Autumn landscape"

How to make a children's application "Autumn Landscape"
Step 1. Prepare the background of the postcard. The postcard is made on watercolor paper, which Varya toned with gouache (white + blue).
Step 2. Making a window in the postcard.
Cut out the window. We walked along the edge of the window with a blue foam brush. It turned out the edging of the oval window.
Step 3. We make the application "Forest" inside the postcard using PVA glue. Glue on pre-dried leaves. How to dry the leaves - in the previous article of this cycle
Step 4. Birds flying in the autumn sky. Mom painted birds in the sky. which fly to warmer countries for the winter in autumn.


No. 2. Children's autumn application from leaves "Birds"
Step 1. We collect leaves for the application. Varya collected bird-leaves on her own.
Step 2. Dry the leaves (how to do this - in the previous article of the leaf application series at the link above).
Step 3. We glue the leaves on PVA glue (it is sold in liter jars at a hardware store).
Step 4: Making the Play-Doh Leaves.
How autumn leaves are made: several autumn shades of plasticine were mixed, rolled out and the shape of a leaf was squeezed out with a mold.
Step 5. We draw a nest. 
Number 3. Children's autumn applications from leaves: hedgehog
The first version of the children's application "Hedgehog"
Tatyana and Varenka took a picture of a Hedgehog without needles for a walk and collected leaves, applied them to the image - tried them on right on the street. Then they dried it at home in a book and decorated the hedgehog. Here's what they got!

Marina Viktorovna Ovchinnikova (Krasnoyarsk Territory, Norilsk) and her son Timofey (5 years old, Kindergarten No. 45 "Smile") shared with us another idea for making the "Hedgehog" applique. The craft of Marina and Timofey is called "Hedgehog with autumn leaves"
The second version of the children's autumn application "Hedgehog with autumn leaves"
This is a large hedgehog appliqué or autumn panel that can be used to decorate a room.
Material: cardboard hedgehog, dry leaves and flowers, buttons.
How to make a hedgehog:
Step 1. Cut out the hedgehog's torso from cardboard, draw eyes and a nose.

Step 2: Select the autumn leaves you like and glue them to the back of the hedgehog. We form needles on the back of the hedgehog from the corners of the leaves.

Step 3. We decorate our hedgehog with dry flowers, buttons. We glue them on PVA glue.

Application is ready!
No. 4. Children's autumn applications from leaves: rainbow
This idea was shared at our Autumn Workshop contest by Svetlana Kuznetsova and her son Artemy (2 years 2 months).
You will need for the application:
- Autumn leaves
— White or colored cardboard
— Gouache
- PVA glue
- Paint brush and glue brush
Step 1. Prepare autumn leaves - collect and dry. How to do this - in the previous article of the cycle about applications from leaves (the link is given above in this article),
Step 2. Paint the leaves with gouache in the colors of the rainbow, let dry. It can be done by a child.
Step 3. Glue the leaves on the glue in the desired sequence of colors (“Every hunter wants to know where the pheasant lives”: red, orange, yellow, green, blue, blue, purple).

No. 5. Children's autumn application of leaves: panel "Girl Autumn"
The master class was shared by Tegaeva Olga Nikolaevna (Moscow region, Sergiev Posad district, Shemetovo village, MGBOU d/s No. 75 "Fairy Tale"). The application was made by Yaroslav Kucherikhin (4 years old).
We need to complete the application:
- glass frame
- dried flowers and leaves,
- a drawing or photo of a girl.
How to make an application with children:
Step 1. Preparing the leaves.
The longest process is drying flowers and leaves. We dried between the pages of a magazine.
Step 2. Figurine of a girl - autumn.
Glue a picture of a girl of a size suitable for the frame to the background. From dry leaves and flowers we form an outfit for Autumn.
We decorated the flower on Autumn's head with sequins.
Step 3. We place the finished autumn application in a frame under glass. That's what happened with Yaroslav.

No. 6. Children's autumn application of leaves: "View from the window"
This application was made and sent to our competition by Alexandra Albertovna Naumkina and her children: son Ivan (4 years old) and daughter Maria (1 year and 3 months old) from Barnaul, Altai Territory.

How to make the application "View from the window" with the children:
Step 1. First we make a background - draw the sky (Masha helped for 1 year and 3 months).
Step 2. Then we draw birds in the sky (this was done by mom).
Step 3. Cut out the window frame.
Step 4. Together with the children, we paste the "forest" - autumn leaves - at the bottom of the picture. We glue them on PVA glue.
Step 5. Glue the frame on top of the finished application. And we put the finished work under a thick book so that everything dries well and sticks evenly.
No. 7. Children's autumn application: "It's me"
This craft was also sent to our competition "Autumn Workshop" by Alexandra Naumkina. She writes: “The craft is simple, but the children love it. I took a picture of my son on my mobile phone, sent a photo to my mail. I opened my email on my laptop and printed out a photo. The son cut out his silhouette and pasted it on a white sheet of paper. Then we glued some leaves. We thought they were few. I cut out a stamp in the form of a leaf with a clerical knife from an elastic band. The son quickly slapped the leaves on our craft. ”
This is the children's autumn applique with autumn leaves that Alexandra and Vanya got.

Children's autumn application No. 8: sailboat
This children's autumn application from leaves was made by Osolihin Georgy (5 years 10 months), and Georgy's mother Marina Osolihina sent his work to our competition of children's autumn crafts.
Leaves and seeds are used in the application (to put the sun in the sky).

Children's autumn application of leaves No. 9: butterfly
Other materials can be used in the leaf appliqué, such as in this Butterfly appliqué for children. The application was made by Herman Osolihin (3 years 11 months) with his mother. The mother of Herman Marina Osolihina sent an application to our competition.

And here is another version of the autumn application of leaves in the shape of a butterfly. This work was completed and sent to our autumn craft competition by little Sophia (5 years old) and her mother Anna Shikhareva. How to make such a butterfly:
You will need:
- cardboard A4 (basis for application),
- PVA glue,
- scissors,
– leaves for wings: 4 different types of leaves per pair,
- an acorn cap for the head,
- 2 acorns for the body.
Application progress step by step:
Step 1. Glue two leaves of the same type to the background as the upper wings. Below them, glue the lower wings - 2 leaves of a different type.
Step 2 Glue two acorns in the middle between the leaves to make the body of a butterfly
Step 3 Glue the acorn cap on top of the body. This will be the head of the butterfly. Using a black marker, draw the eyes and mouth of the butterfly on the head.
Step 4 Make mustaches. To do this, glue 2 petioles from the leaves
Step 5 When the wings dry, they can be decorated with smaller leaves and a different color. Here is the finished application!

Children's autumn application of leaves No. 10: gingerbread man, rooster
These applications were made by children from "MBOU secondary school No. 5" (middle group No. 11 "Stargazers"), Tyumen region, Yugorsk. An application was sent to our autumn competition of children's crafts "Autumn Workshop" by the teacher of the middle group Petushkova Lyubov Anatolyevna.


Children's autumn application of leaves No. 11: autumn vase

This master class was sent to our competition of autumn children's crafts by Zainetdinova Yulia Yuryevna (Republic of Bashkortostan, the city of Sterlitamak. Municipal budgetary educational institution of additional education for children - Center for extracurricular activities "Nadezhda" of the urban district of Sterlitamak)
Children's age: 3-4 years.
Materials: autumn leaves fresh and dry (preferably different colors), a sheet with a vase outline, PVA glue, a brush and a good mood!
Application technique:
Stage 1. "We decorate a vase."
We rub the dry leaves with our fingers (at the same time we train fine motor skills and tactile sensitivity), apply a layer of PVA glue to the contour of the vase and sprinkle with leaves. Here is our vase ready.
Stage 2. "Fill the vase."
From a set of fresh leaves, children choose the ones they like, then fill the vase with a brush and glue, creating their own unique composition.
Examples of children's compositions are in the photo below (these are the works of children 3-4 years old).


Children's autumn application No. 12: a hedgehog under an autumn tree

Master class by Yulia Yuryevna Zainetdinova from the Republic of Bashkortostan (Nadezhda Center for Extracurricular Activities, Sterlitamak Urban District)
Children's age: 5-6 years.
Application materials:
- autumn leaves fresh and dry (preferably different colors),
- bunches of rowan,
- maple or ash seeds, the so-called "helicopters" for hedgehog needles,
- a sheet with the image of the outline of a tree and a hedgehog,
- PVA glue,
- brush,
- plasticine
- and good mood!
Technique for performing applications with children: a step-by-step description
Stage 1. “We dress the tree in autumn outfit”
From a set of leaves, the children choose those that they like, then with the help of a brush and glue they “dress up” the tree.
Stage2. Bring the hedgehog to life
We roll plasticine balls and dress up a hedgehog, then we stick needles from “helicopters” into these balls.

Stage 3. "Decorate with mountain ash"
Stage4. "Autumn Land". Sprinkle the bottom of the picture with crushed dry leaves (see the description of Yulia Yuryevna's previous master class on this page).
Application from autumn leaves: idea number 13. Flowers
You can lay out a pattern or a mandala from autumn leaves. Get original flowers. These flowers were made by Sofia (5 years old) and her mother Anna Shikhareva.
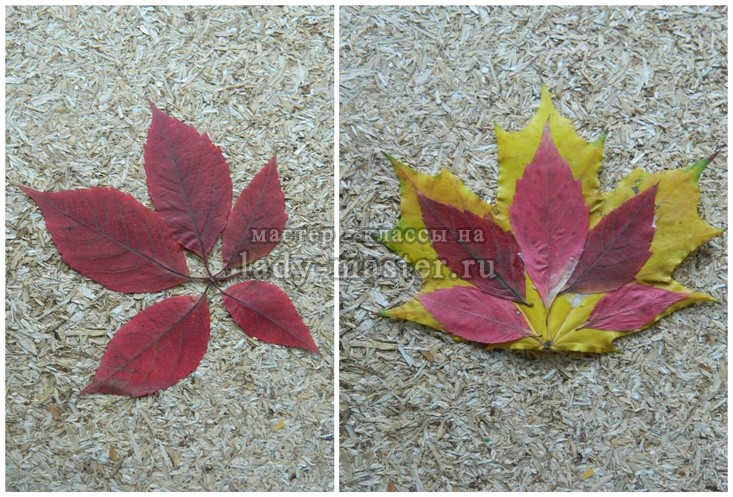
How to make a flower mandala:
MANDALA "Flower" (lower photo in the illustration)
You will need: A4 size cardboard, 4 pieces of different types of leaves (yellow and brown), pine needles, PVA glue, acorn hat.
How to make an application: first glue, alternating in color, the leaves in a circle. Next, glue the acorn hat in the middle. Finally, decorate your pattern by gluing green pine needles on it.
MANDALA "Autumn Eye" (upper photo in the illustration).
It is done by analogy with the "Flower" mandala.
You will need: A4 size cardboard, PVA glue, two pairs (four each) of different types of leaves: 4 yellow, 4 green, 4 smaller brown and 4 smaller green, an acorn cap and 4 sprigs of dry grass like feather grass.
How to make an application: As in the previous work, you first need to glue the leaves of contrasting colors, alternating them in color. Then stick an acorn hat in the middle of the flower. When the leaves dry, glue smaller leaves of a different color on top, place two branches of feather grass and fasten at the top and bottom to form an “eye”.

Children's autumn leaf applications: video for kids
And in conclusion, I want to invite all the little readers of the "Native Path" and little artists to see a lesson on the application of leaves in a fun "Shishkin school" my favorite TV channel for children is “My Joy”.
Together with the mouse Shunya, children will learn how to make an appliqué from leaves and learn how to craft.
Happy viewing everyone!
More ideas for autumn applications with children can be found in the articles of the site:
Get NEW FREE AUDIO COURSE WITH GAME APP
"Speech development from 0 to 7 years: what is important to know and what to do. Cheat sheet for parents"
Click on or on the course cover below for free subscription
Here comes the golden autumn! Warm sunny days are calling to go for a walk in a park or forest. And at the same time, you can pick up very beautiful leaves, because the time for crafts for kindergarten will soon begin!
What do you think yours will be? Make a beautiful bright peacock out of leaves!
The creation process is simple and interesting. Take care of it with your child and you will have an interesting evening!
Creativity Toolkit
You will collect all the materials for a peacock from leaves during a walk, on the way from school or kindergarten, as well as in a public garden near your house. Leaves are needed - maple, birch - it doesn't matter! The main requirement is not too large and very bright!
In addition, you will need:
- Colored cardboard;
- Velvet cardboard in black or dark green;
- A piece of thick (can be corrugated) cardboard;
- Glue gun;
- Plasticine.
Take any tools and materials that your imagination has enough for, then create!
If you decide to skeletonize the leaves, then prepare soda and an old toothbrush.
To make your panel the most original and beautiful, make skeletons out of leaves and brightly color them. Doing this is quite simple, and the result is surprising.
We present to your attention 2 methods of skeletonizing autumn leaves.
With the first option, the lesson will not be very pleasant, and work will need to be started at least 3 weeks before the creation of the craft. If you are ready for this, then try it.
For this method, a container is taken, foliage is laid in it, warm water is poured and everything is closed with a lid. In a warm place, such leaves quickly begin to rot. In this case, the pulp of the leaf is more likely to be destroyed, and this process concerns the hard veins last.
After 3 weeks, we need to remember our leaves. Clean water is poured into the basin and raw materials are laid out there. Very carefully it is necessary to clean off the rot, trying not to damage the veins. Everything superfluous that is not removed by hand, you should try to remove it with a toothbrush. Skeletonized leaves are stacked under oppression and dried.
As you can see, it's not a very pleasant experience. Again, in our lives it is not always possible to prepare in advance, so there is another method - much faster!
In the second option, you need to boil the leaves in a soda solution.
To do this, 200 grams of washing soda powder is dissolved in 600 ml of warm water. Prepared leaves are immersed in the mixture, boiled for an hour and a half at a low level of fire.

After a while, this liquid is poured out, and clean water is poured into the pan and cooking continues for about 30 minutes.
Use a fork to check the condition of the sheet. We finish when the separation of the pulp from the veins becomes free.
Now we take out the leaves and gently, without pressing, wipe them. Some parts may not separate, in which case boil the raw material again. Remove from the "broth" carefully, because the leaves are very fragile and can collapse! Dry as in the first option.
Before work, the skeletons of the leaves can be ironed, and then the dye can be applied - gouache, dyes for eggs, watercolor, spray paint. Bright colors are welcome, because a peacock of leaves cannot be dull!
You can bleach them with the usual "Whiteness".
Do-it-yourself peacock from leaves
To create a bright panel, prepare a sheet of light-colored cardboard, velvet cardboard, scissors and leaves.

On the cardboard in the middle, draw a semicircle - this will be a sketch of the tail. Squeeze out the glue along the largest arc and very quickly, without letting the glue harden, lay out the leaves.
In order for the work to be fun, first sort all the leaves by size and shade.
Let the first row be from ordinary leaves, but the second and all subsequent ones can be laid out from skeletonized ones.
After the entire surface of the tail is filled in, cut out the silhouette of a bird from black velvet cardboard and stick it on top of the leaves.
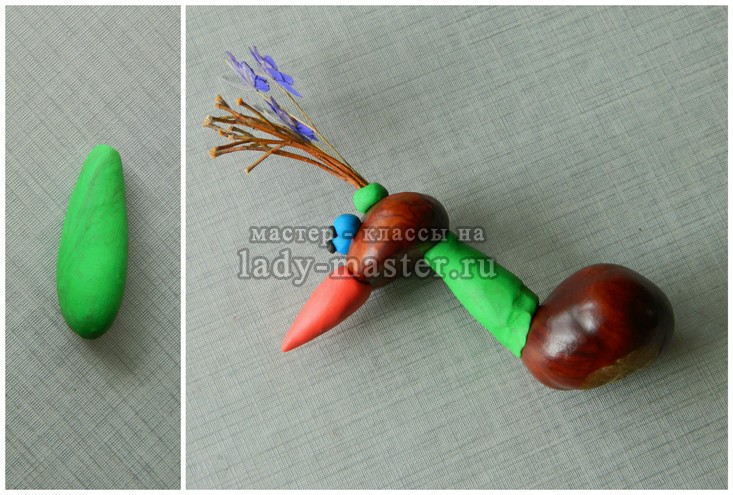
Peacock from maple leaves and plasticine
It is even easier to make such a bird, you just need to remember the modeling lessons! It's even better if your little one helps you make the body, neck and head.
To do this, you need to take blue plasticine and knead it, and then complete the desired shape.

For the tail, collect maple leaves - the brightest and most beautiful. But all fallen leaves have an unpleasant feature - they dry out and warp, losing their delicious appearance. To prevent this from happening in your case, prepare them - canned in glycerin or coated with wax.
Stick a few leaves into the tail part of the plasticine body so that they peek out from one another. For the head, you can make a crest from a twig.
Create legs from sticks and acorn caps.
Cut out a small stand from thick cardboard and paint it green or stick green paper on it. Glue a peacock of leaves on it.
That's all! The child is delighted - because his craft will be amazing!
If you don’t know what to do with your child in rainy weather, try doing it with him. Earlier we talked about how, now you can use the resulting material for your crafts. We have collected 25 ideas for you on how to make do-it-yourself autumn leaf appliqués.
Let the children choose the leaves for the applications themselves. They should be of different sizes: larger leaves can be used for the body, and small ones can be used to make, for example, large ears for animals.
To make the legs, you can use small twigs or narrow leaves, whichever you and your child prefer.
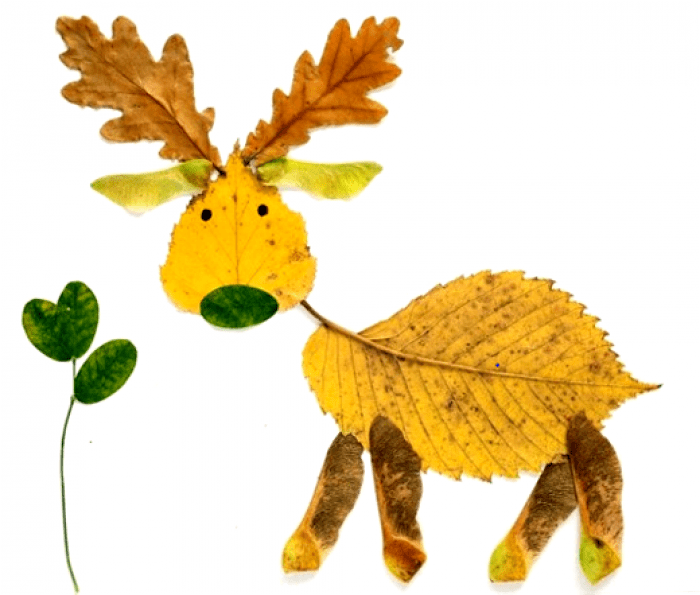
Applications from autumn leaves for children: animals
Making animals from leaves with your own hands is one pleasure. Such leaf applications can be done both on a blank sheet and on a finished drawing. For example, before you start making a fox, draw a forest for it, a lion for the Sahara desert, an elephant for the jungle, a fish for the sea.
Such crafts will be very useful in kindergarten, when kids study domestic and wild animals.
Leaf craft for kids: Fox


.jpg)


DIY applications for children from autumn leaves (photo)
Applications and crafts from leaves: birds and insects
Butterflies, bugs, chickens, parrots - all these beautiful creatures can also become heroes of children's crafts from autumn leaves. And just like in the case of animal applications, you can use a plain sheet of paper or cardboard, or a drawing as a basis.

DIY applications for children from autumn leaves (photo): Chickens

DIY applications for children from autumn leaves (photo): Parrot

Do-it-yourself applications for children from autumn leaves (photo): Owls
.jpg)
Do-it-yourself applications for children from autumn leaves (photo): Owl

DIY applications for children from autumn leaves (photo): Crow
.jpg)
DIY applications for children from autumn leaves (photo): Insects

Do-it-yourself applications for children from autumn leaves (photo): Grasshopper

DIY applications for children from autumn leaves (photo): Beetles and butterflies

Application for children from autumn leaves with their own hands: Snail
Applications and crafts for children from leaves: people, portraits
Children will surely like such applications from leaves - after all, these are whole pictures. Take a drawing depicting a person, more glue, autumn leaves - and create. To make it more fun, you can use photos instead of ordinary pictures.

.jpg)


Pictures of autumn leaves: crafts for children
To make pictures of autumn leaves with children, you will need, in addition to the leaves themselves, glue and paper, a little imagination. If there is no time to come up with a plot, take one of the autumn-themed coloring pages and use it as a base.


Leaf Painting: Craft for Kids

Leaf Painting: Craft for Kids

Leaf Painting: Craft for Kids
Sunny day off. In the morning, my daughter and I took a walk on the street, collected an armful of maple, rowan and ash leaves, and distributed a dozen fresh chestnuts with a shiny shell into our pockets.
Upon arrival home, some of the leaves were spread between the pages of magazines. These are stocks for the winter. Part - put in a glass, it turned out something like a small bouquet.
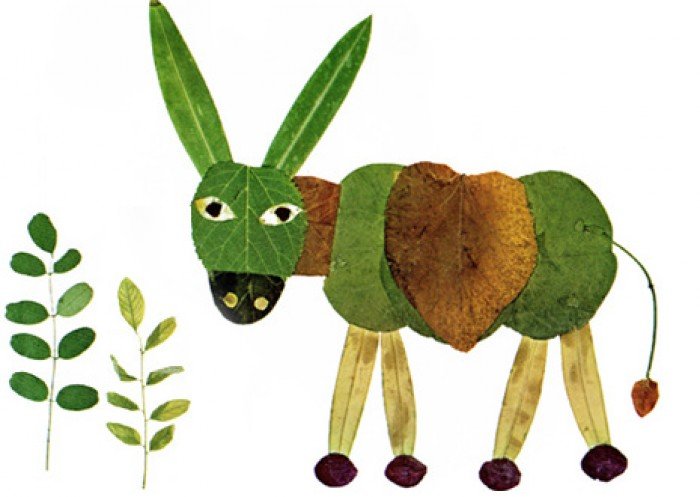
From the remaining leaves, chestnuts and plasticine, today we will make a peacock - a bird with a huge fan-shaped tail.
To begin with, we list all the materials and tools that will be useful for working on crafts:
- - a bunch of rowan,
- - autumn leaves of different shapes, colors and sizes,
- - two chestnuts
- - plasticine,
- - PVA glue.

Let's start with the design of the tail of the craft. In its manufacture will have to use PVA. While the part is drying, we will make the rest of the bird's body.
So, choose a clean maple leaf without unkempt rust and damage. This is the first layer of our tiered tail.

The decor of the peacock tail does not end there. It is necessary to pick up 5 pieces of small green leaves, for example, from a wild rose or chestnut. We glue these details on top of the leaves of wild grapes.

This could be the end of the feather decoration, but we decided to add the final touch - rowan berries. They will, of course, take the longest to dry.

Putting the tail aside, we are engaged in the chestnut head of a peacock. We sculpt plasticine eyes and a huge red beak for the bird. We attach a tuft of twigs from above to the top of the head. In our herbarium collection there were several blue flowers that became the decoration of the tuft.

We attach the head to the chestnut body of the craft using a long plasticine neck. We did not have enough blue plasticine. When designing this part of the body, it is advisable to use not green, but blue.
Two thin brown tubes with three fingers at the ends are the legs of a peacock. Of course, such limbs will not support the weight of the chestnut body and head, so we will seat the bird on a horizontal surface.


Therefore, let's make funny little animals and fairy-tale characters from dry leaves together.
There is no need to look for another such material for application from leaves: bright, of various shapes and sizes, with interesting overflows of colors.
Autumn leaves - the material is not only cheap and affordable, it just falls on your head and spreads like a carpet under your feet. Do not be lazy! Choose and create!

Making applications from leaves
For an application of autumn leaves, you will definitely need paper and glue. To achieve the desired result, change the shape of the leaves with scissors. Remember, you can only use dried leaves(usually they are dried between the pages of books, or with an iron, covered with paper on top).

The next step is to come up with a picture. With this, I think there will be no problems. From the leaves you can make fairy-tale heroes, animals, various landscapes, or just a beautiful ornament.

What are the applications
When making applications from leaves, you can use various techniques, giving the crafts uniqueness and originality. I will tell You about several of these techniques.

leaf applique examples
Hope, sample photos of autumn leaf applications, which I have prepared especially for you, will certainly help to create interesting images, picturesque landscapes, and your room will always be decorated with a small piece of autumn. Making a leaf applique is very easy when there are so many beautiful examples. Usinfantry!