Appetizing hedgehogs from pears and grapes. New Year's table for children
That's why I propose to cook such an unusual hedgehog from fruits and treat family and friends with a delicious dessert. Be sure they will appreciate your efforts.
To create a creative fruit hedgehog, you will need:
black olive,
Grapes "quiche-mish",
dry cloves,
Toothpicks.
1. First, we will make a muzzle for the hedgehog.
Use kitchen scissors to cut off the stem of the pear. With a knife, cut off part of the peel on the pear - this is the future nose of the hedgehog. To keep the hedgehog firmly on its feet, cut the fruit from below.
But be careful so that you don't accidentally get hurt.
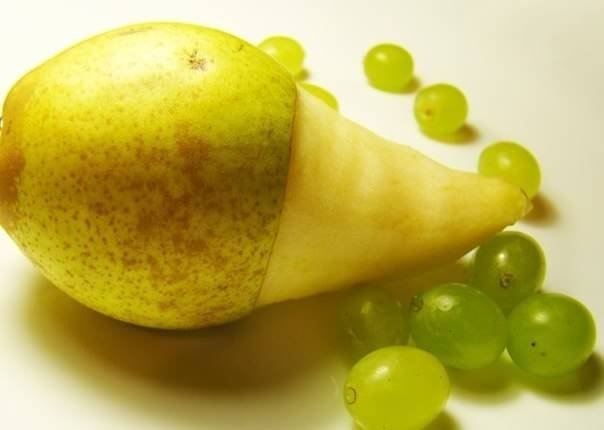
2. Thread the grapes onto the toothpicks and stick them into the pear, as shown in the photo. These are needles for our hedgehog.

Start from the center row and gradually move to the sides. Only the muzzle should remain without spines.

3. Take a black olive and cut off the edge so that it can be better attached to the pear.

4. Put an olive on the tip of a pear and make eyes out of a dry carnation.

That's all. Our prickly, but appetizing fruit hedgehog is ready to delight the surprised looks of your loved ones. Rather treat your friends!
It's autumn outside. She painted the leaves with her colors, the children went to the garden and school, which means it's time to start doing crafts. It's no secret to anyone that every child loves fruits, and DIY fruit crafts are great and beautiful, especially when they can be taken to an exhibition at a school or even a kindergarten. Do-it-yourself fruit crafts develop perseverance in children, turn on imagination, and most importantly, this is a great activity for motor skills.
You do not even have to spend impressive amounts of money on all kinds of educational toys. In addition, spending time with your child will bring you closer and strengthen your relationship. After all, spending a couple of hours with your child doing such a fun thing is cool!
By involving your child in activities such as making crafts on your own, you include him in the creative process, which will positively affect the development of your child in the future. And if you join him and can fulfill his fantasies, then feel free to take your works of art to various autumn exhibitions. Also, handmade fruit crafts will decorate any home.
To begin with, you can lay out a composition from fruits, this is the easiest option for doing crafts, but at the same time it actively develops the child’s imagination, logic and thinking. With the help of such a game, names and colors are better remembered, and many children who previously did not like certain fruits may well eat them with great pleasure. For those who like to watch rather than read, they can watch a video where all kinds of options and master classes for DIY fruit crafts are provided.
In the photo you can see how quickly and beautifully with the help of bananas, kiwi, oranges and many other fruits, decorate any cake, and the festive table itself will become much brighter and make any guest delighted.
During the execution of many crafts, you will need toothpicks and a sharp knife, so the manufacture of all compositions should take place under the strict supervision of adults !!!
For such a fruit composition you will need:
- Pear
- Grape
- toothpicks
Let's move on to the instructions for making a hedgehog. We have to clean one side of our pear, this is where the muzzle of our hedgehog will be. Our hedgehog should be prickly, for this we will take grapes and we will prick it on toothpicks, leaving the sharp end to look out.

Pear hedgehog
After our spines are ready, we begin to evenly stick them into the uncleaned part of our animal. For the nose we use a dark grape, and the eyes can be made from ordinary matches. Here our hedgehog is ready. Not a single child can resist such a cute, and most importantly, delicious creation. Below you can see photos and videos on the manufacture of this fruit composition.
Another simple but fun craft to make is called a car. This composition will take a little time, but the baby will be very interested. We will need:
- Banana
- Apple
- Grape
- toothpicks
To begin with, we will make a semicircle from an apple, it is not worth cutting it very thinly, since it will be the machine itself. Banana cut into half rings. After the toothpicks we pierce the apple in the places where the wheels should be. This must be done evenly. It remains to "dress" our wheels on toothpicks and secure them with grapes. Agree that this is a simple, but at the same time quite nice machine.

fruit machine
Probably not only every child, but also many adults are very fond of bananas. The next craft will not disregard any child. After all, it is from this fruit that you can create such an incomparable dog like a dachshund. Even an adult will not refuse such a dessert!
So let's get started. To make this dessert, take:
- Two bananas
- toothpicks
- Pepper (peas)
- felt-tip pen
- Carrot
Carrots need to be washed and peeled. Bananas do NOT need to be peeled. We cut out the paws from the banana peel and strengthen it with toothpicks so that it can stand. We need the second banana for the muzzle, cut out the ears, draw the eyes with a felt-tip pen, then we will have peppercorns in this place, because the dachshunds have small eyes.
Now let's take a peeled carrot and make a funny muzzle for our taxi. Next, use toothpicks to connect the dog's head to the body. That's all, a small culinary masterpiece is ready. Now take it to your baby, he will appreciate your efforts!

Oh, how beautiful a salad will look, clearly resembling a turtle on top! For this you will need kiwi. Peel it and cut into circles, and for the paws and head, cut the fruit lengthwise into 2 parts.
Treasure Island
A very funny and edible fruit craft that will decorate any table at a children's party.
We will need:
- Banana
- Mandarin
- Slice of lemon
- Banana or tangerine peel strips for garnish
The instructions for making crafts are very simple and will not make anyone suffer from the execution of such a dessert. To begin with, we have to peel all the fruits from the peel. Bananas need to be cut into circles, and kiwi into circles, and then in half. Divide tangerines into slices. Now let's get down to the most important thing - we will beautifully depict the island on a plate.
Since peeled bananas tend to darken quickly, it is best to prepare the dessert before serving.
We lay out slices of tangerines, which will represent the island itself. Now let's depict a palm tree, the stem of which is a banana sliced \u200b\u200bin circles, and the leaves are pieces of kiwi. A slice of lemon will act as the sun, but make rays from thinly sliced \u200b\u200bpieces of peel. Here is such a simple and at the same time delicious work of art we got.
In conclusion, I would like to say that with the help of such interesting activities as do-it-yourself fruit crafts, you can not only get close to your child and attract him to creative urges, but also plunge into the world of childhood and bright colors yourself.
The fruit season has begun, which means you can start making interesting fruit crafts that can be taken to kindergarten or school - young children really like this, as everyone loves fruits. No need to buy expensive toys to develop the motor skills of the baby's hands, no need to spend money on all sorts of things that develop thinking, imagination and perseverance. Just take care of your child, whether it's a boy or a girl, doing fruit crafts with your own hands. Now you will learn what can be done quickly and beautifully from fruits, because it can be crafts in the form of animals, still life and much more. When a child makes, he first of all remembers their name, learns colors and shapes, develops his thinking, imagination, associations. One of the easiest crafts can be considered an application. Just show your child what to put on a fruit plate. Make funny animals, a boat or a flower with it. He really likes to build and come up with new interesting compositions. If the child does not eat well, then such a game will interest him, and he will eat with pleasure! Well, if you don’t have time to read the entire article, I advise you to watch the video, which presents fruit crafts.
Fruit Owl
A very simple craft will be an owl, which you can do with your own hands together with your child. Such an owl can be taken to kindergarten, and most importantly, it can be made at any time of the year, even in autumn, because all the required fruits can be bought at the store. You can see detailed instructions on how to make such a craft.
You will need:
- Pear
- Grapes (dark and light)
- Strawberry
Progress:
- We cut a piece of pear almost to half. This will be our foundation.
- From kiwi cut out two circles and peel the peel with a knife. We put the circles on the wide part of the pear to make eyes.
- We cut one dark grape in half and fasten the kiwi on top, like pupils, with a short toothpick.
- Cut the strawberries into 4 pieces. A sharp piece, more like a beak, is attached to a pear.
- We divide the dark grape in half, and then cut each half into 3 parts. This will be our paws and we fasten them down the torso.
- From the same grapes we cut out the eyebrows. Divide the grape into 4 parts and prick two pieces with toothpicks over the eyes.
- From light grapes we make small wings. We divide the grape in half, and make one cut in each half. We need 4 such halves, 2 on one side and 2 on the other. With the help of toothpicks, we fasten them on the sides tightly to each other. Our cute owl is ready.
Video master class owl from fruit
lemon mouse
For children of kindergarten age, I want to offer such a cute mouse that can decorate your holiday table. Such a craft will not take much time and effort, but it will cause a storm of emotions among the guests. To make your own crafts, see the detailed instructions below. 
You will need:
- Lemon
- sprig of parsley
- Scissors
- Knife (small for carving and large for slicing)
- Toothpick
- Black pepper
Progress:
- We cut off a small side piece of a lemon for stability.
- From the cut piece we cut out thin and round ears.
- The muzzle of the mouse will be on the side where the elongated tail of the lemon is located. With a small knife, make indentations for the ears and insert them into the holes.
- We also make holes for the eye and antennae. To make the holes more even, you can finish them with a toothpick.
- We cut the dill stalk lengthwise and insert it in place of the antennae, resorting to the help of a toothpick.
- Insert pepper in place of the eye.
- From the rest of the lemon, cut the peel in a circle and cut out the tail with scissors. For the tail from the back of the mouse, we make an incision and insert our blank. Our wonderful mouse is ready.
Video how to make a mouse out of a lemon
Hedgehog in the fog
You can make a funny hedgehog out of a pear, and both you and your child will enjoy working together with your own hands. It is good to make a hedgehog in the fall as a craft for kindergarten or school. You can see how to make such a hedgehog in our master class with detailed instructions. 
You will need:
- one pear
- Grape
- toothpicks
Progress:
- Using a knife, peel the pear from the sharp side. This will be the muzzle of a hedgehog.
- Now take a grape and insert a toothpick into each berry. This should be done so that the sharp end of the toothpick peeks out a little.
- Now the prepared toothpicks with berries should be evenly stuck into the pear. It is in the unpeeled part of the fruit.
- We make a hedgehog nose, for this we take one black grape and string it in place of the pear tail.
- Hedgehog eyes can be made simply from matches or cloves.
How to make a fruit hedgehog with video instructions
That's all your funny hedgehog is ready. Please your baby with a funny and tasty toy. You can come up with a whole fairy tale and tell it to your child while eating.
typewriter
You can make many of these cars for a child's birthday and impress the little guests. We are sure that more than one child will not refuse such a treat made by himself. Fantasize together, and we wish you a tasty and entertaining lesson. And to make such a machine is very simple, your baby can help you with this. 
You will need:
- Grape
- Banana
- Apple
- toothpicks
Progress:
- Take an apple and cut it in half so that you get a semicircle.
- Now peel the banana and cut it into rings in the same way. Each ring must be cut in half.
- Take toothpicks and pierce the apple where the wheels should be. Do it evenly.
- It remains to put cooked banana slices on both ends of the toothpicks and fix it all with a grape.
banana dachshund dog
If your child loves bananas, then our funny dog will be able to attract him. Make it nice for the baby and for dessert, present him with a craft made by yourself, and possibly together with the child. In order to understand how to make a banana dog, we will now describe in more detail. 
You will need:
- Two bananas
- toothpicks
- peppercorns
- Black marker
- knife
- Carrot
Progress:

That's all our funny dachshund is ready and can please the whole family. Look carefully at the photo and follow the instructions, it's very simple. We wish you a fruity mood!
A simple children's craft from apples - funny little men
It is very easy to make such funny little men with your own hands with a child. This craft will not take you much time, but will interest the child for a while. Such little men can be used to decorate a children's table, for exhibitions.
You will need:
- green apples
- Apple seeds
- Toothpicks or matches
- sharp knife
Progress:
- Take two apples, one should be larger than the other. Stack the apples on top of each other so that the small apple is on top of the big apple. Fasten the craft with toothpicks or matches.
- Now take the third apple and cut 4 pieces from it. Two of which will be the legs of a little man, fasten them at the bottom of the body. And the two remaining on the sides in the form of hands.
- Cut a small apple into two pieces. One will be your man's hat.
- The seeds will serve as eyes, they can simply be pressed into the apple. The mouth can be cut out with a knife or made from leftover apple slices. At your discretion.
Your simple and fun craft is ready. She will please the child, he will be able to play with her or put on the table during lunch. Rejoice yourself and make a small holiday for the baby.
Children's craft - rat Larisa from radish
Quite an interesting craft for kids, which you can do with your own hands together with the baby. It is not difficult to make it, the main thing is to apply imagination and skill. Such a craft can be done in kindergarten for an exhibition.
You will need:
- Large white radish
- Lettuce, but better than cabbage
- One small radish
- Olives
- sharp knife
- toothpicks
Execution process
- You need to rinse and dry the large white radish well. Remove all the roots, leaving only the tip of the radish, they will serve as antennae. The tops should not be removed either, it will be the tail. But if there is a lot of it, thin out, cut off the excess.
- After that, you need to cut off the front of the radish and use a toothpick to fix the radish in this place. This will be the nose of the craft
- We make ears with the help of notches, we make them small. Carefully insert lettuce or cabbage leaves into them.
- Now it remains to make the eyes of our rat, for this we take olives. We cut the olives into circles and with the help of toothpicks we fix them in a radish. Eyebrows can be made from the remaining radish.
Here is a funny girlfriend ready. Give it to your grandfather to please him for the holiday. After all, he already has Shapoklyak.
Original eggplant and carrot helicopter
If your child loves helicopters, then you can surprise him with a joint vegetable craft. Such a craft can be imagined, both for kindergarten and for grade 1 school. With detailed instructions, you will succeed easily and quickly, you can also watch a video master class. 
You will need:
- Carrot
- Eggplant
- toothpicks
Progress:
- We take an eggplant and cut off a beveled piece of peel - this will be our windshield.
- From carrots we cut two circles for wheels with a thickness of about 1 cm.
- Using toothpicks, we attach the wheels to the eggplant. The tail of the eggplant should be facing up.
- Cut the carrots lengthwise into strips so that they look like blades. From the same carrot, we cut out a cylinder with a small diameter, about 4 cm high.
- We attach the cylinder with a toothpick to the top of the helicopter. Part of the toothpick should be visible in order to attach 4 strips-blades to them.
- We cut off a circle from carrots, and from a circle we make a screw, cutting 4 triangles out of it. Our helicopter is ready.
Videos eggplant and carrot helicopter
Craft little mice
If your child does not eat cucumbers well, then we can offer you an interesting way out. Make a quick and appetizing little mouse craft with a vegetable from a vegetable. It won't take long, but we assure you, your child will love eating cucumbers. Moreover, they contain so many useful substances and vitamins. 
Compositions made from fruits and vegetables become a real decoration of the festive table. Cooks come up with more and more delicious "crafts", which sometimes it's a pity to even eat, they are so beautiful and amazing. Carving - this is the name of the "art" of creating compositions from fruits, and any person can master it. You need to learn from the easiest craft to make, for example, the one you see in the photo in this article. We will tell you how hedgehogs are made from pears and grapes. Such a vitamin composition, thanks to the master class presented here, can be performed by each of you. Read the description, get the necessary goodies from the refrigerator and plunge into the sweet creative process.
Preparation of materials for the composition "Hedgehogs" from pears and grapes
First of all, we will select fruits and berries. Pears cook hard, oblong shape. The fruit must not show any signs of impact or scratches. In grapes, give preference to dense, fleshy berries of large size.
Stern of vitamin delicacies, to complete the figurine you will also need cloves or raisins, currant berries. All elements of the composition will be fastened with toothpicks.

Before you start making crafts "Hedgehog" from pears and grapes, make sure you have the necessary utensils and tools. We will need a large flat dish for setting the figures, and a knife. Also, prepare a pair of clean gloves and napkins. When the preparations are completed, you can start making delicious crafts "Hedgehogs" from pears and grapes.
Description of the process of making a vitamin composition
On the peel of the pear, make an incision in a circle, stepping back from the narrow edge of the fruit 3-4 centimeters. Next, with a knife, carefully remove the upper shell of the fetus. Thus, you have formed the face of a fruit animal. To make the pear Hedgehog craft stable, cut the peel along the entire length of the fruit from below.

Put the product on a dish. Next, we perform the "needles". Use a toothpick to pierce each grape in the middle. Insert blanks into the fruit over the entire surface of the "back". First, fill the central part of the fetus with needles, then the sides to the very bottom. Make hedgehog eyes from cloves or raisins. Use a currant or dark grape as a spout. Attach strawberries or raspberries to the back. Do the same for the second hedgehog. Place them on a platter. If desired, you can prepare a whole family of vitamin figurines from smaller fruits.
On a note
Since the composition "Hedgehogs" of pears and grapes is made from fresh fruits, and the "muzzle" area is peeled, after some time it may darken and lose its aesthetic appearance. If you need to keep the craft for several hours, we recommend that you sprinkle it with freshly squeezed lemon or lime juice immediately after cooking. Before the arrival of guests, store fruit and berry hedgehogs in the refrigerator. Sweet carving!
Raisa Tyugashova
There are many famous hedgehogs. For example, Hedgehog in the fog, or Poor hedgehog who is covered in thorns and cannot sit, or Hedgehog rubber hat in raspberry. Are there few of them? But such a sweet, tasty, juicy no hedgehog yet!
See how simple it is.
For our master classes will be needed:
Pair pears,
tassel grapes,
toothpicks,
cloves (spice,
Berry (chokeberry,

Before work, wash and dry fruits.
1. Cut off the convex side with a knife pears, so that pear in the prone position was stable. This is the body of our future hedgehog.

2. Then we peel off the skin from the nose to about the middle of the body, as shown in the photo.

It turned out a light muzzle, and the body is darker.

3. We make eyes from the spice of a carnation, just stick it into the pulp pears to be symmetrical. And we make the nose from a hard berry - chokeberry. We break off the tip of the toothpick, pierce the berry through and attach it to the sharpest end pears. The eyes and nose are ready.

4. Each grape string on a toothpick. These are needles hedgehog.

5. Then we stick a toothpick with a grape in the green part of a pear to get an even row.

6. And so row after row, until the whole body hedgehog not covered with needles.

like this we got a hedgehog. You can make several hedgehogs.

You can bring such a craft to an exhibition, an autumn fair, or simply decorate a table for an autumn holiday or a birthday.
This craft can be done with your child. An adult works with a knife, and a child can string grapes on a toothpick and then decorate hedgehog, make eyes, nose. And help for an adult, and the child will be happy!
Imagine, be inspired and create!
Related publications:
Apple and pear trees blossomed... I sing lines from my favorite Katyusha. I cut branches, leaves and flowers And again, I sing my favorite lines. Here.
In the process of introducing children to folk art, everything is important: a selection of folklore material, and familiarity with household items, and of course.
Play plays an important role in a child's life. The mobile game is the way to knowledge of the world. During the game, children will learn different properties.
Summary of the master class for parents of the 1st junior group Purpose: To develop cooperation skills. Introduce parents.
Master class on the topic: “Making a baby book” The purpose of making baby books: to develop a steady interest in preschool educational institutions.
1. We took a 5 liter bottle. Cut out round holes on both sides. 2. A piece cut from leatherette was attached to the top of the lid.
Prepared workspace. We took what we needed to make the feeder, this is a shoe box, scissors, a ruler, a pencil, glue, a rope.