How to sew a bear costume with your own hands? What elements should the costume consist of? We sew a New Year's costume for a child with our own hands How to sew a bear costume for a baby.
Soon your son will have a New Year's party in kindergarten and everyone should come in costumes of teddy bears? Prices for purchased products are biting, and in what is more or less affordable, half of the group will probably come ...
Such thoughts have been tormenting my head recently. So I decided to make my own costume!
Why this choice of style?
- Firstly, it will be in a single copy and I will not have to look for my child in the crowd.
- Second, it's cheaper. I met the most budget version of the suit in stores for 700 rubles, and the fabric cost me only 300!
- Thirdly, I myself was able to choose the style. Since the room is hot, I settled on a humane version and sewed a vest. And not fur, but fleece.
- Fourthly, I categorically did not like the fact that in 99% of cases options with a hat were offered in purchased costumes !!! What kind of hat, and even fur in a stuffy room? And my answer was - the hood! It can always be removed if necessary, without occupying the baby's hands, and it will not be lost anywhere.
If you like this option, I'm very happy! Well? Let's sew then?
What will be required to sew such a New Year's teddy bear costume?
The costume is designed for a boy 2.5-3 years old.
- 1. Fleece fabric in two colors - brown and sand.
- 2. Tracing paper for patterns. If not, then you can safely use plain paper and glue. I like the second option even more.
- 3. Tailor's chalk.
- 4. Scissors.
- 5. Threads in three colors: brown, beige and white.
- 6. Brown lace.
- 7. Pencil or marker.
- 8. Ruler or measuring tape.
- 9. Needle.
- 10. Corset tape (you can replace it with a plastic tape from a regular bottle, cut it yourself).
- 11. Pin.
- 12. White sewing tape.
- 13. Of course, a sewing machine.

Let's start sewing.
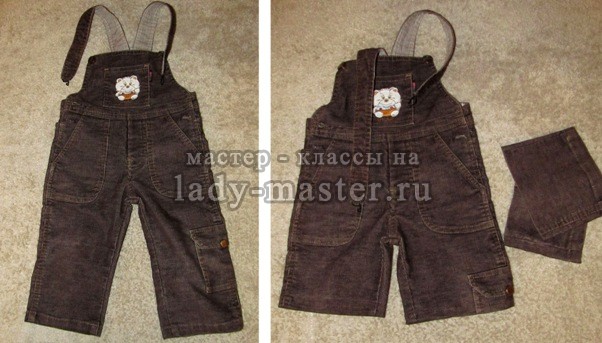
Surely every child has a jumpsuit or panties, which are already too small for him in length. So I found such a little thing, and I was very lucky that it turned out to be thematic brown. I decided to make shorts by cutting and hemming the legs to the required length. You can take regular jeans or shorts right away, look at the situation.
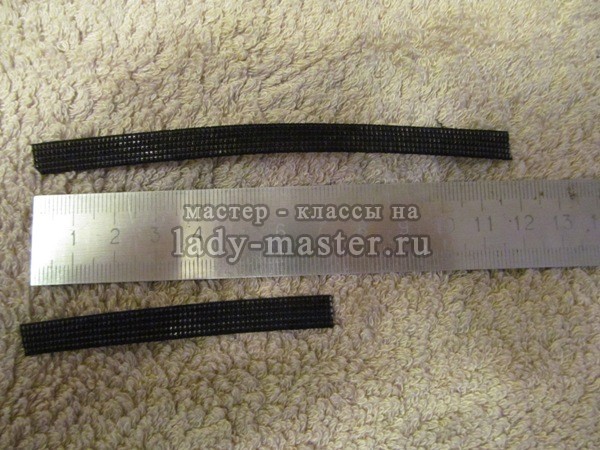
1. Now we need to make fleece cuffs on the bottom of the shorts. Measure the bottom leg width. In my case, it is 34 cm. From the sand-colored fabric, cut two strips 5 cm wide and 34 cm long. You can do this without a pattern, but if you doubt your abilities, it is better to first cut the piece out of paper, and then use it to cut out of the fabric.

2. Open the leg along the inside seam by 5-6 cm.
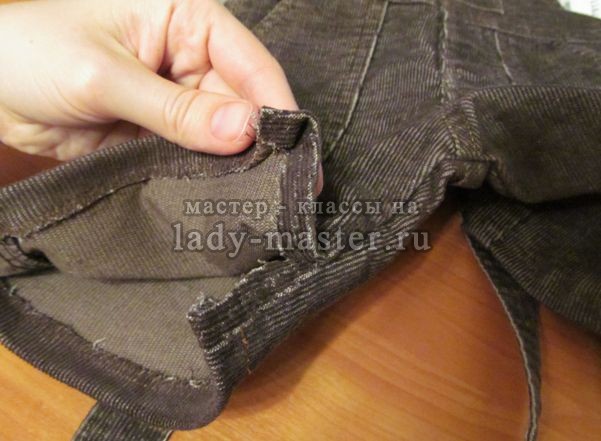
3. Lay the strip of fleece on the shorts face down as shown in the photo, stepping back from the edge of the leg 2 cm. Sew.
4. Turn the fleece inside out and fold its edge into the inside of the shorts. Sew again, retreating from the edge of about 7-10 mm. If you find it difficult to do this without a basting hand stitch, do it before each operation, then take out the “rough” thread.

5. Sew back the inside seam of the legs. These cute fleece cuffs should turn out.

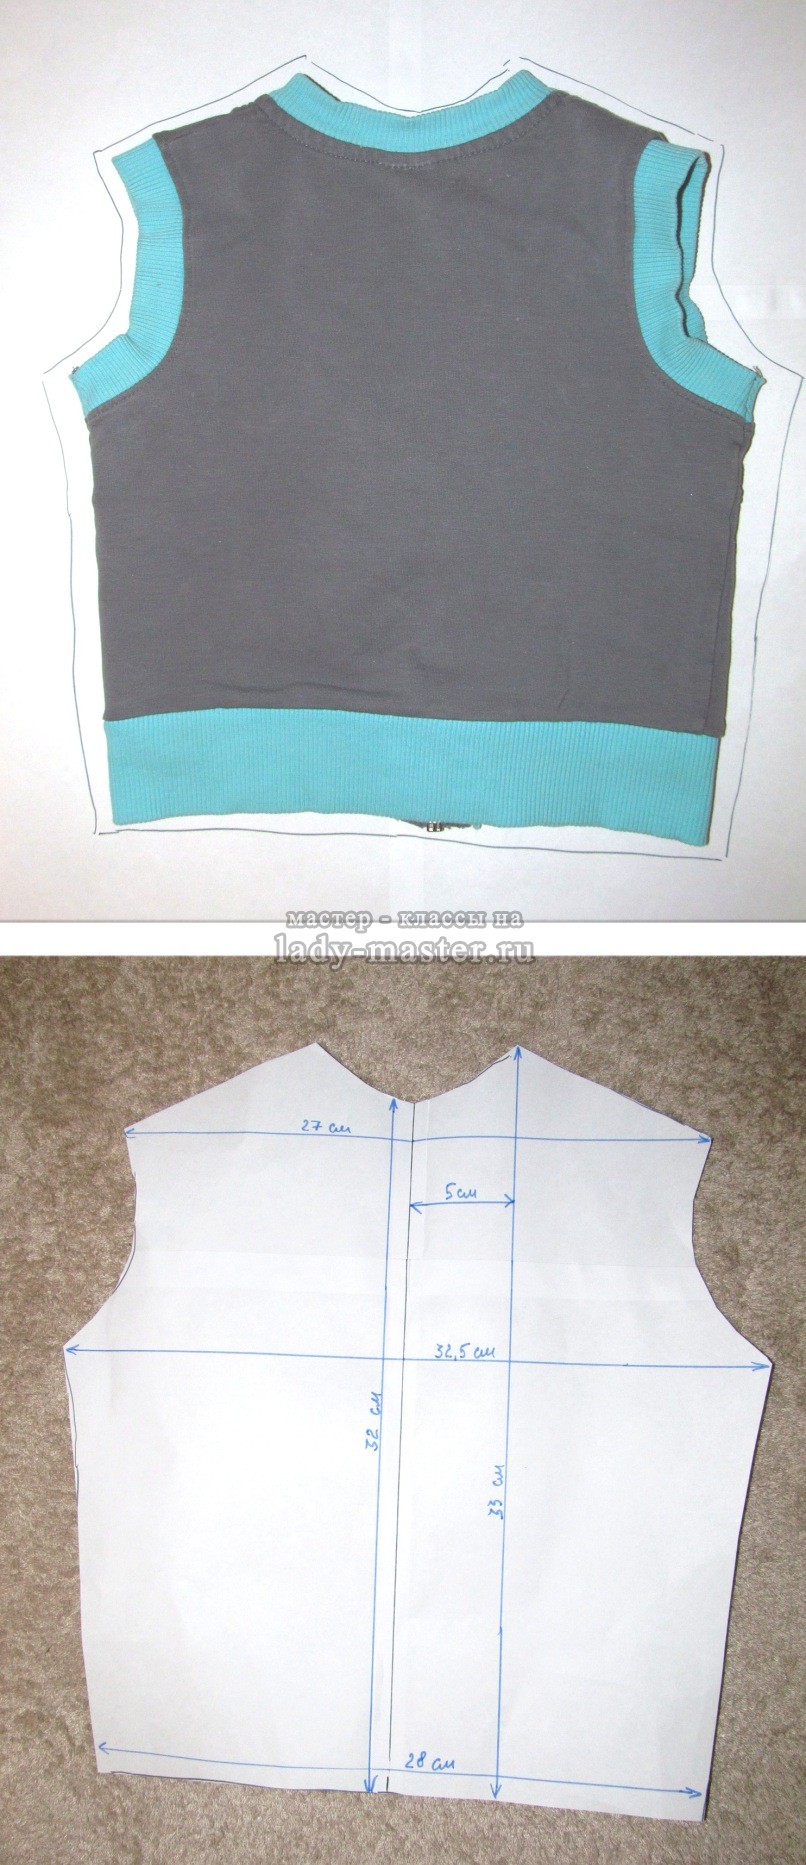
6. Let's start sewing the vest. If your child already has a similar thing, then you can cut out a pattern in her likeness. If not, then use the pattern with the dimensions shown in the photo. Such parameters are suitable for a child of 2.5-3 years.
7. Now we will cut out or create a hood pattern ourselves. You can take any thing whose hood your child likes. If you cut it yourself, make the front line of the pattern a little longer than on the item itself.
8. Using the first vest pattern, cut out two identical pieces from brown fleece. On one of them, make a cutout on the throat. So we designate the front of the vest.

9. I wanted to decorate the front of the vest with something. I printed out a drawing of a bear footprint from the internet, made sure it was the right size, and cut out a footprint out of the sand fleece. Then, I marked the main lines of the pattern with a felt-tip pen and basted it on the main fabric so that it would not deform during sewing on a sewing machine.

10. Here's what I got.

11. Now overcast the details of the vest from all sides.
12. Using a hood pattern, cut out two of its identical parts. Attach them to each other along the line marked in the photo with chalk. Overcast the edge. Turn the hood right side out.

13. Now we will need to sew a sand-colored edging to the edge of the hood. This is necessary both for beauty and in order to then thread the lace there. For this:
- measure the length of the hood pieces that go near the face. In my case, this length is 64 cm (32 x 2);
- from sand-colored fleece, cut and overcast a strip 64 cm long and 6 cm wide;
- on the right side of the brown fleece, lay a strip of sand cloth with the wrong side up. Sew them 5 mm from the edge.

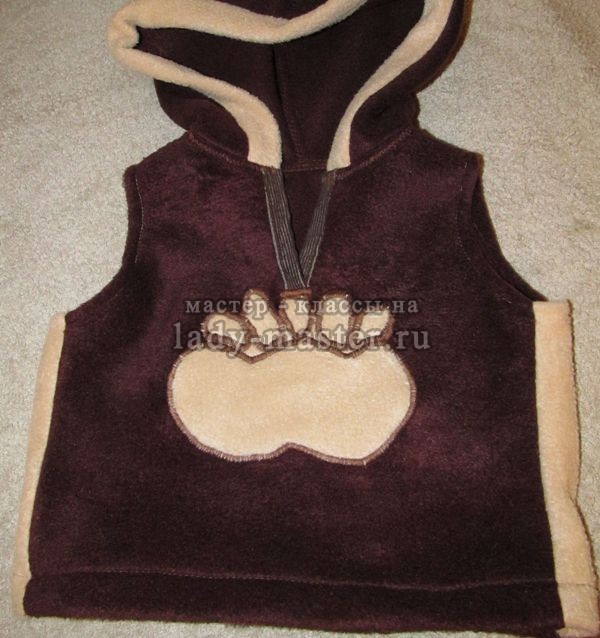
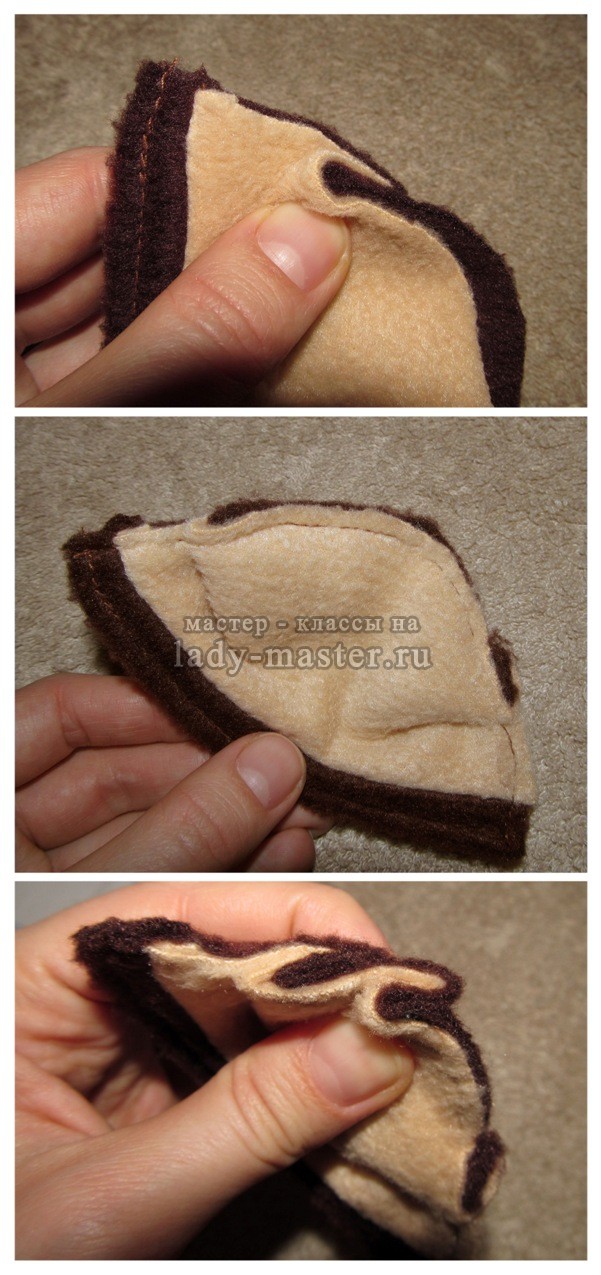
14. We act on the principle exactly the same as when creating cuffs on shorts. We turn the sand fleece inside out, fold it to the wrong side of the hood and sew it again at a distance of 5 mm from the edge of the fabric. Here we have such a cute hood.

15. On the front part of the vest in the middle of the neck, we make a cut to the patch itself. This is necessary so that the child's head can easily fit into the suit.

16. The edges of the cutout need to be processed. We do this by analogy with the cuffs and hood. For this purpose, I took the brown jeans that were left over from the overalls and cut out of them two strips 3.5 cm wide and 6 cm long (along the length of the neckline). She swept over pieces of fabric.

17. Let's start processing the edges. Wrong side put a strip of jeans to the edge of the neckline and attach. Then we wrap around and make a line again.

18. Do the same with the second edge. At the bottom, sew the edges of the cutout to the pattern of the bear's footprint with exactly the same kind of stitching that the pattern itself was sewn on so that all together it had a beautiful and finished look.
 19. Overcast the bottom of the hood (the one that connects to the neck of the vest).
20. Finally, connect the two parts of the vest at the shoulders - front and back.

21. Using a basting hand stitch, sew the hood to the neck of the vest. During the procedure, constantly check the correspondence of the lengths of the parts. Fleece is very stretchy, so small size inconsistencies can be easily corrected by slightly stretching a certain part. First sew one half of the hood (connecting its middle to the middle of the neck), then the other. This way you avoid distortion.

22. Stitch the hood to the neckline. Pay attention to the bottom photo - the seams are very thick. But they are at the neck of the child. In order for the baby to be comfortable, we will now eliminate this drawback.
 23. Bend all the seams on the neck down and zigzag with brown threads. So the seam inside will become neat, and outside it will be almost invisible.

24. Baste the side seams of the vest and measure it on the child. If all is well, then proceed to the next step of the master class. If not, and he suddenly turned out to be too small (as in my case (well, there is a hole in the old woman), then make side inserts of sand-colored fleece in the vest. Cut strips of the appropriate length and width from this fabric so that they reach from the bottom of the vest to its armhole.Overcast them and stitch them to the sides of the vest.

25. Now we will process the armholes. We fold the edge of the fabric inward and sew.

26. Now you need to stitch one side of the vest. After that, we process its bottom: we bend the edge inward and make a line.

27. Finally, we grind the second side of the product. The vest has acquired an almost finished look!
28. On the wrong side of the hood, 1 cm above the neckline, on its edges on both sides (in sand-colored fabric), make cuts 8–10 mm long with scissors. Hand-handle them and use a pin to thread the lace there. Now our hood can be tied and tightened. The vest is ready, and we are starting the most interesting thing - sewing the bear's muzzle on the hood of the suit!
29. Now we will sew bear ears with you. To do this, you need a corset tape of any color. Cut two pieces 12 and 7 cm long.
30. According to the patterns shown in the photo, cut out two parts. The larger one should be brown.

31. Fold the parts as shown in the photo, right sides to each other and sew in a straight line.

32. From the wrong side, place a corset tape 12 cm long on the brown fleece to the very seam and stitch it. Sew the second tape in the middle, perpendicular to the first. Fold the fabric in half as shown in the photo so that the ribbons remain inside. Connect the edges of the fleece evenly. As a result, you will get a blank bear ear with a brown edging on top.
33. Make large folds along the edges and stitch them. Make another fold next to each other and fix them by hand. On a typewriter, this is quite problematic due to the small size of the parts.
 34. This is the ear you should get. Thanks to the corset tape, it will keep its shape and turn out to be tight. The beige fleece will be inside the ear, the brown fleece will be outside. Make the same second ear.
35. Hand sew the ears to the hood.

36. Now let's make the eyes. To do this, you need a sewing white tape. This is great because it can be erased, just like the permanent markers with which we will draw the pupils later. I found a rather narrow such ribbon, so I sewed its pieces together. Then I cut out ovals and drew eyes. They must be basted on the hood, and then sewn on a typewriter in a circle with white threads.

37. Making a nose! Take any black fabric, stuff it with cotton wool and manually sew a round spout, then attaching it to the hood.

38. In the same way as the nose, we make a tail, but we will take sand-colored fleece for this. We sew it to the back of the shorts.

39. Done! Here is such a wonderful, and, most importantly, unlike anyone else, I got a New Year's teddy bear costume!

And my child really liked it and then he spun at the mirror for a long time and admired himself!

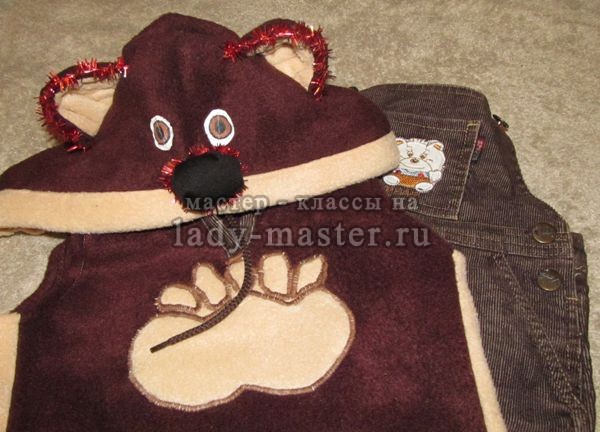

I'm just sure that with such a detailed photo instruction you will get a costume no worse, and maybe even better! Ears and tail can be decorated with tinsel, giving the product a truly festive look!
New Years is soon! And this means that a series of corporate parties, masquerades, children's matinees will come. The most important participants in Russian New Year's fun are Santa Claus and the Snow Maiden.
But the main characters often in Russian epics are a brown bear, and a hare, and a fox, and of course a gray wolf. As a rule, the role of a fox or a hare is suitable for a girl's New Year's costume, and a bear cub or a gray wolf is suitable for a boy's New Year's costume.
DIY Christmas costumes for children
It is not difficult to make an outfit with your own hands, but it is important to have good artificial eco-fur in your hands, as well as patterns, scissors and a sewing machine.
As a rule, there are quite a lot of patterns of New Year's costumes on the Internet, besides, making an outfit does not require special skills of a clothing designer. It remains only to collect the idea into one whole. So let's get started? But first, we recommend watching a video on how to make a New Year's costume for a boy or girl with your own hands:
bear costume
Gorgeous bear fur should be in the foreground.
bunny costume
Coward Bunny gray
Jumped under the tree.
Sometimes a wolf, an angry wolf
trotted through
Perhaps the most courageous participant in every Russian fairy tale. He spent both the fox and the wolf 
fox costume
The cunning and red fox is a participant in almost every holiday. And how you want the costume to be as alive as possible. And you can fulfill such an idea, but using high-quality artificial fur 
Outfit of the Snow Maiden
Despite today's popularity of Disney characters, it will always be relevant, especially among those who are not enthusiastic about secondary roles. In order to make a Snow Maiden outfit, you need to get a blue children's dress, which can be easily turned into a New Year's outfit: we sew snowflakes on it, we trim the bottom of the sleeves and the hem with faux fur 
Christmas dog costume
On the eve of 2018, the New Year's costume of a dog will be especially popular, because it is this animal that will be the symbol of the coming year. Such a costume can be purchased at the store, or you can easily make it at home with your own hands, without putting much effort. 


To quickly make a New Year's dog costume, you do not need to spend a lot of money.
For the outfit you will need:
- a hat or cap: it should be without a pattern, preferably brown, sit tightly on the child, but at the same time not be tight and not squeeze the head, because the suit should be not only beautiful, but also comfortable;
- fur: can be taken from an old unnecessary fur coat, unsuitable for further use; the image of the dog directly depends on the color of the fur;
- vest: in order not to spoil the new product, you can make a vest yourself, taking the old one, you can even make it a few sizes smaller; it is not necessary that it covers the entire back, because then it will look ugly and look more like a long fur jacket;
- trousers or leggings of a dark color, preferably also brown;
- an unnecessary old toy: necessary in order to cut out the eyes that will be attached on top of the hat; the larger the eyes, the more beautiful the muzzle of the dog will look;
- knitted ribbon is needed for edging, it will give a little shine, beauty.
Step-by-step instruction:
We cut out a strip for the tail from the fur, sew it along (fur inside) and along one short side, turn it right side out, sew it to trousers or shorts.
We sheathe the edges of the vest with a ribbon or a strip of fur.
We cut out 4 details of the ears from the fur, sew them in pairs along the contour with the fur inside, turn them inside out and sew them to some kind of hat.
The original New Year's dog costume is ready! It will take quite a bit of time to make it. If you know how to sew, then the costume can be sewn independently from and to.
gnome costume

So carnival the costume is suitable for a boy up to a year, and a girl. It will consist of three main parts:
- shirts
- cap
How to make them:
- The cap does not have to be sewn, it can be glued from cardboard. But for the baby, it is still worth choosing a soft material so that the baby is comfortable. Making a cap is very simple - roll a piece of fabric into a cone and sew it with a sewing machine.

- A beard in the form of a triangle can be cut from any fabric (it is better to use felt). Fur is then sewn onto this blank. If you wish, you can sew the beard to the hat so that it does not fall off the baby.
- Make a coat for the dwarf. Any fabric can be used. A child's blouse is suitable as a pattern. Circle its contours on the fabric, cut out the resulting blank and sew the upper part of the little gnome's costume.

snowflake costume

To make such an airy snowflake costume, you will need:
- White lining
- Medium hard tulle or organza
- Elastic band (its width should be 2 cm, and the length should be 5 cm less than the girl's waist)
- White T-shirt
- hair hoop
- White ballerinas
The process of creating a skirt and an openwork necklace for a future snowflake is very simple:
- For a skirt, we prepare a “flared sun” pattern - we cut out a circle from the lining fabric with a hole in the center for the waist. We tuck the bottom of such a skirt and hem it on a sewing machine.

- We cut out the upper part of the skirt with tulle or organza. We cut out exactly the same blank as for the first part. We make a smaller tulle pattern for a necklace that will be sewn to a T-shirt.
- Now we sew the two parts of the skirt and sew them to the elastic.
- We make a crown for a snowflake: glue artificial fluff or fur on a regular hoop. We also prepare cardboard snowflakes for it. We recommend topping each snowflake with sparkles for beauty.

- We sew white artificial fluff to white ballet flats.
wolf costume


Snowflake costume
A real symbol of the New Year and winter, a very feminine image in which any girl looks just wonderful, is the New Year's Snowflake costume. Most often, parents of little girls stop at this idea, because babies in a short dress trimmed with rain look simply charming. So, how to make a New Year's Snowflake costume? In this case, it is better to take a light dress made of light or silver fabric as a basis, you can choose material with lurex - it will look good and resemble snow that shimmers in the sun. The outfit is decorated with snowflakes, rain, sparkles - whoever is in what much.

New Year's squirrel costume
Not a single New Year's children's party is complete without such a character as Squirrel.
In the photo, the children's New Year's costume for Belochka looks bright and elegant:
The main attribute of the attire of this furry animal is a large and fluffy tail, pulled up.
That is why work on creating such an outfit for the New Year should begin with a pattern of a luxurious tail:
Draw a tail on cardboard, cut it out.
Transfer the pattern to a piece of red, gray or brown fur, fix it with pins and cut it out. Do not forget about the seam allowances - add 1.5-2 cm on each side. Sew the details of the tail on the sewing machine.
The finished tail will need to be securely attached to the suit. To do this, it is important to make a fastening system: sew a button from the wrong side to the tail, thread a fishing line into it. Turn the tail out, bring the ends of the fishing line out.
Further, in order to fix the tail in a vertical position, it is necessary to make another design: cut three pieces from a wide elastic band - two on the shoulders of the child, the third - to fix these two parts on the back. Tie the ends of the fishing line that hold the tail to an elastic band located in the middle of the child's back.
For the squirrel, you still need to make ears. To do this, take two hangers, a headband, some fur, organza and an orange satin ribbon. Wrap the rim with a satin ribbon, fixing its edges on both sides with glue. Cut out two ears from the shoulders, wrap them with organza so that on one side it is folded once, on the other - twice. Then carefully sew them to the headband with the side where the organza is folded once. Sew some fur to the tips of the ears.
As a costume for Squirrel, put on a turtleneck and a skirt of the same color as a ponytail. If there is a fur vest, it will be a great addition to the New Year's outfit. Ugg boots are perfect for a suit, you can buy them here: https://uggsonline.ru/zhenskie/. This online store has a large selection of uggs in all sizes and colors.
In these photos, children's New Year's costumes for girls are presented in a wide variety of options:
Having spent a little time on making a costume, parents will bring unforgettable joy to their baby. Find this time and please your child.
Happy New Year, may your little one's dreams come true!
Moms dress their children with cute animals for the holidays. The image of a teddy bear for a boy is more than ever welcome.
Today's master class is devoted to the question: how to sew a bear costume with your own hands for a boy.
DIY bear costume for a boy: materials and tools
The fabric from which the suit is sewn should be breathable, and if it is faux fur, then the knitting should be loose and loose. This is in case you want to sew a suit out of an old thick plaid that looks exactly like a bear skin. If the material is too dense, the child will sweat quickly. In this state, the baby will not want to have fun at the holiday. For the same reason, this master class offers a separate version of the suit, where the vest and pants are sewn separately.For sewing, you will need the following materials and tools:
The top or front fabric is brown or beige, terry or fleecy (the length of the pile does not matter);
The bottom or inner fabric does not matter what color, the main thing is that it be made of natural material (linen, poplin, satin, cotton);
Plastic eyes and nose to represent a muzzle or ear rim;
Strong threads, scissors, measuring tape, sewing machine.
If you have a plain natural dense fabric or satin, then the bottom or inner fabric is not needed.
DIY bear costume for a boy: a separate costume
For this costume, you will need to sew a vest, shorts or pants and a hat or ears on the headband. Boots and mittens are sewn at will. A child without them will look like a bear. At the request of the parents, the image can be supplemented with little things.So, for example: a vest can be sewn both with ties and one-piece, with a bow around the neck and a fabric of a different color on the chest and stomach.
Option 1
Here is a solution for making a costume can be offered from brown satin fabric.For this product you will need a piece of fleece fabric, satin fabric, a red bow or fabric on a bow, and a wide elastic band.
Stage 1
Before drawing the pattern, measure your child with a measuring tape. You will need to know the height of the jacket (from shoulder to hip), sleeve length, arm circumference, collar circumference, shoulder width (from collar to shoulder angle), chest circumference. For pants: thigh circumference, leg length from the waist to the ankle (if these are shorts, then to the knee), the length of the inside of the leg (from the groin to the ankle), leg circumference.
Stage 2
Measure the fabric, draw the details and cut them out of the fabric. You should get: two parts of the jacket (front and back), two parts of the sleeve, two parts of the pants. Note that the front of the sweater should be cut out of the fleece fabric.
This pattern of pants is the easiest and fastest.

Stage 3
Sew together the front and back of the jacket. Sew the sleeves into the arm holes.
Sew the details of the pants together along the upper side cuts. Scroll the product so that the seam lies between the parts, and the two parts lie on the sides of the seam folded in half. In this position, stitch each piece separately. This seam will go between the legs.
Stage 4
Tuck the cut-off part of the sleeves and the bottom of the sweater and sew, stepping back from the edge one centimeter. Fold and stitch the waistband and leg opening in the same way.
Insert a wide elastic band into the sleeves and waist on the jacket. Insert the same into the pants at the waist and legs.
Stage 5
Sew a ready-made butterfly to the neck. If you do not have a purchased butterfly, then you can make it yourself.
You will need a 20 x 20 cm square of fabric for a bow and a 5 x 10 cm strip of the same fabric. Sew together two opposite edges of a large square and turn the seam so that it lies in the middle of the resulting tube, and not on the side. Turn inside out and iron the fabric tube.
From the strip, in exactly the same way, make a small circle. Insert a large circle into a small one and stretch exactly to the middle. Butterfly is ready. You can safely sew it to the bear costume.
Option 2

For this type of costume, the vest is worn wide open.
Stage 1
Choose a fabric and apply vest details to it. If you chose a fabric with faux fur for such a suit, then a natural fabric lining is usually sewn on its inside. And this means that if you sew in the lining, then the patterns must be duplicated. That is, the drawing of the details is applied both to the front fabric with artificial fur, and to the lining or inner.
For sewing, you need to get two parts of the front side and one part of the back side of the vest from the front part and exactly the same parts from the inner fabric.

Draw the outline of the details for sewing pants or shorts on the fabric.
Stage 2
Cut out the resulting parts and sew together the parts from the inner fabric and separately from the outer fabric. The vest is sewn on the shoulder and on the side.
It’s worth mentioning right away that shorts or pants are sewn according to the same principle as in the first version of the suit.
Stage 3
If you are sewing a product without a second inner layer, then turn all cut edges (sleeve, neck, hem, trouser leg and belt on pants) inward by one or two turns and sew, stepping back from the edge no more than one centimeter.
If you decide to sew a suit from two layers (inner and outer), then assemble the resulting parts together. Fold the pants sewn from the inner fabric with the pants from the artificial border right side to the front. Sew along the cut edge, namely at the waist and at the legs. Do the same with the vest.
Leave a small piece (15-20cm) unstitched. Turn your pants and vest inside out through these holes. Hand-sew the unstitched section of the fabric with a blind seam.
DIY bear costume for a boy: hat or headband with ears
In order to make it clear that you have a bear in front of you, and not another animal, you need to sew a hat with the face and ears of a bear.Stage 1
In order to sew a bear hat, you need to measure the circumference and depth of the child's head.
Stage 2
Apply a pattern of a hat, ears and muzzle to the fabric according to the following pattern.

Stage 3
Cut out the resulting parts and sew together. Pre-sewn ears are inserted into the ear holes, and the seam is stitched on a sewing machine.
Turn the bottom edge of the hat over and sew around the entire circumference.
Stage 4
Sew the muzzle onto the front of the hat, leaving a small section unsewn. Through it, push a lot of filler under the fabric and finish the left segment. These will be the cheeks of the bear. He has large ones, so the larger the shape, the better.
Sew the nose and eyes in place. The hat with the bear's face is ready.
If you don't feel like messing around with sewing a hat, you can make bear ears and attach them to the rim. 
According to the scheme above, only the ears are cut out and sewn together. The bottom edge is not stitched. The ears are turned inside out and put on the rim with the lower edge. Sew up the cut edge so that the rim remains hidden inside between the fabrics.
I'm sitting, sewing a New Year's costume for the youngest, to the kindergarten for the Christmas tree. Parents were given a task: girls - snowflakes, boys - forest animals. I decided that there would definitely be bunnies for sure, it means that we should be a bear (the wolf, fox and hedgehog somehow didn’t look to me). Thinking that I don’t want a suit in the usual sense (a satin or fur jumpsuit or a shaggy vest), I decided to sew trousers and a sweatshirt from velor (well, almost fur) and a hat-mask, especially since everything was at home and was waiting for its hours.
Based on this MK, you can sew a hat for any animal, changing only the ears and appliqué.
Well, let's start.
We will need - elastic material for the hat (to better fit on the child's head), felt and a sewing machine.
I took the hat pattern from the free Ottobre magazine, I just removed the extra seams. I drew the muzzle of the bear I needed and made its pattern.


1. We cut the hat, I made one seam at the back of the head and tucks, the rest was closed. We cut out 2 details of the cap (if the lining is made of the same material) and details of the muzzle from felt and ears (details of the ears from felt cut without seam allowances). I grind a tuck on the forehead on the top part of the hat (not on the lining).


2. I sew the details of the ears, placing a little velor on their round part, in order to turn them inside out, a dark edging forms on the front side. I put the finished ears to the right and left tucks and grab them by the very cut of the seam of the cap, so that there is a general impression of the muzzle.


3. I attach the nose and pupils to the muzzle blank and place it in the right place on the forehead near the cap. I sew with a regular line on a typewriter.


4. Next, I mark the places of the seams on the muzzle and sew with contrasting threads. I embroider highlights in the eyes and dots on the cheeks with French knots.
Well, you can already see what we can do.


5. I stitch the top of the cap and the lining along the line of the face, then I sew up all the tucks, including those on the lining. Lastly, I grind the seam at the back of the head, leaving 7-8 cm unsewn in the lining in order to turn the hat on the right side.

Carnival costumes are a mandatory attribute of most children's parties, but at each of them the child may want to try a new look, and this is quite expensive. Therefore, parents try to sew costumes on their own. For example, you can create an image of the owner of the forest - a bear - in several ways, varying in degree of complexity, but each of them perfectly conveys the intended character.
We sew a New Year's bear costume for a boy

If you know how to sew, especially working with dense and heavy fabrics, you can start making a bear costume from scratch. But this will take a lot of free time, which is usually already in short supply, so for those who need an easier way out, there are several simple express options.
- Firstly, you can always use the things in the house and do their “transformation”. In particular, for the New Year's bear costume, you will need a loose jacket with a long front zipper, and it is desirable that it be with a hood. Also useful are straight wide trousers in brown or white, made of soft material (for example, fleece). The shade of the jacket does not play a special role, since it will be greatly modified. In the store, all that remains is to purchase a sufficient amount of brown or white fleece, find suitable threads and related tools - scissors, soap, pins, etc.
- The dimensions of the cut of brown or white fleece are calculated in advance: the fabric should be enough to completely cover the original material of the jacket. You don’t need to build a preliminary pattern, since you already have a frame, and you just need to “wrap” it with a new layer. A jacket is laid out on a stretched and ironed fabric, first the front and back are circled along the contour, then the hood, and then attention is paid to the sleeves. All the details must be cut out, not forgetting about the increase for the seams, and carefully sewn over the sweater.
- Particular attention is paid to the hood, i.e. future bear head. To arrange it properly, 4 circles with a diameter of 15 cm are cut out of brown fleece. They need to be folded together in pairs with the front sides inward, sewn so that only 2-3 cm of the edge remains intact, and turn out through this hole. These will be the bear's ears: inside they are filled with either a dense synthetic winterizer or scraps of other fabrics. In the middle on each "ear" you need to place a circle of lighter fleece, with a diameter of 7-9 cm. After that, the "ears" can be sewn to the hood, with the hole through which they were stuffed down. Additionally, from 2 small circles (diameter 6-7 cm) of black color, sewn together and also stuffed with padding polyester, a nose is obtained. Eyes can be drawn or embroidered with dark threads.
- The last detail of the bear costume is mittens that will imitate his paws. The sewing technology is very simple, and even a pattern is drawn in a matter of minutes. It is enough just to circle the child’s palm along with the fingers, making a small increase so that his hand feels free inside the thing. From the same brown fleece, parts are cut out, which are again connected in pairs with the front sides, sewn together and turned inside out. On the inner sides of each mitten, you need to place smaller copies of the same pattern, made in a lighter shade - these will be the “pads” on the paws. And in order to keep the mittens on children's hands, the edge is bent, turning into a drawstring, and a simple linen elastic is inserted into it.
Read also:


If you still decide to sew a children's bear costume from scratch, you will need to build a pattern. In fact, there is no single pattern for such a suit, because it can be one-piece and separate, certain details can vary in it, so choose from the existing assortment what you can do.
The general components of the image of a bear are a free top and bottom, soft slippers, paws, mittens, round ears that can “sit” on a cap or on a rim. Additional details like ears and mittens have been discussed above, and now you need to pay attention to the main things: the top and bottom of the suit. These are wide straight pants that can even be combined with slippers, and the same wide jacket, also often sewn with mittens. To complete the image, it is recommended to add a round belly pillow to the jacket to make the bear plump.
The pattern of the upper and lower parts of the suit are standard patterns of simple trousers, the legs of which can be gathered at the bottom with an elastic band, as well as a classic pattern of a long-sleeve sweater with a zipper. Allowances for fabric shrinkage and seams are determined based on a specific type of material: for a bear costume, it is recommended to choose soft, loose options - for example, fleece, or fabrics that imitate fur. But since the child can be hot in the latter, it is better to use them in separate areas: a hat, back, neck trim.
If you want the suit to be one-piece, be sure to insert a hidden zipper into the side seam. Putting it in the middle of the “torso” is unreasonable, since often in the abdomen there is an additional bear’s belly, which cannot be divided in half, and the expanding chest may not be enough for the baby to remove the costume painlessly.
It is possible to add volume to the bearish body not only due to the pillow: in a one-piece suit made of trousers and a sweater, a whalebone or other rigid corset-type frame connected in a circle is inserted into the junction (often close to the hip bones). But such technology is more suitable for a suit for a boy of 8-10 years old: it will be inconvenient for a preschooler to move around in such clothes.

An interesting express method for creating a polar bear costume is suitable for parents of kids of 2 years old. To bring it to life, you need a large toy polar bear, equal in height to your child. Carefully, several seams open at the toy: the one that connects the head and torso, and the middle or lateral one. As soon as the bear can be “opened”, all stuffing material is removed from it, and the toy is stretched by hand.
Since such products are not intended to be worn on the body, care must be taken to ensure that the baby is comfortable in such a suit. Therefore, you will need a soft, but not warm (the material of the toy itself is already dense) fabric in such an amount that is enough to create a full-fledged back layer. You don’t have to worry about special care regarding cut parts or seams: the main thing is that they do not cause discomfort to the child when they are adjacent to his body.
A zipper is sewn into the side seam so that the suit is easy to put on and take off. The seam connecting the torso and head of the bear is not connected back. The free edges of the fabric must be processed to prevent them from shedding, a thin elastic band is sewn into the edge related to the head of the toy, corresponding in length to the girth of the child's head. If necessary, you can make a tightly stuffed bear belly out of 2 fleece circles connected into a round pillow with a padding polyester inside. This pillow is sewn in the center of the body from the front side, the seam is applied hidden.
The latest quick version of the children's polar bear costume is no longer focused on reworking old things, but has a simple tailoring technology, so any mom can do it. The entire costume will consist of a vest, short pants, a hat and mittens. How to build the last 3 elements was described in detail above. If you do not have the opportunity to make a full-fledged hat, you can do with simple round ears stuffed with batting and attached to a plastic rim, which must be covered with the appropriate fabric.
The vest is a traditional sleeveless jacket: a solid back, separate front halves, fastened with a button or hooks. Here it is already recommended to work with fabrics imitating fur, since fleece will not be enough, and due to the openness of the suit in the fur “shell”, the baby will not overheat. The vest has only 4 seams: 2 side seams, connecting the front halves with the back, and 2 upper ones, located on the shoulders. Additionally, the edges of the parts are processed, especially the opening for the hands and the neck. The hooks are sewn opposite each other on the front halves, from the wrong side, so that the fixation is hidden.
Of course, you can buy a fancy dress in the store. The choice there is simply huge: the traditional costume of a bear or a hare hangs next to the outfit of a robot, Zorro or Spider-Man. But modern costumes are not cheap, not every family can afford such a purchase. And okay, if a costume was required only for the New Year, in many kindergartens all themed matinees are held in costume. And for children's birthdays, they are often asked to bring a child in a costume. So if you like it or not, but many mothers have to take up a needle and scissors and remember what they were taught at school in needlework lessons. But not everything is so difficult, even a novice craftswoman can sew a bear costume.
"Fast" bear costume
This costume is suitable for a matinee in the garden and can be made in just an hour. The outfit consists of ears, mittens, a ponytail and a bow around the neck, like a bear from the cartoon "Masha and the Bear". We will need a small patch of satin, brown faux fur, a thick headband and a couple of safety pins. We make a bow tie from chintz. From the fur you need to cut out the mittens, ears and tail of the bear. Then cut off a strip of material, sheathe a bezel on it, attach ears on top. You can pre-seal the ears and tail with padding polyester or cardboard. We attach the butterfly and tail to the child's clothes with safety pins. The bear costume is ready!
Carnival bear costume
It will take a little more time to sew this costume, about four hours. For him, you need to take 80-100 centimeters of faux fur, a piece of leatherette, artificial eyes from a needlework store. We measure the volume of the child's head and cut it out. We make a nose out of leatherette, ears out of fur, sew them on a hat and glue the eyes. We cut out from the shorts, vest and mittens. We sew a fur tail to the shorts, glue triangular claws cut out of leatherette on the mittens. To prevent the paws from falling off the child, you can insert an elastic band into them in a circle.

Jumpsuit with hood
Sewing such a bear costume is somewhat more difficult than the previous ones, but the result will be excellent. If you take white faux fur instead of brown, you get a polar bear costume. Most likely, the child will ask that the outfit be dressed for him not only on holidays, but also for everyday games. The basis of the costume is a jumpsuit. Patterns that match the age and size of the child can be found in needlework magazines or on the Internet. And you can lay out any jumpsuit from the baby’s wardrobe on the fur fabric and circle it, not forgetting to leave allowances for the seams. Do not worry, the fur will hide all the flaws. Mittens for this costume can not be cut out. The front of the bear costume must be fastened with a zipper, internal buttons or snaps. You need to insert elastic bands along the edge of the legs and sleeves, sew ears on the hood, and a ponytail on the ass.
The need to bring a son in a carnival costume to a New Year's party puts parents before the choice of buying or making their own holiday attire. In terms of labor savings, the easier solution is to go to the store. However, spending family money on a one-time purchase is an irrational step.
Preparing a costume on your own scares many parents. But practice shows that a suitable outfit can be prepared in a couple of evenings. A good choice would be the image of the unofficial national symbol - the bear.
What should a children's bear costume consist of
The first association with the bear's carnival outfit is a baggy faux fur jumpsuit. It looks the most beautiful, but it will be difficult for a child to stay in such warm clothes for a long time. For this reason, it is worth stopping at a more comfortable option, which is sewn from fleece fabric.
Despite the fact that in nature there are several colors of these predators, traditional brown material should be chosen as the basis for the costume.
The outfit itself will consist of the following parts:
a hat imitating a bear's head with ears, eyes and a nose sewn to it;
fleece vest;
old pants of a similar color that can be shortened and hemmed at the cut.

Materials and equipment for tailoring
For the costume you will need fleece fabric, padding polyester, brown threads, glue, a sewing needle and scissors. Faster and better work will come out when using a sewing machine. In the absence of this device at home, it can be temporarily borrowed from friends or acquaintances. You can use faux fur for the tail.
As a basis for the bottom of the outfit, the son's old pants are suitable. It is desirable that they be dark gray or brown (it is better not to use bright trousers).

Breeches preparation
The lower part of the outfit will have to be shortened due to the fact that the old pants have become small for him in length. At the first stage, you need to cut off unnecessary parts of the trousers with scissors. If it turned out not quite exactly, the error will be corrected. After that, you will need to cut the inner seams of the legs from below by 5-7 cm and measure the width of the trousers in this part.
The resulting elements are sewn with a machine, first from the outside of each leg, and then from the inside. After that, the previously ripped seam over the fleece should be restored. As a result, a brown edging will be obtained at the bottom of the breeches.
For the tail, you will need a round piece of faux fur to match the suit with a diameter of about 10 cm. It should be stitched around the circumference, pull the thread and fill the resulting cavity with synthetic winterizer. After that, the tail can be attached to the back of the breeches.
The preparation of the bottom part of the outfit is completed!

Sewing a vest
The vest can be made solid, since this option is sewn from 2 fabric elements.
As a sample for the pattern, a son's T-shirt or sleeveless jacket is suitable. It should be reproduced on paper with a margin of a couple of centimeters, which will be “eaten” by the seams.
When the fabric is cut according to the drawing, you can begin to stitch the resulting pieces of material. It is important to follow the smooth direction of movement in the process of using the machine. Having connected the resulting parts on the sides, you should ennoble the vest from below, carefully tucking it in this part and securing the resulting bend with a seam from the inside.

Making a hat
By analogy with the previous element, you can sew a fleece headdress according to a pattern made on the basis of a boy's knitted hat. The technology completely repeats the manufacture of the vest. After that, only the last details will remain: ears, nose and eyes.
Any old soft toy can act as a “donor” for the eyes. They can be attached with glue, or with threads, if there is a corresponding hole.
The ears are made from pieces of round-shaped fleece, pulled together around the perimeter and stuffed with padding polyester. Small incisions are made in the upper part of the cap, where the ears will be. They are fastened with seams.
The nose should be black and resemble a potato. Any fabric that needs to be folded and stuffed with padding polyester is suitable for it, after which, sew to the bottom edge of the front side of the cap.
To create a comfortable costume for a children's party, extraordinary abilities are not required. Sewing can be turned into a pleasant and fun activity if you involve the whole family in it!

A kind fairy-tale bear is a frequent guest at children's matinees. Therefore, many kids are happy to try on the role of a brown giant. It is hard to find the original bear mask in stores. A good option would be to make it yourself. How to make a bear mask with your own hands, you can find out in the proposed master class.
Depending on the availability of free time, a method for creating a mask for a child is selected. The foam bear head looks the most bright and presentable.
Necessary materials
To create a children's toy, you must use only safe materials. For children under 5 years old, it is better to choose whole natural fabrics, without lint or synthetics added. It is also recommended to do without accessories in the form of buttons, sequins and other things. If a toy is made for an older child, then the fantasy is limitless here, as is the choice of material.
Soft toy fabrics
Knitwear is ideal for sewing toys for the little ones. It is an elastic and practical material, from which it is very easy to make a toy, it is safe. It is easy to wash and does not lose its shape, does not require additional processing, and thanks to the variety of colors, the toy will turn out to be very effective.

Another fabric often used for tailoring is silk.. This is a capricious material, when working with it, patience and accuracy will be required. But products made of silk are very beautiful and durable. It is also used for decoration, but can also be used with a solid fabric. Requires gentle washing and gentle drying.
And the most popular material for sewing soft toys for the little ones is cotton fabric.
It is very diverse, inexpensive and is used everywhere. It is very easy to work with, it has increased durability and strength, besides it is safe, and stains and dirt are removed quickly.
For older children, you can use other fabrics, this is faux fur, wool, ideal for sewing bears, it will give the toy realism, and with careful handling it will last a long time. Other fabrics are also suitable, for example, velvet, velor, felt.
Other materials
To make a soft toy with your own hands, you will need not only fabrics, you need to have other materials, such as:
- Pattern and template, according to which the details of the toy will be created;
- Soft filler, you can use cotton wool, but it is recommended to take pieces of foam rubber, it will help to keep its shape longer;
- Threads and a needle, scissors;
- Thick paper;
- If decor is planned (when making toys for children over 5 years old), then buttons, sequins, ribbons can be used.
Plasticine products
Soft, flexible plasticine is the most popular material. Children are delighted with multi-colored plasticine blocks, from which wonderful animals can turn out. They can decorate a room or play a fun game. Use your imagination, because this is how creativity develops. Applications with the help of cardboard sheets and molded products will harmoniously fit into the interior.
Chanterelle
Use:
- plasticine orange, green, white and black;
- autumn leaf;
- stack.
From orange plasticine, it is necessary to blind the nose and ears, then the tongue. A round black nose ball is attached to the bump. From white plasticine, roll out the eyes in the form of a semicircle and from the green oval shape of the pupils. Then stick the tails of the leaves on the eyes, these will be the cilia.
The tail and paws are blinded from orange and cut out the incisions with a stack. Attach all the accessories to the material and plant the fox on the autumn leaf.

Penguin
You will need a plasticine knife and colors of different shades.
Roll the head and two wings out of black. From orange - two paws and a nose. For the eyes, you will need two round round cakes and two small black balls. Stick on a bump and the penguin is ready.

Hedgehog
You will need fluffy spruce or pine cones of an elongated shape and multi-colored plasticine.
From brown, roll up the muzzle of an oblong shape and stick it. In the form of sausages, build two paws. Make eyes out of white and black.
Complete the hedgehog with a filling apple and a pretty mushroom on the back.

Important nuances
To sew a soft toy, you need to accurately make a fabric pattern using a template. This is an exact copy of the details of the future product, depicted on paper, which is then transferred to the material. Each toy has its own set of patterns, but you can draw it yourself. Then you should cut them out and fix them on the fabric with the help of tailor's needles.
Before making the toy, wet the selected fabric and dry it. This will help to check if it will shrink on the first wash and if the toy will lose its shape. If this happens, it is recommended to wash the material before sewing, dry it, and only then proceed to work.
Decor on the theme of autumn
The beginning of classes in schools and kindergartens makes parents think about new crafts. The bright colors of autumn are inspiring and uplifting. Come up with a lot of interesting things that will please the eye.
Basket
To work you need:
- cones (about 50 pieces);
- hot glue;
- wire of two sizes;
- cardboard.
Basket weaving starts from the base. Wrap a thin wire around the cone and twist the two ends of the wire. Attach the second and also wrap and twist with wire. You will get a ring with the fluffy side inward. Next, create a second row, but two pieces less. You can add a third if you wish. All blanks are glued together.
For the handle of the basket, it is necessary to make a frame of thick wire and fix the material on it with a thin wire. Next, connect to the base. The bottom of the basket can be made from cardboard and glued.
autumn bouquet
It is necessary to prepare:
- hot glue;
- wire;
- scissors;
- tapes;
- beads, sequins;
- paints.
Attach cones or beads to the ends of the wire with glue. They can be dyed or sprinkled with glitter. Connect individual long sticks or branches into a bouquet and tie with a ribbon. Fill the resulting void with satin bows and acorns. You can put this wonderful bouquet in a vase or give it to your loved ones.
colorful bouquet
For such decoration use:
- branches of the desired length;
- hot glue gun;
- paints and brushes;
- oilcloth (on the table).
Decorate the branches and set aside to dry. Next, you need to paint the material with a brush or pour paint into a glass and dip it. Wait until it dries completely and glue the branches and cones together with hot glue. Got a flower.
Fasten the bouquet or put it in a vase, as shown in the photo. A light autumn bouquet with the scent of spring will delight the whole family.
Pattern toy Bear
Making a soft toy teddy bear is quite simple and easy on your own. To do this, it is enough to use any popular pattern.
A few tips on how to pick it up:
- All patterns can be divided into simple (with a minimum number of details) and complex (where additional design is required in the form of accessories and decor, these are dresses, ribbons, seam processing).
- Beginners should start with easier ones, these include: Barney bear (or a simple cloth bear), sock bear, Tilda-style bear.
- Other popular but complex sewing patterns are: Teddy bear, ballerina bear, polar bear, bear with babies.
Knitted option
The bear costume does not have to be sewn. Festive vestments can be knitted. Suitable threads are selected: boucle, velor, grass.

From ordinary wool, acrylic, cotton, it is better to knit an outfit with elongated loops. They draw a pattern of overalls, a vest or panties and a blouse, knit in any suitable way.
Making a bear costume is a good solution for a Christmas tree, carnival or other similar event. This is a completely doable task. Even if there is no needlework experience.

Workshops on making soft toys
Fabric teddy bear
One of the simplest patterns is the Barney Bear, transferred directly to the fabric, without the use of templates.

How to make a soft toy with your own hands without a template:
- Take a small piece of fabric and fold it in half exactly in the middle with the right side inward;
- Using a pencil, draw some rounded lines;
- You should start with the head - describe a small semicircle, then an ear, a rounded cheek, a slightly elongated paw, a slightly rounded belly and an elongated one leg;
- Cut strictly along the contour;
- Expand the material - the bear pattern without using a template is ready;
- Repeat all the manipulations exactly, so prepare its back;
- Sew together the two halves from the wrong side;
- Leave a small gap, unscrew the product and fill with filler.
There are other interesting patterns of a soft bear toy.
Felt bear
To make a felt toy you will need:
- multi-colored felt;
- Mouline threads;
- pattern paper;
- tracing paper;
- scissors and needles.
Performance:
- Select and transfer to tracing paper the template of the details of the felt bear, the scale must be respected and be 1:1. Also, everyone can show their imagination and draw parts of the bear's body on their own.
- After the drawing has been transferred to tracing paper, it is transferred to thick paper, observing the scale and every detail exactly. Thus, the template is ready.
- Then all the constituent parts are cut out of a dense sheet, and with the help of tailor's pins it is fixed on the fabric. Carefully outline with a simple pencil or chalk, remove the template and cut it out - the pattern is ready. Advice! perform all manipulations on the wrong side.
- Next, 2 identical parts are superimposed on one another and sewn together, leaving a small gap for the filler. They are turned inside out, the toy is evenly filled with foam rubber, cotton wool, padding polyester (optional) and sewn up to the end with neat stitches.
- After all parts of the bear's body are made, they are sewn together, and depending on the fantasy, eyes, nose, mouth are made.
One option for creating a face is to use buttons or sew on store-bought sequins. Many craftswomen embroider them from multi-colored Mouline threads using satin stitches. You can also cut out the nose, eyes and mouth from felt of a different color and sew them on with threads; for this, a chain stitch is most often used.
The final touch in the manufacture of felt bears is the decoration of the product. You can sew on several multi-colored ribbons, bows, sequins and a very bright and beautiful toy is ready.
Teddy bear from a sock
Making a teddy bear out of a sock is very easy.
For this, you do not need a pattern, it is enough to have materials:
- new sock;
- filler;
- needle, thread;
- scissors;
- marker.
Work algorithm:
- turn the sock inside out, put the heel up;
- the head is the bow, draw them with a marker;
- cut along the contour and sew;
- leave a small hole, fill the product with filler;
- we form the nose of the sock into a ball;
- evenly distribute and sew to the end, tightening the edges with threads;
- a rounded head is obtained;
- then the heel and part of the toe to the elastic is the torso and paws;
- the heel is the future hind legs, it must be cut strictly in half and form two limbs, sewn together, stuffed with filler;
- the front legs are made of elastic, simply cut out, sewn together and sewn to the body.
- then the ears are created, they can be made from the rest of the sock or take a new one.
- They can be made from elastic - just draw two semicircles and cut out, stuffed with filler and simply sewn to the head.
- For decor, you can use ribbons, buttons, sparkles, thus creating eyes, mouth, nose.
- From another sock, you can make a color for a bear, for this you need to cut out small round fragments and sew on the paws, muzzle and even the stomach - thus, get an unusual color.
Bear pillow
To create such a bear, you will need cotton fabric, soft filler, a sewing machine, and scissors. To get a more realistic product, it is recommended to take weave in various colors.
The first step is to create a pattern, it should be large enough, rounded. The head and ears are depicted, then they are cut out, the seam is sewn on the machine, the product is turned inside out and stuffed with soft filler, sewn up to the end. The material acts as a decor, it will be comfortable to sleep on it and so

Thus, the effect of the muzzle of a bear will be created.
Two round applications are cut out of a dark color - these are the eyes. They are sewn to the pillow with hidden seams or attached on a typewriter.
It is better to make the muzzle bright, it is any color to choose from, in the form of a large oval-shaped piece of fabric. A small round mouth is sewn to it.
For realism, you can sew on small front paws. They are made of the same fabric color as the pillow itself and are attached to its lower part, having previously been stuffed with filler.
Bear in Tilda style
This teddy bear is distinguished by its elongated body proportions and legs, and recently it has gained a lot of fans. To make a Tilda-style bear, you need to take a fabric made of bright sprint cotton, a pattern according to which a pattern, scissors, threads, a needle will be created, ribbons, bows often act as decor.

Transfer the template to the double folded fabric, leaving a small seam allowance. Sew together and turn right side out, then sew with a blind seam.
The peculiarity of this soft toy is that the paws are attached to the body with buttons, this allows them to move, creating a different position of the bear's body. The ears are sewn to the head, and the nose, eyes and mouth are created from threads, without the use of any decor. Ribbons or bows are an obligatory decoration for a bear in the Tilda style; you can also make original embroidery by hand.
Teddy bear
Making a soft toy Teddy bear with your own hands is a difficult task, so you should carefully study the algorithm before starting work.
How and where to start:

Work algorithm:
- Transfer patterns of details to a pile fabric, they must be in a mirror image;
- Cut them out, leave punctures for the paws to create fasteners;
- The ears and paws are made from two different materials, the outer side is made of pile, the inner side is made of cotton;
- Sew them together;
- Turn out, and then fill with filler;
- The next step is fixing cases;
- They are inserted into the space left in advance, these are cardboard discs with a hole with a bolt to be mounted (the body of a bear cub);
- A nut is also sewn into the limb, and then stuffed with foam rubber;
- The mount is carefully sewn into the limbs and torso, making them invisible;
- Next, you should screw the limb to the body, such an attachment gives the soft toy mobility;
- By analogy, do this manipulation on all paws;
- After the body of the teddy bear is ready, the eyes, mouth, nose should be embroidered with threads;
- Tie a bow or ribbon around the neck;
- Teddy bear is ready.
Bear-ballerina
To sew a bear - a ballerina, you need to take a dense material, best of all from a short pile. For heels, palms and the inside of the ears, you need to choose a soft fabric, for example, silk, cotton.

Patterns need to be made according to patterns, there will be a lot of details here, because. legs, palms, knees and shoulders are movable, they are sewn separately. In order for the pile to lie in one direction, all fragments of the bear are made in a mirror image, and then sewn together. They are turned inside out, stuffed with foam rubber and sewn up with a hidden seam.
The ankles, legs, shoulders and palms of the toy are movable, this is done with the help of a button fastening. There are 2 design options, this is hidden (when the stitches and buttons are sewn into the details from the wrong side) and external (they are sewn on the front side and look pretty cute, only the color of the fabric and the color of the buttons should match).
The loop is made on the body, and the button is sewn on the legs. Further, the loop is made on the arm or leg, and the fastening is sewn on the palm or ankle. To decorate the face of a bear - ballerinas most often use beads or multi-colored sparkles. A ribbon is tied around the neck, the same is attached to one ear.
A mandatory accessory for this toy is a ball tutu, it is created by hand and transparent bright fabric, such as chiffon, veils, cambric.
The cut should be short, it should be baited on a thread evenly distributed to get beautiful volumetric waves. Pull off the skirt at the waist of the bear, sew it up with a hidden seam, you can also insert a narrow elastic band, this will make it possible to change clothes at the ballerina bear.
Polar bear

In order to understand how to make a soft toy with your own hands, you will definitely need a bear pattern with the number of necessary details.
This soft toy differs from all the previous ones not only in color, but also in the fact that the bear stands on four legs. Therefore, tailoring a polar bear is different from the rest. The fabric should be chosen dense with a long hard pile, the pattern should be made strictly according to the pattern, performing in a mirror image. Sew fragments together, fill with filler through a small hole.
In order for the toy to be stable, it is necessary to fill the paws very tightly.
In one version, the polar bear is performed in a stationary state, the limbs are sewn to the body, and in the other, a hidden button mount can be made.
Bear with babies
To make a soft toy of this type, there are many options for patterns, it can be a bear in a prone position, and around it are several of her cubs. And also sitting with the offspring on his knees, or even standing. The complexity of this composition lies in the fact that you have to work with small details. The fabric can be varied, ranging from faux fur or regular cotton.
For sewing the family, movable fasteners are not used; all limbs are sewn tightly to the body. To create muzzles, buttons are selected from the mother, for babies, most often the mouth, nose and eyes are made out with Mouline threads or glued with small sparkles.
Children's decorations
Make a funny menagerie at home, because the child will be happy with new friends. Lots of funny crafts to make, from big bears to cute little hedgehogs and cone owls.
You will need:
- twine;
- glue;
- beads for the eyes;
- plasticine.
Wrap the twine around the bump for the head, after sticking plasticine on it, and the second for the bear's belly. Glue small eyes and paws onto the twine.
Squirrel
Necessary:
- hot glue;
- scissors;
- sample;
- felt of different colors;
- coin.
The step by step process is:
- Cut out the elements.
- Glue the eyes and nose onto the squirrel's face.
- Glue the tail on the other side.
- Glued a small coin to the base from the legs will give stability.
- Glue the parts of the acorn.
- Glue the paws and acorn and the cute squirrel is ready.

What stitches to use when sewing a soft toy?
Threads for sewing toys must be strong and must match the product. An exception happens only when it makes a looped decorative seam, it is used as a finishing seam and not only sews parts together, but processes the edges of the fabric.
To create a soft toy with my own hands, I usually use the following types of seams:
- External- they sew internal fragments, it should go in small stitches and look neat, there should be no gaps between them.
- Looped seam - the thread is passed through the loop over the edge of the fabric and tightened, thus, loose fabrics are processed and the details of the pattern are sewn together.
- Secret- the thread with a needle should be inserted into the fabric from the inside, having previously folded the edge of the material together. The stitches are made small, neat, it is necessary to ensure that the needle and thread go exactly along the line, without going to the front side.
- Docking seam - in this way a button and some other accessories are sewn to a soft toy, as well as fragments, these are limbs, a head, a tail, etc. They are sewn with small stitches on the front side, passing the needle through the fabric.
Photo of do-it-yourself bear costumes
Please repostWhat is better to make the eyes and nose of a bear
Most often, buttons are used or sequins are glued, but sometimes Mouline threads can be used to decorate the muzzle. To do this, you need to master the embroidery method. The most common of them is the smooth surface, the stitches are made even, tightly adjacent to each other. Cross stitching is also used, this is the easiest way.
For some toys, the application method is used.
Here it is necessary to cut a small blank from a fabric of a different color and sew a pattern using a buttonhole seam.
Manufacturing process
Making life-size puppets with your own hands is a creative process that requires a lot of time and perseverance. First you need to choose the necessary hero, which you will create with your own hands. Well, if there is a photo of the character.
Make a sketch using a computer program or draw by hand. Combine a sketch with a human figure, in the process you can change the proportions, for example, reduce or increase the head, torso. Make measurements and a pattern of a life-size puppet, as well as calculate the required amount of foam rubber or isolon.
How to fill a sewn toy
Foam rubber is most often used as a filler, this material is dense, it does not fall off and perfectly holds any shape. It's also easy to take out if the toy needs to be washed. You can take ordinary cotton wool, but it quickly goes astray, and the product may lose its original appearance.
A synthetic winterizer is also used - it is easy to purchase, and it is a pleasure to work with it. With it, the toy will keep its shape for a long time, it is easy to dry and does not go astray. An alternative option is holofiber - this material is durable and easy to use.
As a filler, natural fillers are used, this is wool. It is environmentally friendly, allows the product to keep its shape and even generates heat, with such a toy the child will be very pleased to sleep.
Needlework is a great tactile activity for parents and toddlers. Practical exercises develop hand motor skills, and an environmentally friendly product will not adversely affect health.
Combine business with pleasure, because you can create many more wonderful figures from cones and plasticine:
- monkey;
- rooster;
- turtle;
- bear;
- snowman;
- a bird;
- peacock;
- little man;
- goblin;
- swan;
- chimpanzee;
- shell, etc.
How to insert a wire frame
The wire frame is used in soft toys quite often, it allows you to keep the shape and gives it flexibility. To create it, you need some wire, for safety, its ends should be bent with round teeth. The wire should be copper or floral, along the entire length of the toy.

Then, when the desired workpiece is made, it is lightly coated with glue and wrapped with the selected filler. This will prevent her from getting out during the operation of the toy. Further, the filler is evenly distributed around it and a frame is obtained, which is then placed in a fabric pattern. The fragment is merged.
Thus, the wire frame is inserted into both the torso and limbs or even the ears and tail of the toy.
What accessories to complement the costume
You can decorate a bear costume with a butterfly, which you can sew with your own hands or use a ready-made one.
To do this, cut out 2 squares of black or red material 20 * 20 cm in size and another 5 * 10 cm. A small square is trimmed to make a tube. After that, the workpiece is ironed. Large squares are also stitched from the wrong side, while remembering to leave room so that the workpiece can be turned right side out. This will be the main part of our bow. It is put on a large square and it turns out a bow for a bear.
If it is not possible to sew a bear hat, then it is quite possible to get by with a mask.
On the Internet you can find a mask for every taste, print it on a color printer, or, in extreme cases, decorate it with pencils. Do not forget to attach an elastic band to the cardboard mask so that you can put it on.
In addition, you can supplement the bear with a barrel of honey. Of course not real. To make it, you need a fabric of two colors to create the appearance of wooden planks. To do this, you need to cut a rectangle measuring 40 cm by 40 cm and two circles with a diamond of 15 cm each. You can sew a rectangle of two shades to imitate wooden boards. After that, we attach circles on both sides so that the point turns out to be voluminous, and we sew the side of the workpiece. Do not forget to make a beautiful inscription "Honey". Now it’s clear that we have a bear in front of us.
How to decorate a soft toy
There is a huge selection of accessories for decorating toys. The most commonly used beads, buttons, sequins, ribbons and bows. They are sewn to the product with a hidden seam or special glue. You can also take small pieces of fabric, for example, velvet, cambric, silk, chiffon, they are superimposed and then sewn on with a buttonhole.
Sometimes original embroidery acts as a decoration, as this helps to make a soft toy unusual. This option is increasingly used when the product is created by hand.
Another option for creating a unique look can be specially tailored clothing, such as a dress, skirt or overalls. It is made from beautiful lightweight fabric.
What can be done
It is only necessary to apply imagination and desire to get unusual toys created by your own hands. To decorate a house or apartment, you can create interesting Christmas wreaths. Snowmen and Christmas trees will have fun under the Christmas tree, and a small zoo will amuse the child.

Job Benefits
Cones - environmentally friendly natural material. He has no age restrictions. Joint work on various topics will give a lot of positive emotions to adults and children, help to decorate the interior of the apartment.
Preparing the head mount
We connect two loop cotter pins, we put a washer, a disk, and another washer on one cotter pin. Then, using a splitter or pliers, we wrap the antennae. You need 4 washers for the head, on both sides of the disk, otherwise the mount will not swing. We insert the resulting design into the head. The fastening should be in the place of the lower tuck. If necessary, add filler under the disk and sew the head with a hidden seam.
If necessary, we pluck the pile on the nose and under the eyes, before installing the eyes.
After that, we take out our eyes, cut off a piece of a super-strong thread (about 50 cm) and fold it in half. We insert a loop of thread into the loop of the eye, pass the ends of the thread into the loop of the thread and fix it. Carefully, so as not to damage the eye, flatten the loop of the eye with pliers. We do the same with the second eye.
Once again, we check the place with the help of positional eyes and make a small hole in this place with an awl. We insert the thread on which the eye is held into a long needle, and we leave the thread down behind the disk, just below the back of the head. as close to the disk as possible. It does the same with the second eye, we draw a thread 2 mm from the thread of the first eye. We ask someone to hold the head or we squeeze between the knees and tightly tighten these threads between ourselves, tie them with a strong knot. Then we insert the ends of the thread into a long needle, bring these ends in the ear area, pull the thread and deepen the knot from the eyes, cut the threads as close to the head as possible.

After that, all limbs must be fixed in the body. We start with the lower paws, then the head, then the upper paws.

We remove the washers and discs from the paws, having previously connected the antennae back with pliers. In the body, at the marked points, we make holes with an awl. We insert a cotter pin into the hole, put a disk, a washer on it and twist the antennae with a cotter pin.
Fixing the head: make a hole with an awl in the region of the upper tuck, insert a cotter pin into it, put a washer, disk and another washer on it, twist the antennae.

After all the limbs are fixed, we begin to stuff the body. We stuff the neck section tightly so that the head proudly “sits” on the body. We fill the tummy, gently alternating the filler with the weighting agent.
Sew a hole in the back with a hidden seam. Sew the ears and tail with a hidden seam.
The simplest bear made of fabric
Even a child can cope with such work, so you can safely sew a toy with your children. The fabric bear pattern can be drawn by you by hand, and you can draw as you like - a bear cub with long paws or a rounded plump bear with a big head or ears.
Fold the fabric in half with the design inside, place the pattern on top and circle with chalk or a fabric marker. Cut out two pieces at once and sew them on a typewriter or by hand, leaving a small opening for turning and stuffing. Turn the fabric inside out, stuff it well, not forgetting about the ears and paws, sew the hole with your hands. The bear is almost ready, it remains to draw a face for him and decorate it as fantasy tells.
Bear Mask: Pattern
And for those who do not have time to engage in artistic creativity, there are always ready-made template masks on the Internet at hand, which you just need to print and cut out.
Bear Mask Templates:
New Year's


Surprised Decorate


paper model
In the end, I settled on creating a paper model so that I could work with it in the future.
To begin with, I needed a scan of the bear's head to glue it out of paper. It was not difficult to find a scan, especially if you know where to look.

I downloaded the model, opened it with Pepakura, set the approximate dimensions, saved it in PDF and uploaded it to a flash drive. Then I went to a stationery store for drawing paper.
Drawing paper is denser than office paper, which means that the glued model will not crumple under its own weight.
After buying a couple of packs of paper, I went to the agency that prints. I gave the flash, five minutes and the scan was already in my hands. I went home.

Well, this is where things get interesting.
He poured coffee, turned on the film, armed himself with a clerical knife and PVA glue, and began to glue. In order for the ribs to bend as they should, at first I ran along the edges with a non-writing pen. After that, the edges are well bent and the corners become clear. Then I cut it out and carefully glued it. I glued several elements at once, so that the work went faster.
The process requires a lot of patience, but in the end, patience pays off and after a couple of films you have a glued model in front of you. And it looks exactly like a scan on a computer.
You sit, look at her and are touched, all the same, how pleasant it is to look at your creation!
There is a paper model, now you need to prepare it for strengthening with epoxy.
Spacers
In order for the strengthening to be successful, it is necessary to place spacers in the weakest places on the model. If this is not done, then the model will lead 100% and all the work will go to waste. And if you arrange them, then everything will be symmetrical and beautiful! So I do not recommend ignoring this stage. Go…
We select these very weak points by lightly pressing on the edges with your fingers, if it bends without tangible resistance, then a spacer is needed here. Usually these are the places where the edges are long.
As spacers, I used bamboo skewers, which I bought at a hardware store in the cottage department. I don't know why they were lying there and not in some kitchen utensils.
I cut it according to pre-verified dimensions and glued it to the model with hot glue. Thus, he firmly fixed those places that were bent and pressed through.
Waxing
In the future, when the model is strengthened, the paper will need to be disposed of. And so that it does not stick tightly, inside the helmet must be treated with shoe wax. The wax will act as a good separator and keep the paper from sticking to the resin.
A little hack. It is better to use black wax in order to see where the surface is processed and where it is not.
Both preparatory procedures are completed and now the bear is ready to be reinforced with epoxy.
strengthening
What is good about epoxy is that it does not have a high price, is sold by weight and is not toxic. She can work at home, there is practically no smell from her, which is certainly a big plus. She also has disadvantages, namely, the time for complete drying is about a day. Of course, let's not forget about safety. Be sure to wear a respirator, gloves and goggles.
In general, I went for epoxy, but for now the bear will lie down next to Uncle Stalin =)
Epoxy bought. Bodyazhim first batch.
To do this, pour hot water into a container and stick a bottle of resin into it so that it warms up and becomes fluid. This will make it easier to work with her. We wait a few minutes and measure out 10 parts of resin and 1 part of hardener. I measured on the scales that I once bought on an alishka. Mix the whole thing well and apply with a brush on the inside of the mask.

Apply in a thin layer. Since this is the first layer and it is the most important. If the coating is too oily, then air bubbles and cavities may form, which will have to be sealed. I covered it, left it to dry, after laying a newspaper, otherwise the resin will drain right onto the table, and then you will tear off its horseradish.
Repeated the procedure 3 times.
After the third time, the resin turned into a shell. In order for the mask to become very strong, it must be reinforced with fiberglass.
I bought fiberglass in a store for car body repair.
We take fiberglass and cut into small squares, about 5x5 cm. Again we knead the epoxy. Now we apply fiberglass to the inner walls of the mask and impregnate it with epoxy. After I processed the entire inner surface, I left it to dry.

After drying, the mask becomes so strong that you can jump on it and nothing will happen to it =)
The mask has dried, it's time to remove the paper from it. Since the model was pre-treated with wax, there should not be any problems with removing the paper.
Now we will grind the corners so that the muzzle of our bear becomes a little more rounded.
And this is the result I got, at the end of the strengthening.
Necessary tools for creating a bear

To sew a bear will need:
- Plain sewing needle.
- Acute scissors.
- Awl cone to make holes for the paw attachments.
- round nose pliers or pliers.
- Pencil or wooden stick for stuffing.
- A pen or marker to transfer the pattern to the material.
Next, take on the lower legs

We sew from 1 to 2 points. Leave a hole for eversion and sew from 3 to 4 points. We do not sew the bottom.

We sew the sole, taking into account the marks, we sew along the sole. It’s better to “make money” first. Pay attention to the sole has an inner part, it must match the part of the leg where there is a mark for the disk.

Despite the complexity, the sole should be sewn evenly, without wrinkles.

Now that all the details are sewn, turn inside out and move on to stuffing.
First of all, I stuff my head. I start with the nose, stuffing it very tightly, since then we will tighten and embroider the nose. According to the density of stuffing, you can compare the head with a tennis ball. When stuffing, try to shape the head with your fingers, not forgetting where you have the bridge of your nose or forehead. Sawdust is very malleable and, unlike sintipuh, when stuffed with them, it is easy to “blind” the head of exactly the desired shape.
Very often you can hear that one pattern produces completely different bears, even in size. A lot depends on the padding.
The hole in the head is not sewn up yet. I put my head down and move on to the paws.
Before stuffing the limbs, you need to install a mount in them.
We put a washer on the cotter pin, then the disk. After that, in the paw at the indicated point, make a hole with an awl and insert the resulting structure into this hole. Then from the outside we put on the second disk, the washer. With an awl, we push the antennae of the cotter pin so that when stuffing the washer is tightly pressed against the fur and the sawdust does not fall under it.

Paws (palms and feet) need to be stuffed very tightly, because. further we will use the tightening to form fingers, above the paws you can stuff softer. It is possible, when stuffing the lower paws, after stuffing the feet, to alternate the filler with the weighting agent.
After we stuffed the paws, we sew up the holes with a hidden seam.
Then we proceed to tightening the fingers on the paws.
We make markings with pins.

Then, on the back of the palm (feet), we introduce a thread and leave a tail with it, we bring it out at point 1.

Then we insert the needle at the second point behind the seam, and bring it out at point 3, pull it to form a finger. We enter point 4 by the seam, exit at point 5, tighten. We bring the needle to point 6 behind the seam and return to point 5, tighten and return the thread to the same hole on the back of the palm where we entered at the beginning. We tie the tails, insert them into the thread, insert the needle into the same hole, bring the paws anywhere, pull the thread, hide the knot and cut it off.
We dip a synthetic brush with a short pile (can be cut off) into the paint, wipe the brush on paper. With a semi-dry brush, I begin to stain the edges of the soles, paws, ears, tummy. Rub with a clean wide brush or toothbrush, making smooth transitions. You can make bald spots in places and pinch the wool.
I plucked the bear's left shoulder and rubbed the hole with a coarse sandpaper. She stained the sawdust that appeared with paint and mended it.
The next step is to shape the head.

Take a break, have some tea or coffee and dream about your bear. It is very important with what attitude you take up your bear, so it will turn out.

We fasten the ears with pins to the intended place.
The next step is to prepare all the materials and tools we need in the process of work:
- Mohair 12 mm (Helmbold, Article: 150-014) size 1/16. For the first bear, it is better to choose not thick mohair.
- Cotter pins T 2.0 * 20 mm - for attaching paws 4 pcs and O-cotter pins 2.0 * 25 mm - for attaching the head - 2 pcs
- Plywood discs with a diameter: 25 mm for the upper paws - 4 pcs, 30 mm - for the lower paws 4 pcs, for the head 25 mm (I sew into the head itself) - 1 pc and 20 mm (for the neck) 1 pc. Total 10 pcs.
- Washers 12 mm 12 pcs
- Black eyes (matte or glossy of your choice) 5 mm - 1 pair
- Super strong threads for tightening the eyes, sewing threads, threads for embroidering the nose (you can use a regular floss).
- Filler: sawdust or sintepuh (about 150 gr) and weighting agent - granulate, marble chips, coarse quartz sand.
- Needles: sewing (for seams) and puppet (long for tightening and setting eyes)
- Awl for making holes and straightening the pile
- stuffing stick
- Splitter
- Brush and oil paints for tinting
- You may also need tweezers, pliers
When everything is finally ready, we start the process:
Teddy bear from a sock
A pair of woolen or knitted socks, naturally new, will make a very cute bear. A pattern is not needed, and the entire master class fits in one picture - cut out a head with ears from one end of the sock, a torso with lower paws from the other, cut out the upper paws from scraps, and an oval for the muzzle from the other sock. Next, you should sew a cut on the head between the ears, sew in the paws and fill the torso and head, connect them together and shape the muzzle. Funny bear is ready.
After that, we fold the side parts of the head inward with fur and sew the two parts together from the nose to the lower undercut (from point 1 to point 2).

Then we sew a wedge into the head. We always sew on a wedge, start from the mark on the nose, make sure that the darts match. Sew one side to the bottom tuck.
We proceed to the next side, we sew along the wedge from the top tuck to the mark on the nose. Make sure that the bend in the bow matches. Then from the top tuck towards the bottom, to the mark where we left a hole for stuffing and eversion. The head is sewn on to the body.

First we sew the tucks, after that the body, not forgetting to leave a hole for eversion.
Next, we sew the ears, leaving the lower part not sewn up, leaving a long thread. Then we turn the ears inside out and sew the opening at the bottom with a “hidden” seam. The thread should still remain, because. we will sew her ear to her head!
Sew the tail (just like the ears).
How to sew a teddy bear
Step 1

Draw this freehand Teddy Bear pattern and then cut it out. To make your teddy bear pattern, place the design on a piece of cardboard (an empty grain box works well for this), draw on it, and then cut it out. Place a cardboard toy template on the back of your material, make sure any design on the material will fit the bear exactly, then draw the template, turn it over and draw again.
Step 2

Cut out both pieces. Make your own teddy bear. Place both pieces on top of each other, on the other side. Sew together leaving a gap large enough to stuff the bear.
Step 3

To help stop any wrinkles when you turn the right side of the bear on the click around the curves of the bear.
Step 4
Turn the right side of the bear inside out. You may find it easier to use a wooden spoon handle to push your arms and legs out.
However, for the bear's eyes I used a couple of sewn-on buttons on press studs, however, if you don't find anything suitable, it's best to sew on the "eyes" with thread. You can plan the shape of the nose by sewing a triangle and then fill it in with vertical stitches. Using the (Y) shape for the nose will result in the lips nicely. Now decorate your bear with the ribbon; use a bow on the head for a girl or a bow around the neck for a boy.
Of course, you don't have to be a kid to have one of these cute shades; these funny little hairstyles can be a great gift when used as a pillow for mom or grandma!
Facial decoration and accessories
One of the most crucial moments in the creation of life-size puppets is the design of the face (muzzle). It is necessary that the doll looks beautiful, kind, cute, her eyes should be kind.
A smile plays an important role here, because if this doll is for kindergarten, then it should attract the attention of children and give them bright pleasant impressions. Therefore, the design of the muzzle should be approached as responsibly as possible, with a good mood and creative spirit.
Eyes and all other details of the face can be made from material or painted with acrylic paints.
Accessories such as gloves and shoes, a handbag, etc., play an important role in a life-size puppet. They are made by hand and must fit a certain character. So, for example, a bear should have a basket or a barrel of honey.

Sewing a bear costume with your own hands for a boy is a creative and interesting task. Sometimes you think longer about the idea of a future image than you sew. Execution most often depends on the fabrics and decorations available at home, free time and richness of imagination.
Work example:

Festive can be one-piece or consisting of separate parts: vest, turtleneck and panties. On the head of a child, you can put on a headband with ears or make a full-fledged bear head. The image will come to life if you put makeup on your face.
How to sew a bear costume
Before you sit down for a bear costume at home, prepare everything you need for this. When choosing fabrics, stop at natural. In synthetics, the child will quickly sweat and the clothes will become a greenhouse for him. Most often, satin and faux fur are used, it must be loose so that the outfit breathes. When using synthetics, make a natural lining, it will be more comfortable.
We will create a teddy bear costume from a vest, panties and ears. The simplest version of the execution, which does not require several days of work, professionalism in sewing and talent.
Here is what you should get as an output:

So, you should have:
Sewing machine, scissors, ripper (just in case), thread and needle, bar of soap for marks or pencil, centimeter, thimble, elastic band in the belt;
2 types of fabric: front and back. For the outer, something fleecy or terry is suitable, the color is beige, brown, black, and for the inner fabric, use cotton. By the way, no one forbids making a white beast outfit, but children will perceive it as a bunny with short ears;
Headband, filler for ears and tail - foam rubber, round balls of foam or cotton wool;
What the bezel looks like:

Newspaper or tracing paper for drawing;
Optional accessories: applications with images of bees, jars of honey or cubs; a polka-dot bow tie, a satin handkerchief in a pocket; if this is a costume for the New Year, then New Year's themed brooches, a snowflake on the back are possible.
Prepare everything according to the list in advance so that nothing distracts you during the work.
Step 1. Pattern
A hint for the lazy: tracing paper and calculations may not be needed. Just take a jumper, shirt or jacket and pants or shorts from the child’s closet, circle the back and front of the newspaper, look at how everything is sewn. That's it. Yes, you can forget about the fit and the perfect cut, but very quickly and simply. If there is no paper, then you can transfer immediately to the wrong side of cotton and fur. Remember to leave 1.5 - 2 cm for allowances. You will also need to tuck and overcast the edges of the resulting elements.
If this method seems too amateurish to you, then arm yourself with a ruler, centimeter, pencil, paper and scissors. You will draw, and before that take measurements. To make a pattern of a bear costume with your own hands, it is enough to build a drawing of an unbuttoned vest and pants. If you have a tight deadline, then find the finished drawing closest to the desired size and simply transfer it to the material.
Do not spend too much energy on drawing, try to speed up this stage. All the most interesting is ahead!

When you have the outlines of the future outfit on paper, you can transfer the drawing to the lining and front surfaces.
Step 2. Cut out
Once you've got the suit template figured out and transferred to the fabric surface, cut out the details, leaving a margin for the seams. Then take and separately sew all the parts. You should get 4 things: two pants, one of cotton, the second of their furs and two tops.
The cape will be sewn on the sides and shoulders, and the pants, first along the inner, and then along the outer seam. For originality, add lampas.
Step 3. Sew
Take 2 pants and place them front to front. Do not confuse, otherwise you will need a ripper. Sew in the waistband and at the bottom of the legs, leaving a "window" for eversion. Do the same with the vest.
Once inside out, sew up the untreated area with a blind stitch.
Do not mix up the sides when sewing.
Add some of your own to this idea.

If you are sewing without lining, then simply sew the parts and tuck the edges 1.5 cm, then sew with a straight seam. So the clothes will not crumble. There is another option: overlay, but on an amateur model it comes down to zigzag the edge. If the edge frays a lot, then the zigzag will only ruin the edge. Don't be lazy, turn it up.
Step 4. Insert an elastic band into the belt
We make a margin at the waist from 2 cm to 8 cm, focusing on the width of the elastic band. If it’s very thin, then 1 cm is enough. We turn it up, sew it, leaving a small hole in a centimeter. Next, we take the tape in the belt, a pin, put it on the tip of the tape, and hold the other with our hand so that it does not get lost in shorts or pants. We pass the assembled structure to the right place, tie it on a sea knot, cut off the excess, protruding residues and sew up the hole.
Fastening:

If the gum is thick, then we do the same with a margin and a larger hole. The only difference is that the edges will have to be fixed stronger. It is better to baste with a narrow stitch 2-3 times, and not by hand. So the fastening will be more reliable.
Accessorizing the costume
In this way, you will be able to independently sew a bear costume for an adult. With the existing base, you can connect a creative approach.
Felt figurines
Animals:

Snowflakes:

Tail
Take foam rubber or cotton wool, even a small anti-stress ball will do. Tighten the base with the rest of the fur fabric to make a round shape. Sew the tail to the back of the pants.
bezel
To make the bear costume as realistic as possible at home, build ears. Several ways to choose:
- Cut out 4 semicircles, stuff them with cotton wool and sew.
- Use thick cardboard as a filler, then the ears can be made larger.
On the head:

gallant little things
Sew a red flower in place of the pocket or imitate the peeking edge of a pocket square. You can sew or glue any image if the pile is not very long and allows it.
Wear around the neck if desired. It is sewn simply: two fabric squares are sewn, turned inside out and pulled together in the middle.
Butterfly:

We complete the image of the bear - apply makeup
Easy to put on. The main thing is that the child does not move during application and then tries not to rub your art with his hands. Choose special hypoallergenic paints. There are a huge number of video tutorials for drawing animals on the body. Although the easiest way to copy from a static picture. You can show your imagination and come up with your own performance.
Aquarium option:

You will need basic black and white, as well as brown. You need to paint over the entire face with brown, and make the area around the nose in a lighter shade, apply lips with thin black lines. White for accents: mustache, under the eyes. Do not overdo it, otherwise a panda will come out.
Minimalism:

You can draw a muzzle from the mouth, without affecting the chin, to the middle of the forehead. On the second half of the forehead, draw the ears. The child is ready!
And mother:

That's all! The work is finished! If you work according to the instructions and follow a simple algorithm of actions, it will take you only a few hours. The procedure is suitable for making a bear costume with your own hands for both an adult and a child.
Good luck!