Paper origami schemes for beginners. Origami paper lessons for children
Crafts based on paper begin to be made even in kindergartens. This material is popular because it is easy to work with and, most importantly, interesting. For those who are interested in paper art, we suggest considering the easiest paper origami for beginners.
What do beginners need to create origami
The first thing you need is, of course, paper and your hands. But if you are determined to delve into the art of origami, we recommend purchasing additional, useful tools.
Before we start viewing the topic of paper origami for beginners, I would like to note that not only paper can be used to create masterpieces.
You may need:
- Glue. Use PVA or pencil glue. Glue components in origami are practically not used, but glue will add strength and decorative elements to the finished fake. Experienced origamists use a special spray adhesive. It makes it possible to combine two materials and creates interesting combinations of textures and colors.
- Coloring materials. This refers to everything from pencils to paints. Due to such materials, you can use white paper in your work. Be careful with watercolor paints, their excessive use can lead to damage to crafts.
- Scissors. Before work, it is better to take care of the presence of several not tight scissors with different lengths. The tips of such scissors must be sharp. If you plan to work with small elements, prepare scissors for manicure. In our master classes, scissors are practically not needed, we will consider the easiest origami for beginners.
- Knife for office work. It must be well sharpened. In some situations, this knife can replace scissors.
- Sharpened pencil. It will help to mark up the material.
Origami box with lid
If you urgently needed a small box with a lid, then all you need to make it is two sheets of paper. We suggest you make an origami paper box for beginners.
The finished box is ideal for storing small items. Using special origami paper that has a pattern, you can create beautiful packaging for a small gift. The finished design will be very simple, the bottom and lid do not fall apart, so the box does not need to be tied with tape. For manufacturing you will need:
- two square sheets of paper (one should be shorter than the second sheet by a centimeter);
- basic knowledge of how paper origami is made for beginners.
The beauty of making this box is that you don't need scissors, glue or tape. Everything is done quickly and without auxiliary materials.
Let's get to work: 
- In our work, sheets with dimensions of 19 by 19 centimeters and 20 by 20 centimeters are used. We take a large sheet and add two opposite corners. We iron the fold. Unfold the paper and fold the other corners. We unfold again.
- Now fold each corner to the center point. We get a square, iron the folds.
- We take the nearest side and bend to the center, carefully smooth the seam. We unfold the workpiece with the other side towards us and repeat the work. We repeat the action with the remaining sides.

- Expand the future craft. You should have a square in the center. This is the size of the future box, or rather, one of its parts.
- Take the sides, stretch them. The remaining two sides are folded to the middle. We iron the seams. You should have noticed that the sides of the resulting figure are divided into four squares.

- Focusing on the extreme square, wrap the end of the figure so that you get a diagonal. We carry out work with the rest of the workpiece.
- If the work is done correctly, then in the central part of the product, two squares should remain, and paper on the sides in one layer.
- Rotate the figure with one of the corners towards you. Lift it up. Gently spread the center of the workpiece with your fingers. Wrap the corner inside the product. On the other side, you need to act by analogy with the first.

- Iron all folds. One part of the future box is ready. You can already use this part, but we are making a box that closes. Therefore, we take the second square, which is smaller and carry out the same actions that we performed with the first sheet of paper.
If you managed to make the second part of the box, then you got the bottom part. It can be covered with a lid that we made earlier.
As you can see, the work is elementary. Such origami, made from paper according to the schemes for a beginner craft lover, can bring many benefits. You will be able to improve hand coordination, improve your skills in making paper crafts.
Choosing paper

The main rule by which you need to choose a material is strength. It doesn't matter if you make origami paper crafts or it will be a box, durable paper will not tear. If the material is not dense, it will begin to tear and you will quickly get tired of this activity.
In addition to density, it is important that the working material holds the folds made.
Separately, paper for modular crafts should be considered. Here, of course, it is better to dwell on the thin version, which will allow you to bend several layers at once.
Otherwise, choosing paper is not difficult:
- Paper for office work. This material is durable, does not slip during operation and is able to keep its shape well. This paper is ideal if you are making an origami airplane out of paper.
- Multi-colored paper for children's work. Before using or purchasing, make sure that it is strong enough and that there are enough colors in the kit to complete the craft.
- Wrinkled paper. It is not used to make animals or cars, but for this, this option is ideal. Such a material has ductility and strength.
- Gift wrapping paper. A great option for making bright crafts.
There is paper that is specifically used for origami. They call her kami. You can buy it in the departments for creativity. Paper can be decorated with patterns or painted in any shade. Washi is another option for origami paper. This material is created by manual dressing.
We do not recommend using special paper immediately. Practice on simple crafts, which we will talk about below, using ordinary heavy paper.
Paper stories or paper origami for beginners
Folding origami figures will appeal to both young children and adults. If you are a beginner, we recommend starting with simple but very interesting figurines. We invite you to consider our paper origami and understandable diagrams for beginners.

The simplest crafts are paper-folded animals. For example, a gray or white mouse with a long tail and a curious nose.
Instruction: 

The mouse is ready, it remains only to finish her antennae, nose and eyes. By the way, if you add to the craft, and a few more fairy-tale characters, you can make a good children's fairy tale teremok.
Volumetric paper cat
We continue to do crafts and now we will try to design origami animals from the cat family. We have already considered detailed manufacturing instructions. This design option is no less interesting, but at the same time simple.
If you follow the simple tutorial below, you will have a voluminous kitty. For the first work, it is better to use ordinary office paper, in the future it is appropriate to take dense double-sided material. Let's get started:


Paper dog muzzle step by step
If you are looking for the easiest folding crafts, then there is nothing easier than making a cute dog face.

Let's do it step by step:
- fold a triangle from a square;
- iron the line and unfold the figure;
- focusing on the line obtained in the center, bend down the sides of the triangle;
- we start triangles both from above and from below.
The muzzle of the dog is ready. Decorate the finished origami so that it resembles a real dog.
origami fish
Making origami fish is very easy. In just a few minutes, you can create a whole paper "aquarium", consider several options for making fish.
triangular fish
 (Step 1)
 This fish is not only easy to perform, but also very beautiful. This craft is interesting in that, according to one scheme, several fish can be folded, which will not be similar to each other. For manufacturing, take colored double-sided paper. How to make such a fish:

The fish is ready, draw eyes and you can play with it.
gold fish
Who hasn't dreamed of catching a goldfish? Catching her is not so easy, but making origami is easy. Who knows, maybe she will fulfill your desire.
 (Step 1)
 Prepare the paper you need colors and get to work:

That's all. The wish-fulfilling fish is ready. Draw fins and eyes on it. Can add . Well, if you continue the fairy-tale theme, then you can’t do without a ship with which you can catch a goldfish. in one of the previous articles.
simple origami plane
 Plane scheme
 There are many schemes by which you can make an origami plane out of paper. the site advises you to start viewing the manufacture of airplanes, it is better with a simple and well-known model. Even if you know how to make it, repeating the construction will help show your child the manufacturing process, and you will “warm up” your hands before more serious crafts.
We begin to design a simple airplane:
- fold a sheet of paper vertically, then unfold it;
- the corners located on top are bent towards the center, focusing on the line obtained in the previous paragraph;
- fold the resulting corners again, make sure that the edges do not connect and do not intersect with each other on the center line;
- bend the sides from above to the bottom from each top;
- spread your wings.
The toy is ready, we trust the little designer to decorate the airplane.
Airplane that spins

The next version of the airplane is not easy. After starting, it spins, rotates and picks up the air flow.
How to make such an origami paper plane:
- we take the square, bend it and unbend it to get the center line;
- fold the upper corners according to the intended line, the sides of the corners after folding should be combined;
- lay the corners in the middle of the craft, and bend the upper part to the center;
- gently fold the wings of the future aircraft inward;
- turn the workpiece sideways towards you and fold it in half;
- fold the wings on each side.
The plane is ready. This product has one rule of use. You need to launch the plane in an open area.
Besides:
- If the plane is launched over the ground. The product after launch will begin to draw loops.
- If the plane will be launched up. He will start making circles.
It is better to run such a product against the wind. If necessary, fold the wings.
Fighter aircraft
Now we will tell you how to make a real paper fighter.

Follow the steps:
- take a sheet and bend the upper corners to the middle;
- by folding the sheet (as shown in the diagram), we outline the fold lines;
- fold the sheet along the marked lines, you should get a blank with a triangle lowered down;
- bend the corner up, and pull the sides down;
- fold the figure in half;
- we straighten the resulting wings and carefully iron the lines on each side;
- carefully turn the "nose" of the fighter;
- in the back, you need to make two cuts, for better airflow, bend the cut off parts.
The paper fighter is ready. Such an airplane does not need to be thrown up. The launch is best done so that the model is placed parallel to the ground. You can run the finished structure slightly tilted down.
Unusual paper crafts can be created from colored or white paper. This technique came from ancient China, quickly spread to various countries. There are very easy crafts, and some will have to work hard. Let's talk in detail about simple origami for beginners with instructions for them.
Rabbit
Even the smallest children from 2 years old can make a mischievous rabbit craft under the strict supervision of their mother.

Let's analyze the step-by-step instructions on how to make origami in the form of a rabbit:
- Take a colored square of paper.
- Fold straight from corner to corner.
- The resulting triangle is folded in half vertically.
- Now we bend 1.5-2 cm up from the bottom of the triangle.
- Bend two corners to the center.
- The bottom corner needs to be folded up.
- Turn over the resulting figure.
- We get the muzzle of a rabbit with ears up. With a dark felt-tip pen, draw eyes and a nose. Antennae should look in different directions.
- The rabbit is ready.


Chanterelle
A simple craft that is easy to fold in 5 minutes:
- A square of colored paper needs to be folded in half.
- We bend the upper corner of the triangle down to the base of the figure.
- Insert the opposite 2 corners so that they look up.
- Flip the figure.
- The craft is ready! It remains only to draw a nose and eyes of a mischievous fox with a felt-tip pen

Dog
If you love pets, you can choose a dog. The craft can become an applique, as well as an original postcard for a gift to friends.

A detailed master class on how to make a beautiful origami in the form of a funny dog:
- Fold the colored paper square in half.
- Then we turn 2 corners along the edges (you can outline in advance) to the center to get 2 equilateral triangles - these are the ears of the dog.
- We turn the figure over and the bottom corner needs to be wrapped up.
- We turn over again, we get the head of our dog.

The next step is the body:
- We fold the other square in half, set it so that there is a right angle (90 degrees) on the left.
- Then we wrap the right corner to the center - this is the tail of the dog.

Now you need to glue the head to the body with a glue stick, as in the picture. With a felt-tip pen we draw a nose, eyes and paws for our dog.


Pigeon
A single-sided light-colored paper is suitable here. Even a beginner will understand our lessons on how to learn the origami technique.

For the bird we take:
- A square of light colored paper, folded in half.
- Then you need to unfold our workpiece and fold it along another diagonal.
- With a pencil, we draw a line almost in the middle of the triangle along the base.
- Then we wrap the right corner to the right, and the left corner, slightly stepping 1-1.5 cm, to the left, as shown in the figure.
- After that, our workpiece is folded along a horizontal line.
- According to the lines pre-marked with a pencil, you need to bend 2 corners up, as in the figure.
- The left corner needs to be bent down to make a dove's beak.

It turns out a dove with raised wings. It is better to choose light blue, gray or light brown shades.


Experts offer original ideas for beginners on how to make origami with their own hands.


Tulip
In addition to the “classic” models, there are other easy jobs that children from 2 years old (with their mother next to them) can do without scissors.

Let's analyze the stages of work:
- Take a red square of paper, then fold it in half. Expand and fold again along the other diagonal.
- At the triangle, you need to bend the corners from the center. The sharp end at the bottom of the bud must be bent. It turns out a beautiful tulip bud.

flower stem:
- Take a square of green paper, then bend the corners to the diagonal of this square.
- After that, fold the figure in half. In the resulting triangle, bend the lower corner, as in the figure.

We connect the stem with the tulip bud. Paper for buds can be selected in red, pink, yellow, purple and white. So you can collect a whole bunch of colorful flowers, for example, by March 8 or the birthday of your mother, grandmother or girlfriend.

The craft looks good, both separately and in a bouquet in a beautiful small vase.


Asterisk of happiness
Such voluminous bright stars are often prepared for the New Year, but they are also suitable for a birthday or other celebration.

We will need: colored paper of different shades (red, green, yellow, blue, etc.).

First you need to make blanks, cut the paper into strips. If the width of the stripes is different, we will get different stars. The best option is considered to be 1 cm wide and 26 cm long. Thinner stripes will make the work more difficult, but the product will become more elegant. With wide - the craft will not be too beautiful.

Only cardboard is not suitable for work, it is too hard. If you take shiny wrappers, then the product will become elegant. You can take bright sheets from glossy magazines, the inside will not be visible, so it is important to choose only 1 side of the sheet that is beautiful.

The finished star is a regular pentagonal shape. They are easy to decorate postcards with holiday greetings, combine into long garlands or hang on a Christmas tree. They look beautiful just in any transparent container.


Simple funny crafts will be possible even for the smallest, these are interesting and exciting activities. They will develop not only the motor skills of children's hands, ingenuity, the ability to express different moods of animals in a drawing. You can make the same figures from multi-colored sheets of paper, they will still be different.

Exactly following the proposed schemes and drawings, you now know which origami you can do yourself. Let the child choose an animal, bird, flower or car (airplane, boat). Origami is on almost everything that surrounds us.

We bring to your attention beautiful photos of origami in our gallery.


Photo origami
![]()


Children always demand attention. When choosing activities for children, many are interested in creativity and are looking for interesting ideas, including modular paper origami schemes for beginners. In social networks, finding a master class in the origami technique is not a problem. Experienced craftsmen explain in detail how to create a triangular module and design schemes for various crafts.
Module Assembly Technique
Step by step instructions for modular origami for beginners contains a method for manufacturing a triangular-shaped module and diagrams of three-dimensional figures using the origami technique.
Folding three-dimensional figures from identical paper parts is called modular origami. This activity is very time-consuming, but at the same time exciting. Being engaged in the technique of modular origami, children develop not only fine motor skills of their hands, but also mental, creative abilities.
First learn how to fold the module. Take sheets of A4 paper and fold in half until you get 16 rectangles. Cut the sheets along the lines obtained into 16 parts.

For the manufacture of crafts, schemes are used that contain information about how many modules need to be made and what color they should be.
Mounting methods
The module has 2 corners along the edges and 2 pockets on the fold line. These parts of the triangle are involved in attaching the modules to each other. Triangles are placed in two ways - on long or short sides . Binding options:
- Take three elements. Two elements are placed next to each other with long sides and 2 corners are inserted into the pockets of the third element, which is on the short sides.
- Two elements stand on long sides, insert 2 corners of one triangle into the pockets of the second.
- Two triangles stand on the short sides, one triangle is inserted with corners into the pockets of the other triangle.
white paper fantasies
Modular origami for beginners made of white paper looks very impressive. It is used to make a bunny, a dog, an owl, a rose, a camomile, a dove, a white swan.
White Rose
 Take a sheet and fold it into 32 parts. Blanks are folded from small rectangles, a total of 110 white blanks.
The first 3 rows are made up of 18 blanks. In the 1st row and in the 3rd row, the modules are placed with the short sides up, the 2nd row - with the long side up.
Take 8 modules, insert the short side down. The top of the modules is pressed against each other, and the rosebud is ready. The cocktail tube is glued with green paper and glued to the rosebud.
The first crafts from the modules
Small origami figures from modules are not inferior to large structures, they are also beautiful and interesting. Beginners easily collect a Christmas tree, lemon, strawberry, flower, watermelon peel, small swans.
Step-by-step instructions for constructing a Christmas tree:

To make a small lemon, you need to make 96 dark yellow, 16 white, 16 yellow modules. Each row of a modular lemon consists of 16 blanks, which are placed with the short side up. The bottom of the lemon consists of three rows of modules. Yellow blanks are placed in the first row, white in the second row and dark yellow in the third row. After that, 5 more rows of dark yellow modules are made. The lemon is ready.
Flower for beginners
Master class for beginners: a simple daisy flower.

The masters offer beginners step-by-step instructions on how to make a modular paper origami swan. You can make a small white swan, a large swan and the Swan Princess.
Diagram of a small figure
To make a baby swan, requires 22 dark yellow triangles, 120 white and 1 red triangle. The first circle and all subsequent circles of the small swan figurine are made up of 15 blanks.
 The body of the swan is made up of 3 rows of elements, then the product is connected and raised with the corners of the triangles up, 4. 5, 6, 7 rows of blanks are inserted from top to bottom. After finishing the 7th row, they begin to fold the wings. The wing is assembled anywhere in the workpiece of 6 elements.
The wing begins to be made from 1 dark yellow element, 4 white, again 1 dark yellow. In the future, each row of the wing is reduced by one white element, while the dark yellow modules remain at the end of each row. The work is completed when only 1 dark yellow module remains. The second wing is made in the same way. The neck is folded, putting on a triangle in a triangle 15 white pieces and at the end 1 red beak. The finished strip is inserted between the red modules. Usually they put together a whole family of small swans.
Great white swan
A white large swan is made up of 355 white modules and 1 red one. When working on a craft, make sure that the direction of the modules matches.
The body of the swan begins to build according to the scheme:

To make the Swan Princess, you must definitely follow the step-by-step instructions and the assembly diagram.
For the construction of three-dimensional figures it is necessary to have diligence and perseverance. DIY crafts are the most valuable and expensive! It is the best gift for family and friends!
Attention, only TODAY!
Most of us have known from early childhood how to make simple figures out of paper. These skills are instilled by teachers from kindergarten in order to develop our skills and imagination. Many also know that do-it-yourself paper crafts are called origami. And where did this original concept come from and what is its cultural and historical significance? Is it difficult to learn the ancient art to perfection and how to make origami according to the most complex patterns without much difficulty? Is it really useful to make paper crafts and is it worth teaching children this? Let's talk about origami in detail, because this system of knowledge is really worthy of attention.
In this section of the site, we will get acquainted with the most popular classic origami schemes, as well as learn how to make other paper crafts. Let's start with a few examples!
Everyone knows how to make a hat out of paper for painting work using the simplest patterns. In an extreme case, intuition will help here: in childhood, many folded, it is in their likeness that a simple hat is folded for repairs. But the art of origami paper folding does not tolerate monotony or a flat approach. There are many methods for folding paper hats, and you should also not forget about imagery of thinking: you can fold a military cap for children, fold a pirate cocked hat for a boy, make an original hat with a brim or a paper cap with a visor for walking - there are many variations both for the game and for everyday life. Choose any scheme for folding hats below and get down to business as soon as possible!
Have you ever thought about how to make a paper cube and why you need it? Let's say how to make a cardboard cube on our own, we will tell you and even show you. And what useful functions will you give the origami cube? Let's give a hint: remember your children's blocks with letters, from which you learned to add the first words, not yet knowing how to write. And if a paper cube is pasted over with pictures from old children's books, it will turn out to be no less interesting than in our distant childhood, a puzzle constructor.

"The Swan Princess" and "Wild Swans", "Geese Swans" and "Swan Story" - how many fairy tales do you know about this amazing bird? Do you know how to make a swan out of paper to tell your kid your story in pictures about a mythical feather? However, an elegant paper swan is not so much a toy for children as a recognition of the most tender feelings to loved ones. Legends endowed the bird with romantic meaning, in most of which it is a symbol of fidelity and infinitely devoted love. Presenting a figurine of a paper swan as a gift, we are now talking about the main thing without uttering a word. The symbolic bird will tell about everything itself.

The star of Bethlehem, according to the Gospel of Matthew, illuminated Judea with divine light at the very moment when Jesus was born. But today we will not talk about the Nativity of Christ at all, but rather about how to make a star out of paper, if there is nothing to crown the dome of the Christmas tree. Or about how to make 3D stars of different sizes for an original bedroom pendant. Small ones can be folded from foil, and large ones can be painted with acrylic paints and sprinkled with sparkles - you get a luxurious interior decoration.

Remembering the super hit of the popular singer "Yellow Tulips", not everyone will agree that spring primroses are the messengers of separation. Let's leave creative fiction on the conscience of songwriters, because in fact, graceful buds symbolize the arrival of warmth, the awakening of blooming nature and the thrill of sensual relationships. But it is not necessary to wait for spring to enjoy this beauty, because today we will share with you how to make a paper tulip to decorate your home with bright colors at any time of the year.

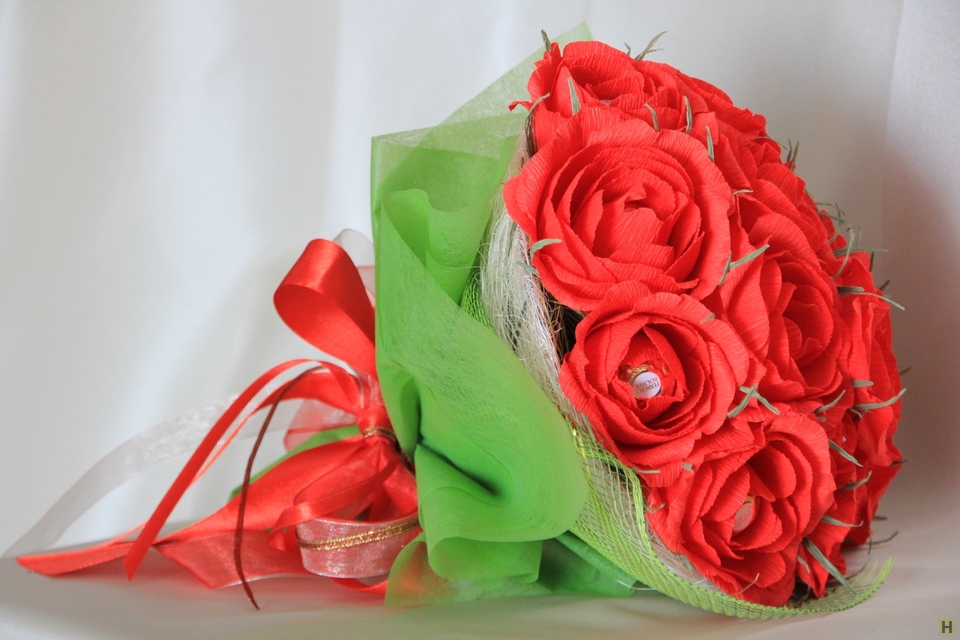
Live roses are beautiful. Romantic flowers are not only a symbol of love, but also a bright decoration of any celebration. The problem is hidden only in the fact that this fragile beauty dies in a few days, leaving a slight sadness of memories of its former splendor. But after all, everyone can make unfading roses from corrugated paper with their own hands. They can be folded into a spectacular bouquet for a gift or interior decoration, weaved into festive garlands or organically added to your evening outfit.
Remember the popular kids game of the mid-90s? This, of course, is not about expensive high-tech toys. Then a simple fortune teller from a notebook sheet was much more interesting. She simply put on her fingers and was always ready to answer our important children's questions: who likes me, will my wish come true, who is a true friend, and many others. In those days, almost every student knew how to fold an origami fortune teller. And today will you remember how to make a fortune teller out of paper and how to play it?

The classic origami crane, made in the traditional oriental technique of folding paper without glue and scissors, is still a sacred symbol of the peoples of China and Japan today. Here, the graceful bird is practically deified, considering its paper figures as a powerful energy backup of the sacred symbol. In fact, since ancient times, cranes have been revered not only in the east. In Italy, for example, this bird is considered a kind of marker of the decency of the family - where the crane settles, kind and very worthy people definitely live. And in the old Slavic traditions, a pair of large-winged kurlyk nesting in the yard foreshadowed the imminent replenishment of the family - the birds were honored and protected.

Isn't it time for us to add new inhabitants to the paper zoo? Today, the origami fox will replenish the collection of animal figurines. We will talk about 3 types of folding of a cunning forest beauty, the more interesting it will be to assemble a whole fox family, where each toy will be unique. Take an orange, preferably double-sided, colored sheet and a black marker to draw a cunning muzzle for a fox. More will not be required. Now watch carefully how to make a fox out of paper in no time.

Thinking of new fun for kids? Then it will be useful for you to learn how to make a frog out of paper - a funny jumper or a frog that opens its mouth in a funny way. You can put together a whole family of toy amphibians using the simple diagrams below. Then arrange a joke competition, whose origami frog will jump to the goal faster. A real princess frog will turn out from a large leaf, and her wonderful frogs will come out of smaller leaves. You only need paper, and any felt-tip pen will provide the eyes of your beast. Language - original additional application. Shall we start? Don't worry, our step by step guide will guide you through every step of the process.

Surely you have already submitted to and, and quite simple to perform. On our website there are detailed schemes for folding these toy boats for an exciting game with a baby or interior decoration. But if you still don’t know how to make a steamer out of paper, then quickly learn this amazing craft. The proud paper steamer will be a worthy addition to your personal origami collection, and for children it will be not only an interesting toy, but also an excellent educational school for a novice innovator. Our step-by-step instructions will tell you in detail how to make a steamer out of paper in 1-2 minutes. See for yourself how simple it really is.
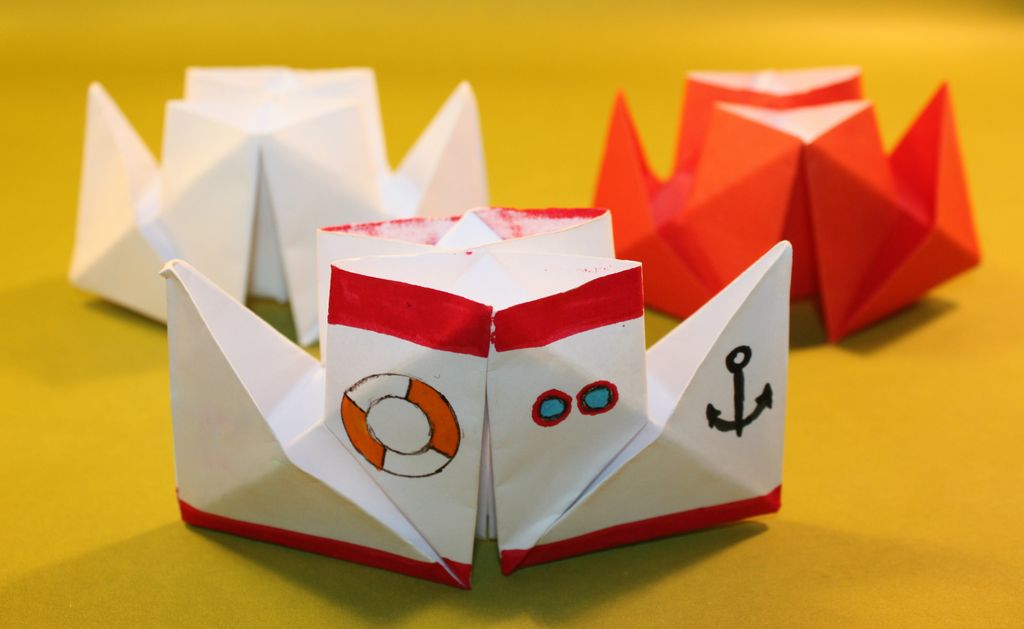
Origami is not only a developing art, but also an excellent opportunity to captivate a child with an entertaining game with paper figures. If the kid does not yet know how to make a paper boat, be sure to teach him how to fold such a toy. The child will develop the further scenario of the game himself: a paper boat can roll animals from Kinder Surprise, and a “real” canoe is simply indispensable for every Indian for hunting and exploring the mysterious rocky grottoes.
 What would you name the boat? Canoe and punt made of paper.
If the baby is bored with toys, just show him how to make a paper boat. Children study the process with interest, and then work on its details for a long time, equipping the origami ship with plasticine passengers, paper tools, a straw flagpole or an impromptu sail. Launching paper boats is even more interesting than folding. Adults do it with the same passion as kids. Why not make folding and launching a paper fleet a family hobby then?

An ordinary letter envelope is bought at the post office, but not every shipment is worthy of a typical paper "pocket". Romantic messages and greeting cards are much more pleasant to receive in an exclusive envelope, lovingly decorated with applications and hand-painted. A beautiful festive envelope gives the first impression of a valuable investment. And in order to emphasize your reverent attitude towards the addressee, you should fold a cute paper envelope with your own hands, using the origami technique and your own imagination.
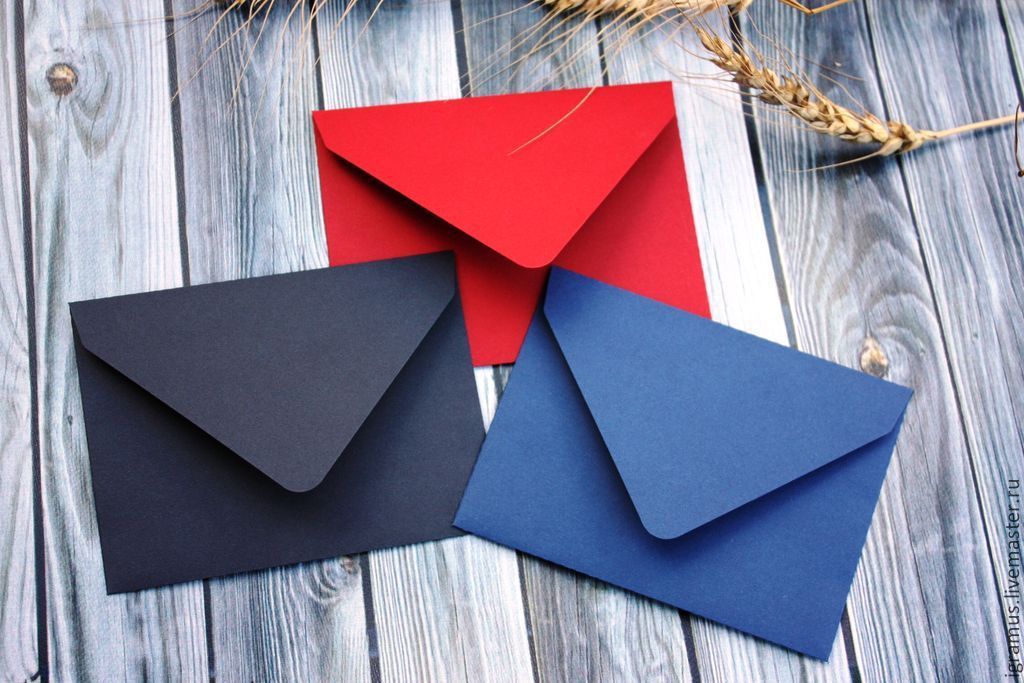 Homemade paper envelopes
The art of origami consists in folding various figures, crafts, and silhouettes out of paper. A feature of the origami technique is that glue or scissors are not used in the manufacture of works. The direction of origami originated a very long time ago, around the 7th century, after the recipe for making paper began to spread from China to other countries, primarily to Japan.
Origami paper figures were used by Japanese monks in rituals and served as decorations for temples. Later they became one of the symbols of Japanese culture and were recognized by the aristocracy.
In contact with
What is origami?
 Right now origami- an intricate hobby or just an unusual hobby that develops both creative and logical skills. Popular, origami in schools and kindergartens, as this is an interesting activity for a child.
And some figures created by origami masters amaze with their beauty and sophistication. In addition, crafts such as paper origami for children will complement the interior of your room in a very interesting way and will serve as a wonderful addition to packaging.
Origami for a child
 Basic origami crafts for children are very easy to make, you just need to understand well scheme.
And from the materials and tools you only need colored or white paper (office paper is suitable for printing), a cutter or scissors for cutting out the original shapes (usually a square or rectangle), a ruler and a pencil, and also for some works - decorative elements: plastic eyes, beads, etc.
There are many different types of origami art and no less interesting alternative techniques to it, here are just a few.
Types of origami

We will turn to the first two methods and find out how to make origami out of paper: modular and classic.
Simple origami for children: animal patterns
Origami schemes in classical technology can be very different. These are flowers, and all kinds of animals or their faces, boxes, airplanes, leaves and many others. When creating paper figures, all folds must be made neat and clear so that there are no errors that can lead to an untidy appearance of the product in the future and difficulties in further folding.
 Let's start by creating a very famous craft - figurines crane.
- First, cut out an even square and fold it in half diagonally 2 times.
- Then follow step 4 on each side. You should get a new square.
- Unfold it to get an elongated diamond, as shown in diagrams 6 and 7, repeat for the other side.
- Bend the edges to the center, as shown in Figure 9. You should get a cut from below.
- Bend the bottom parts up. This will be the neck and tail. On the neck, you will need to make another bend to get the head.
Here is our first crane! Be sure to use the diagram when creating it for a more understandable description of the actions.

If you managed to make a crane, then you can try your hand at creating other animal figurines, for example, pandas, chanterelles or the face of a dog.
You can also play with some of these crafts, and not just use them as decoration.
These include a frog figurine that can jump on the table if you click on it.
 To do frog, you will need to cut a square out of paper. Preferably, of course, green paper, but in general, your frog can be any color you want.
- The square needs to be folded in half twice and unfolded back to get a rectangle with fold lines.
- The upper half of it is folded in half and turned back as much as 3 times: 2 diagonally and horizontally.
- And then the upper part is bent down, while turning inside and forming a triangle.
- Then we bend the edges of the lower part to the center and up.
We bend the corners twice, also twice, to turn them out and get paws. We bend the resulting workpiece in half and bend the lower part.
The frog is ready! You can glue or draw eyes to the finished craft.
Well, if you want to keep your little child busy with this interesting business, choose paper patterns for children, consisting of 5-8 simple steps that any beginner can handle.

Paper Crafts: Modular Origami for Beginners
To create crafts from modular origami, you must first learn how to make the modules themselves.
Triangular modules can be used to create many beautiful products.
How to do origami modules?

Our first module is ready.
For a large and beautiful product, you will need a lot of such details. Choose the size that suits you for the job - not too big so that the product is not very bulky, but not too small either.
 One of the most popular crafts from modular origami is voluminous swan. This is quite a large and serious, though not very difficult work. For such a swan, you will need 485 white modules - for the body and neck, and 2 colored (yellow, red or orange) - for the beak.
After the modules are ready, proceed to connect them together.
- We take 3 modules, insert 2 of them into the pockets on the third. We add 2 more to them in the same way (1 in the second row, 1 in the first). And then we add the module to the 3rd row. So we finish 2 rows, gradually adding a third and closing them in a circle. In total, there should be 30 modules in each row.
- We also do 4 and 5 rows. We “turn out” the product, squeezing the center inward. We add the 6th row, putting on the modules in a checkerboard pattern.
- In the seventh row, we begin to make wings. We put on 12 parts, skip 2 and put 12 more. There will be a neck in a narrow gap, and a tail in a wide one.
- We continue to make wings, with each row reducing the number of modules by 1, until only 1 piece remains.
- In the same way - the tail.
- We make the neck from 10 modules, sequentially inserted into each other (in one row), arching it a little. At the end we insert 2 colored parts - a beak. Our swan is ready!