How to make a New Year's tree toy. DIY Christmas tree decorations
Decorating the New Year's interior plays an important role in preparing for the New Year. Making New Year's decorations for the Christmas tree with your own hands will not only be a good solution in organizing decor, but also an interesting creative process. All family members, including children, can be involved in this activity. In our article, we have collected material on how, using the simplest materials, you can beautifully and elegantly decorate your Christmas tree without resorting to buying expensive decorations. In addition to the publication, we added 45 interesting photos of handmade New Year's toys.
DIY Christmas tree decorations - collecting materials, accessories and preparations
If you decide to make interesting New Year's toys for your Christmas tree as decoration, you should first prepare all the necessary materials and tools. Since the variety of such needlework is very large, we will consider the most basic accessories, which include pencil, glue (PVA and hot-melt gun), brushes, acrylic paint and gouache, scissors, threads. Crafts such as a DIY Christmas tree decoration can have many options, but one way or another, you need to acquire glitter, varnish, beads, and bright braid. In general, it will help make the toys truly New Year’s, giving them a charming shine and uniqueness.
Materials can include scraps of fabric, colored and white paper, cardboard, colorful napkins, polystyrene foam, light bulbs, cereals and even dough.
DIY Christmas toy dog for the Christmas tree - a symbol of the coming year
Since the Year of the Yellow Dog awaits us ahead, it is necessary that this symbol be present in the New Year's interior, in particular on the Christmas tree. A do-it-yourself New Year's dog toy for the Christmas tree can be made in different ways. The simplest one is to cut out a dog from cardboard, adding eyes, ears, and a mouth to it - you can keep your child busy with this creative process. Draw a template and cut it out, and the children will use the template to make many of these little dogs, decorate them and make a garland out of them, hanging them on a long thread or tinsel.
While they are busy with such a fascinating process, you can make New Year’s toys for the Christmas tree with your own hands for 2018, “dogs” from fabric. Felt fabric is often used for these purposes, which holds its shape well and has a rich palette of colorful colors. In the photo in our article we have collected examples of patterns that will help you sew cute doggies. After cutting out the blanks, sew them together and stuff them with padding polyester (don’t forget to insert the ears). The eyes can be made from beads, and a small red cap with a loop can be sewn onto the head.
Bones, also sewn from fabric or made from puff pastry, will help to appease the mistress of the coming year, the recipe for which will be discussed in further material.


How to make Christmas toys with your own hands from paper
Colored and white paper give a lot of scope for creativity. It is especially easy for children to work with this material. It allows you to create a wide variety of decorations: garlands, New Year's toys and snowflakes with your own hands. In order to make the simplest chain garland, you need to take colored paper, preferably double-sided. Cut out thin strips of 1 cm of equal length from it at your discretion. Using PVA glue, glue the ends of the first strip together. We thread each next strip into the previous ring, also glue it together and get a link. This garland can be used to decorate a Christmas tree or the walls and ceiling of a room.
To make multi-colored “snowflakes” for your Christmas tree with your own hands, you need four sheets of paper of different colors. We cut out symmetrical snowflakes from them, as shown in the photo, bend them in half and glue them together with edges, not forgetting to insert a loop. In this way you can make bells, stars, etc. If you make three balls of different sizes and glue them closely onto one thread, you will get a three-dimensional snowman.


Original DIY Christmas toys for a Christmas tree made from light bulbs
If a light bulb burns out in your home, don’t rush to throw it away; it can become an excellent material for making a variety of decorations. For example, you can make Christmas tree decorations from light bulbs with your own hands (photos are presented in the article) using the decoupage technique. For this you will need beautiful napkins. The light bulb can be pre-painted with white acrylic paint. We cut out an image from a napkin, and applying it to the surface, using a brush, apply PVA glue on top. You need to work very carefully so that “ribs” do not form, since it will be very difficult to level them so as not to damage the design.
While the toy is still wet, you can sprinkle it with glitter (they will also help hide some flaws). The loop can be glued using a heat gun. Light bulbs can be painted by making Christmas tree decorations with your own hands in the form of Santa Clauses, dogs, penguins, snowmen, etc. in this way you will create original, unique decorations, practically without material costs.


DIY New Year's bell toys
The bell is an integral attribute of the New Year, since at all times it was believed that its ringing drives away evil forces and protects the house from various troubles. A bell can be cut out of cardboard, decorated with beads, sparkles and a loop. There are also other simple ways to make New Year's bell toys with your own hands. For example, sew. Any fabric is used for these purposes.
Make a template on cardboard. Cut out the blanks according to the template, sew them together, stuffing them with padding polyester or fabric scraps in the process. Make a loop. The product can be trimmed with beads, decorated with small multi-colored buttons, sprinkled with glitter, after applying glue to the surface.
Another way to make New Year's toys in the form of bells with your own hands is to use plastic, namely glasses and bottles. You can wrap the glass in foil (for glue), make a hole in the bottom with an awl and pull through a loop. The edges of the product can be decorated with tinsel or artificial snow. In a plastic bottle, you need to cut off the top part, which is with a cap, and decorate it with paints. We also make a loop on which we tie a large bow. While the paint is still wet, you can apply a layer of glitter.


DIY Christmas toy clock for the Christmas tree
A beautiful decoration reminiscent of the approaching celebration will be a DIY New Year's toy clock for the Christmas tree. You can make it using a cardboard box, which everyone probably has in their home. The most important thing is to cut the roof correctly. To do this, you need to draw it on the front and rear panels and cut it off, and cut the top strip above them in half and glue the roof together, thus forming two gentle slopes. In the future, they can be decorated with cotton wool or white tinsel in the form of snow.
We paint the blank and, after drying, proceed to designing the dial. You can simply draw it using a compass, stick on numbers and arrows cut out of colored paper, use buttons and other materials. You can make your own New Year's Christmas tree clock toys using DVDs, which are easy to draw on with a marker, to decorate the dial.
Having decorated the dial in a way convenient for you, we begin decorating using artificial snow, beads, tinsel and other materials. If our clock will hang on the tree, we need to make a loop to the roof by piercing two holes with an awl and stretching the braid. At the bottom you can put two cords in the same way and decorate them with cones. Your DIY Christmas tree clock toy is ready.


DIY Christmas toys for the street tree
It’s also worth considering decorations for the street - this could be a DIY New Year’s toy for a city tree or for a green beauty in the courtyard of a private house. In any case, it is necessary to choose the right material that will not be afraid of moisture. For example, it is very good to use plastic bottles for these purposes, which are suitable both in size and in terms of moisture resistance and plasticity of the material.
The easiest way is to make a large candy toy by wrapping a bottle in bright foil and twisting the ends. It can be decorated with bows and a loop attached. With the help of paints, a large 5-liter bottle can easily be transformed into a fairy-tale house, and charming New Year's penguin toys for the Christmas tree with your own hands, photos of which are posted in our article, will become a real fairy-tale decoration.
New Year's bells can be made from flower pots. Wrap them in foil, glue on multi-colored tinsel, bows, and ribbons. You can connect two bells together, make a loop and decorate it with a star.
Polystyrene foam can also be a good material for making Christmas tree decorations with your own hands. Cut a circle out of it, treat it with golden sparkles or wrap it in tinsel, first smearing it with glue. Thus, you will get a blank for a wreath. Below you can make a composition from pine cones, artificial flowers, berries and other materials, which can also be given a golden hue. Attach a fluffy bow and a loop at the top.


The ideas for DIY Christmas tree decorations are endless. Looking around, you can find a lot of material that is perfect for decorating the New Year's beauty's decorations. Imagine, experiment and don’t forget to involve children with their unbridled imagination in this exciting process.
DIY Christmas tree decorations - 45 beautiful photos updated: December 13, 2017 by: Kyiv Irina
The New Year is approaching, which means that a magical time of miracles is coming, in which not only children, but also adults believe. A tradition has taken root that if you decorate a Christmas tree with beautiful decorations made with your own hands, and at the same time make a wish, then when the chimes strike, it will certainly come true. In this article we will tell you how make a Christmas tree decoration with your own hands.
Paper is a universal material for needlework. You can use it to make extraordinary New Year’s decorations not only for the Christmas tree, but also for your home.
The modern market offers us many options for handmade paper materials. These include:
- Cardboard
- Corrugated paper
- Self-adhesive paper
- Colored paper of different weights
In addition to decorative paper materials, you can also use old postcards, newspapers, and magazine sheets to make New Year's decor. You just have to show your imagination and creativity to make original ones DIY Christmas tree decorations made of paper, We’ll tell you later what techniques are best to use.
Toy made from paper tubes using scrapbooking technique
We invite you to decorate your Christmas tree this year with this beautiful snowflake:

To make it you will need the following material:
- Several varieties of colored cardboard (two sheets will be enough)
- Scrapbooking paper (you will also need 2 sheets)
- Scissors, high-quality glue (preferably quick-drying or heat gun)
- Braid of any color and fastening from an old chain (in the form of a ring)
When you have all the materials for work in your hands, proceed to complete this DIY Christmas tree decorations made from cardboard. It won’t take much time – literally half an hour, maximum 40 minutes. The algorithm of actions should be as follows:
- Prepare squares of colored cardboard of different sizes. 14 pieces should have sides of 2.5 cm, and 14 should have sides of 3 cm.

- Make tubes from the resulting squares, gluing their ends together to form a rhombus.
- Make a circle out of cardboard (its diameter should be 5 cm).

- Mark the middle on this circle and start gluing the tubes one after another. The first row should consist of large tubes, and the second - of smaller ones.

- Decorate the resulting snowflake with rhinestones, a brooch, attach a braid and a chain attachment to it - the decoration is ready and can be used for its intended purpose.
New Year's paper toy in quilling style
You can do something like this DIY Christmas tree toy for school:

After all, every year on the eve of the New Year holidays, children are given homework to prepare an original decoration for the Christmas tree using improvised materials. The quilling technique is the best in this regard, because you don’t need to spend money on decorative paper, you can use:
- ordinary newspaper sheets
- baking molds (in the form of stars or hearts)
- minimum office supplies - glue, scissors and varnish
- braid for attaching the toy to the Christmas tree
Making the toy is very simple:
- Cut out many different strips of 5 cm wide from newspapers and fold them in half lengthwise towards the center. For an example of how this should look, see the image below:

- Twist each strip into circles, gluing them so that they do not fall apart. They should look like this:

- Place the base of the future toy in strips in a baking dish (along its perimeter). In our case it will be like this asterisk:

- Lubricate the base with glue and fill the mold with circles (they will also need to be glued together).
- When the toy is dry, open it with colorless varnish, and then remove it from the mold, thread it through the braid and hang it on the Christmas tree.

DIY paper ball toys for the Christmas tree
Some people throw away old books, but from their shabby, already yellowed pages you can create such a very beautiful three-dimensional Christmas tree ball:

In addition to book pages, you will need:
- Fast drying glue
- Any container that you circle to make circles out of paper, or a compass
- Scissors
- Chopped glitter
- Paper clips
- Braid
- Needle and thread or sewing machine
Creating this paper Christmas tree decoration will not take much of your time. In half an hour you will make an original decoration if you follow this procedure:
- Cut out circles from book paper

- Sew them in the middle using a sewing machine or needle and thread

- Using paper clips in a checkerboard pattern, clamp the edges together as in the photo:

- These edges need to be glued together to form a ball:

- Fill the resulting holes with glitter or use other decor.

All that remains is to attach a ribbon to the toy and hang it on the Christmas tree.
DIY Christmas tree decoration made from fabric
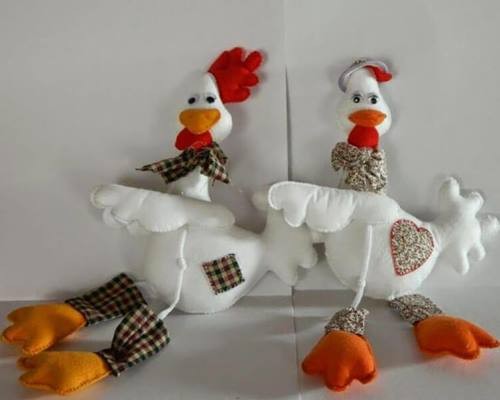
Fabric ranks second among the materials most often used to create Christmas tree decorations. Such toys are very practical, as they do not break. In addition, they look very bright and are completely safe for children. They can be made flat, but they look much more attractive if they are filled with some material, for example, padding polyester or cotton wool, so that they gain volume.

Since the Fire Rooster will be the patron of 2017, we offer you an example of making DIY toys for the Christmas tree, symbolizing the year of the rooster.
To make it you will need the following material:
- Fabric 5 different colors
- Buttons for making eyes for a cockerel
- Sintepon
- Braid
- Pattern
- Thread and needle

- Using this pattern, you cut the fabric, then gradually sew the parts together, gradually filling them with padding polyester.
- Seams can be reversed
- When the product is ready, sew a braid to it, with which you will hang the toy on the Christmas tree
In addition to the symbol of the coming year, you can make others DIY soft toys for the Christmas tree:
- Boots
- Mittens
- Birds
- Asterisks
We have attached the DIY Christmas tree decoration patterns that we have listed for you in this article:


DIY felt Christmas tree toys
Felt is a material that does not require additional processing in the process of making Christmas tree decorations. You can make a huge number of toys from it for the New Year. We will tell you about the simplest but original options.
Felt Christmas tree

- Cut out 5 circles of different diameters from green felt. The maximum diameter should not exceed 10 cm.
- In each circle you need to make a cutout in the form of a triangle, such as shown in the photo below:

- Make cones from these circles, the ends of which need to be glued with quick-drying glue.

- From the cones, assemble a pyramid and sew it with thread. Attach a ribbon to the top.

- Make a Christmas tree trunk from brown felt - cut out a rectangle, twist it into a tube and sew it to the Christmas tree so that the toy looks like this:

Felt candies

- Cut strips from felt, the width of which is 1 cm and the length is 20 cm

- Glue 6 strips of three different colors together

- Twist the resulting volumetric strips into a circle

- Attach sticks and braid to these circles so that you get these Christmas tree decorations:

Crochet Christmas tree toys
Few people master the art of crocheting, because this activity is very painstaking, requiring time and certain knowledge. But with the help of a hook and knitting threads you can make a very simple but original decoration for old New Year's glass balls.

Here are a few Christmas tree toy schemes crochet:


DIY Christmas tree toy from a bottle
The most popular toys on the New Year tree are snowflakes, because they symbolize the onset of winter and the holidays. Oddly enough, you can do something like this Christmas tree decorations made from plastic bottles. They will look very attractive not only on a New Year's beauty in an apartment or at school. Snowflakes from bottles are suitable as handmade toys for the city Christmas tree.

It's very easy to make them:
- Separates the bottom of the bottles from its main part, which you will not need
- Paint the bottom of the bottles with white paints to create a frosty pattern. You can sprinkle them with glitter on top
- All that remains is to attach the ribbon and hang the toy on the Christmas tree
DIY Christmas tree decorations made from disks
In every home you can find many damaged CDs, from which you can make wonderful decorations for the Christmas tree. There are several simple but original options:
- Cover a round disc with knitting threads, fringe, fabric, beads or beads:

- Cut the disk into small pieces, and then paste them over an old glass ball or a ball made using the papier-mâché technique:

- Cut out a bell or a Christmas tree from the disk using a stencil, and simply attach braid to the figures. Due to the natural shine of the disc, such toys will look very bright:

DIY beaded Christmas tree toys
Beading is very popular today. This type of activity is rightfully elevated to the rank of high art, because only gifted craftsmen can create beautiful products from small beads. But this material can also be used to make simple decorative items, for example, Christmas tree decorations. In this article we will present several techniques for making New Year's decorations using beads:
- Cover an old New Year's ball with beads
All you need to make such a beautiful ball is:
- Glass bowl
- Glue brush
- Multi-colored small beads or large beads
Coat the ball with glue and roll it in beads so that it evenly sticks to the ball:

- Weave a toy according to the pattern
This option is suitable only for those who know first-hand what beadwork is. Using beads, wire and a diagram, you can create such a beautiful snowflake:
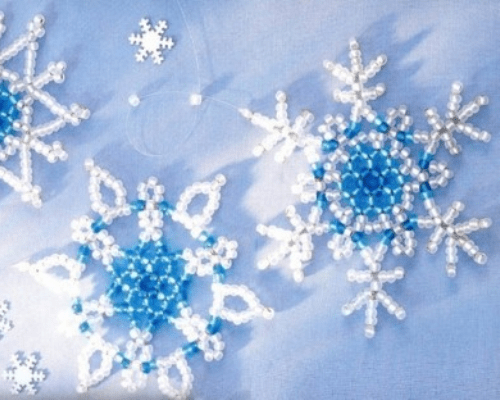
You can safely do this DIY Christmas tree toy for a competition New Year's decorations. Approximate patterns for knitting snowflakes or stars from beads are presented below:


- String beads onto a wire and twist a Christmas tree with a snake

DIY foam toy for Christmas tree
Foam plastic, this is the material from which you can make a large toy for the Christmas tree with your own hands. This material can be processed in any way:
- It can be painted with paints
- Cover with decorative tape or oracal
- Glue beads on him
- Decorate using decoupage technique

Do-it-yourself voluminous Christmas tree toys made from natural materials: photo


In this lesson I will show interesting master classes on how to make Christmas tree decorations with your own hands. These bright and original toys will be the best decoration for our Christmas tree! The most long-awaited holiday is approaching - New Year! For some reason, it is during the New Year that you want to believe in fairy tales and magic. This is such a wonderful time! The snow sparkles, the city streets are decorated with colorful lights. There is a pleasant, pre-holiday bustle all around. Everyone chooses gifts and orders them on the Internet, but it has long been known that the best option is a gift made with your own hands.
How to make New Year's toys with your own hands
If you have a large number of relatives, friends, work colleagues, then it is difficult to please everyone. In this case, you can give a souvenir; all that remains is to make a choice. The best option would be a DIY Christmas tree toy in the shape of an angel. You can make it from paper, fabric, beads, but I want to offer you an unusual option - an Angel made from seashells. Unusual, exclusive and very beautiful! It doesn’t take much time to make, about 20 minutes. Well, shall we get started?
Necessary materials:
- Seashells of various sizes: 1 large for the base (the appearance resembles a dress), 2 medium ones for the wings and you can take two small ones for the legs.
- White gouache.
- Pearlescent (transparent) nail polish.
- Glue gun.
- A thread of beads or a white satin ribbon for hanging.
- Decorative snowflakes.
- Brush.
- 1 large bead for the head.

Take the base. Glue the wings symmetrically to it behind the back wall using a hot gun.

We paint the angel with white gouache. Let it dry. To speed up the drying process, you can use a regular home hair dryer. After the first coat of paint has dried, apply the second. Dry again.

Cover with 1 layer of pearlescent varnish.

Take a string of beads. Measure the diameter of the large bead. Cut to the required length.

Glue the thread to the top of the bead.

Now we glue the head (bead) to the base. We fix it.

All that remains is to make the pendant. This is a Christmas tree decoration, so you need to take either a satin ribbon (0.5 cm wide) or a thread of white beads and glue it to the back of the base of the toy. You can glue decorative snowflakes to the angel's dress.

Our DIY New Year's toy in the shape of an angel made from shells is ready. You can make several of these souvenirs at once. While one is drying from the paint, start gluing the second and third. This is what a conveyor belt of New Year's gifts looks like!


How to make New Year's toys in the shape of mice - the symbol of 2020 with your own hands
New Year's toy - boot for gifts
What's the New Year without gifts and souvenirs?! You always want to give a gift in an interesting way. Therefore, in this master class we will knit a New Year's boot for gifts; it can be hung on the Christmas tree as a hand-made New Year's toy.

To knit a boot we need the following materials and tools:
- White and blue yarn;
- Hook 3 mm;
- Scissors.
“Children's Novelty” yarn is suitable for knitting. It is 100% acrylic. Let's start knitting from the sock. We need to form an amigurumi ring of 6 loops. Therefore, we will make an initial loop and knit 2 more air loops. Then in the 2nd loop from the hook we make 6 sc.
Now we need to increase the number of loops to 24. To do this, we will knit 3 rows with increases in a row. First we will simply increase each stitch by working 2 sc in each stitch.
In the new row we will first knit 1 sc, and in the next loop 2 sc, in the 3rd loop again 1 sc and so on until the end of the row. That is, we knit with an increase through a loop.
Then we will perform a row with an increase every 2 loops. And add 1 more row every 3 loops of the circle. This is how we get 24 loops, knitting 6 increases in each row.


Now we will form the heel. Change the thread to white again. We knit exactly 12 sc. Then we turn around and do 1 ch. Next we will knit 8 turning rows. Each of them will contain exactly 12 sc.

Now we turn the workpiece onto the left side and sew the heel, folding it in half. We sew, doing stbn..

Turn the boot back right side out. Let's start knitting the top. Join at the seam on the heel and knit in the round with blue thread. We knit, decreasing in 2 places. Where the heel meets the toe. Right in the corners.


Now let's make a frill. We join with a white thread and make 3 lifting loops. Next, we knit another 4 dc at the same point. We skip the loop and work 1 sc. Next, we skip the loop again and work 5 dc in one loop. And we will knit like this until the end.

Turn the edge of the sock a little and make a loop from the air chain. We will hang the boot for her.

You can decorate your boot by embroidering a snowflake with your own hands. The New Year's boot for gifts and souvenirs is ready! You can knit several boots, and the children will be happy to look for them and get gifts.

Christmas ball made from disk
Decorating a Christmas tree for the New Year - what could be more interesting? In this short lesson, let's look at a master class on creating a wonderful ball from a disk.

To work we will need:
- white and blue felt;
- disk;
- white cotton yarn;
- glue;
- decorative buttons and other decorations.
First, cut out snow and blue sky from felt, the diameter of this should be equal to the diameter of the disk.

Next, take hook No. 2 and white yarn, start knitting the reverse side of our decoration, it should have a large number of spaces, since thanks to them, the disk itself will be visible. We choose any pattern for this.

The diameter of the reverse side must correspond to the diameter of the disk. Now let's start decorating the outside. Glue colorful buttons to the felt.

Then we take a thread and sew on beads, they will imitate snowflakes. This is what we get.

Now you need to sew the two parts of the product together by inserting a disk in the middle. We stitch and sew a ribbon on top, and also use a white ribbon to cover the outline of the disc.

Now our work is ready. This decoration can be hung on any Christmas tree!

New Year's snowflake on a Christmas tree made of threads
Snowflakes are an integral part of winter and New Year's decorations! There are many ways and options for making such crafts. Today we will look at a very interesting, and most importantly simple way to make a snowflake from knitting threads. Making such a snowflake is very easy and quick, so you can start working with your children.

To make a snowflake we will need:
- white knitting thread;
- 6 transparent beads;
- scissors;
- needle;
- school notebook or book.
It is not necessary to make such a snowflake from white yarn. You can take a thread of any color. The size of the finished snowflake will depend on the object on which we will wind the thread. You can take a general notebook or book and wind a white thread. The thicker we wind it, the larger and thicker the snowflake will be. But you don’t need to wind a lot, because in this case the pattern of the finished product will be difficult to see.
Then carefully remove the workpiece and pull it in the center with a thread of the same color, tying 2 tight knots. That is, we grab both sides of the resulting ring and tie a knot.

Now use scissors to cut from both edges. We tighten them well with the blades of scissors so that the threads are then approximately the same length.
Turn the workpiece over and distribute the threads approximately equally. We need to see the center of the workpiece. We do this on both sides, forming a circle of threads. In this position, place the workpiece on a hard surface.

We divide the threads into 6 approximately equal parts. There is no need to count each thread, just distribute it in bunches by eye.

Now, stepping back a little from the center, we pull the bundle with thread.

We do this with each bunch. We drag at the same level.

In the center we already have a small six-pointed snowflake. Next we will form a new tier of snowflakes. To do this, we need to divide each bundle into 2 equal parts. These parts must be combined with adjacent beams.

And we tie the resulting bundles again.

To decorate our snowflake we will take 6 transparent beads. We thread a piece of thread inside. You can use a wide eyed needle for this if it fits into the hole on the bead.

We tie the bundle again. We do this with each bunch.

Now all we have to do is trim the tassels. We cut them with scissors.

In just a few minutes you can make a beautiful three-dimensional snowflake from knitting threads.

This beautiful airy snowflake can be used as a New Year's toy to decorate a Christmas tree.

DIY Christmas toys for decorating the Christmas tree in the yard
Original Christmas tree decorations can be made using egg packaging, water and gouache paint. Such toys will look bright and beautiful on the Christmas tree in your yard and will delight you and your guests.


To make a Christmas tree toy you will need:
- Egg packaging (store container);
- running water (from the home tap);
- flesh-colored sewing threads;
- plasticine for modeling;
- scissors;
- yellow gouache paint;
- freezer.

Pour tap water into a plastic cup.

Use yellow gouache paint to color the water in the glass. Fill the second glass with clean water in case you need to add it to the mold.

Pour colored water into the molds, but not to the brim. About half.

Close the egg cup lid tightly.

Place the package in the freezer. Let the colored water freeze into ice.


Cut threads for loops. You will need ten pieces of fifteen centimeters each.

At the next stage you will need a piece of plasticine.

Roll tiny plasticine balls according to the number of loops.
Stick plasticine balls to the ends of the threads.

Flatten the plasticine balls.


Place the loops into the molds.

Now you will need a second glass of water.

Add water to the molds to the brim.

Close the mold again and put it in the freezer.

After the second layer of water freezes, remove the finished toy.

This is such an unusual Christmas tree toy.

You can decorate the Christmas tree in the yard. This made ten ice decorations.

Ice toys will delight you until spring!

Original and simple! This is the story of one egg carton).

Christmas deer toy for the tree made from popsicle sticks
The next toy is a cute deer made from wooden popsicle sticks. An entertaining process and amazing results are guaranteed!

Required materials and tools:
- wooden ice cream sticks;
- stationery knife;
- glue;
- paint and brush;
- decorative elements.

At the initial stage, you need to prepare a paper stencil. You can do this in two ways: print it from the Internet or draw it yourself. In any case, the picture must subsequently be cut out with scissors.

We lay out the wooden sticks close to each other and transfer the outline of the deer using the blank. A pencil is quite suitable as a tool. Its lead fits well on a wooden surface.

After completing the labor-intensive process, all elements need to be glued together. The result should be the basis for a Christmas tree decoration.

We begin the entertaining stage of decor by painting a faceless deer. Colors can vary from traditional red to bright yellow. However, you should not combine more than two types. Otherwise, decorative elements may get lost against such a background.

At the final stage, we fasten the loop and decorate the base of the toy. Ribbons, buttons, beads are not a complete list of items that can be used to decorate a toy.
A cute handmade Christmas deer will certainly surprise friends and family with its originality. Using the described principle, you can assemble a whole hand made collection of toys in the form of Christmas trees, shoes or hearts. Creative inspiration and imagination!

Another Christmas tree toy made from popsicle sticks
Christmas snowflake on a Christmas tree made of glue
It’s hard to imagine the New Year’s mood without snow, so let’s add some snowflakes to the home decor. They can be made from various materials, from plain paper to wood and glass. Let's consider a method for making a decorative snowflake from glue.

We prepare all the necessary tools and materials:
- glue gun;
- glue for a gun (a couple of sticks is enough);
- baking paper or foil;
- any cream;
- glue;
- tassels;
- scissors;
- glitter;
- thread for hanging.

The whole process will take no more than an hour, everything is so fast and elementary that you can trust the child to do it. First of all, we choose the design of the future snowflake. You can search on the Internet, or you can come up with it yourself.
Please pay attention that there are no too small parts, the glue will merge into an ordinary blot in them.
We transfer the drawing to baking paper/foil, grease the surface with any cream - without it the glue will be difficult to peel off.

We heat up the glue gun and begin to carefully trace the outline of the snowflake with a strip of liquid glue. We make sure that there are no separate lines left, they all must intersect, otherwise individual parts will simply fall off.

After the New Year's snowflake is completely circled, let it dry for a few minutes.

Dry glue is easily cut with scissors, at this stage we cut off all the imperfections (protruding drops, excess glue), and correct the very shape of the snowflake.

Now you can begin the decorating stage. This will require glue. Using a brush, apply a thin layer of glue to the surface of the snowflake.

Sprinkle with glitter, white glitter will create a more natural effect.

Let the glitter glue dry for 20-25 minutes, after which we attach a thread for hanging. That's it, the snowflake is ready to decorate the Christmas tree and give New Year's mood.


How to make such a New Year's toy - watch a detailed video master class
Solution for threads: take 50 ml of water and dissolve 3 teaspoons of sugar in it, add PVA glue - the more, the better. And we wrap the balloon with threads as shown in the video:
DIY 3D Christmas tree toy
Decorating a Christmas tree with the whole family is a real pleasure. The very preparation for the New Year causes dizziness and anticipation of a fabulous holiday. Each family member is busy with his own business, for example, looking for gifts, recipes for the holiday table, or making New Year's decorations with his own hands.
On the eve of the New Year, why not decorate the Christmas tree with toys made with your own hands from natural materials, in particular, pine cones? This simple craft looks very harmonious on green branches.
For work we prepare:
- pine cone;
- clothespin;
- tinsel;
- plastic snowflake;
- scissors;
- glue.


In this craft we will use an open pine cone. However, absolutely any variety of cones, for example, Crimean pine, is suitable for making this decoration.
And one more moment. A plastic snowflake purchased from a craft store is used as a decorative element. If it is not possible to get such a part, it can be replaced with corrugated paper, plastic flowers cut out of cups.
In general, there is something to think about in your spare time. How to make a decent frame for a bump? The process of making the craft is very simple. First you need to glue the snowflake to the clothespin.


Glue a new decorative craft element in the center of the snowflake.

All that remains is to attach a pine cone on top. We don't regret glue. The cone should stick tightly to the plastic snowflake, not to the tinsel.

The decoration is ready. It turned out to be a kind of candle.

Of course, if you wish, you can paint the cones in different colors in advance, decorate them with beads or sparkles. We won't do this. The resulting candle looks very natural and harmonious on the green paws of our fluffy tree.

Here's proof of that. A bump, like a bump. Nothing extra. Even the red color of the clothespin does not bother the eye (although, without a doubt, wood would be better suited here).

A very original Christmas tree craft made from light bulbs - video tutorial
Children's New Year's craft - Christmas tree made from pasta
Children are preparing for the New Year celebration - learning scripts, poems, congratulations and making winter-themed crafts. These can be applications on windows, paper garlands or Christmas tree decorations. We'll probably stick to the last option. Our Christmas tree is already decorated with homemade bunnies, snowmen and other figures.
Today we will make a craft from pasta in the form of spirals. We suggest focusing on the simplest and most understandable master class, which children of primary school age can independently repeat.
For work we prepare:
- Paper triangle;
- a piece of plastic from a folder or binder;
- PVA glue;
- spirals;
- watercolor with brush;
- ribbon or thread for a loop;
- scissors.

We have a primitive Christmas tree template made from white paper in the form of a triangle, scissors and a plastic rectangle from a binder.

Let's connect them together and cut out a transparent blank from plastic for a New Year's craft from pasta - a Christmas tree.


Of course, sometimes gaps will be visible between the parts, but they do not spoil the craft at all. So even better. The tree has clearly visible branches.

It’s time to pick up a watercolor and a thick brush and cover the Christmas tree with emerald greenery. In order not to stain the table, we placed a regular landscape sheet under the workpiece.

All that remains is to hang bright decorations on the prickly paws of the tree. Let's use PVA. These can be shells, bows or the same spirals. In our case, the curls represent long candles. Let's paint them rich red.

Attach a loop to the top of the craft. Here it is better to use a stapler or superglue. Otherwise, how can you hang a pasta toy on the Christmas tree?

A craft glued to an ordinary clothespin will hold firmly enough to the branches. Then you don’t have to deal with the loop.

This is what our decoration looks like on a real Christmas tree among the balls and tinsel. Beautiful?

Children's craft - Christmas tree made from pasta
This New Year's toy can be made in 20 minutes from simple improvised materials.

The work will require the following materials:
- the basis for the cone is a foam ball or an egg from children’s toys;
- brown velvet colored paper;
- foam balls or cone-shaped blanks;
- narrow tape for loop;
- glue gun
We cut a piece 10 cm long from the satin ribbon. From velvet paper we cut out droplets - scales of the future cone about 1 cm in size. The paper can be absolutely any color, because New Year's cones are distinguished by a variety of colors and colors.

First of all, we glue the tape to the wide base of the toy - to the foam blank.

We begin gluing the scales from the loop side. We cover the entire surface of the workpiece with them.

To prevent the cone from looking boring, we crumble the foam and attach balls to the edges of the scales in the upper part.

The New Year's snow-covered cone is ready in a matter of minutes. Such toys will not only save money on purchasing Christmas tree decorations, but will also decorate the tree and the interior of the room.

DIY paper Christmas angel
One of the most popular New Year's decorations can be called a Christmas angel made of paper, which can be made according to the proposed master class. This angel is made very simply and quickly.

Necessary materials:
- White sheet of A4 format;
- scissors;
- pencil;
- ruler;
- glue;
- gold colored sparkles.

First, cut out 2 squares of paper of the required size, on which the final size of the future angel will depend. In our case, the squares measure 9x9 cm.

Now we fold both squares like an accordion.

On each of the blanks you need to make one fold in opposite directions. This fold should be located approximately 1/3 of the distance from the edge.

On each of the blanks it is necessary to glue the side side, the upper part will be the wings of an angel.

Now let's start creating the head. To do this, cut a strip from a sheet of paper, the width of which is equal to the accordion with which we folded the squares. After this, we begin to twist the cut narrow strip, periodically fastening it with glue.
To create a head of the required size, several strips may be required; we take as many as needed to make a proportional craft.

We make the remaining end of the narrow strip free, creating a halo. We fasten a strip of paper at the bottom and leave a small end.

We glue the resulting blank between two previously bent accordions.

Using golden sparkles we decorate our craft.

Our paper Christmas angel is ready. See how to do it here.

DIY Christmas decorations are the most original decorations. Of course, you won’t find another ball, snowman or animal like this. It is made in a single copy. Christmas trees decorated with homemade children's toys look incredibly colorful and unique.
Today we invite you to consider a simple master class and answer the question: how to make a New Year's craft from a plastic cup? Of course, other available materials will be used in the work. But! The decoration will still be based on a yogurt cup.

So, for the craft you will need:
- cotton wool;
- tinsel;
- a plastic cup;
- sequins;
- satin ribbon or thread;
- glue;
- scissors.

At the first stage, the children cannot cope on their own. You will have to turn to adults for help. You need to make two neat holes in the plastic cup. In a second, dad will pierce even holes with an awl, through which we will stretch a satin ribbon - the handle of the future flower basket.

Secure the ends of the tape with small knots.

Now let's take a piece of snow-white cotton wool and put it in the basket. Of course, any other filler can be used for this purpose. However, we associate cotton wool with snow and the New Year. Moreover, it is incredibly light, and therefore will not weigh down the craft at all.

Let's cut off several short pieces from the tinsel and imitate the greenery in the basket.

It’s time to coat each sequin with glue and place a fiery bouquet on the surface of the cotton wool.

As a result, in 15 minutes we received a colorful, light and cute Christmas tree decoration - a basket of flowers.

Let's show you a New Year's craft made from a plastic cup and scrap materials in close-up.

But the basket took its place on the Christmas tree.


This concludes the work. It's time to remove the remnants of materials used in making crafts from the table and go outside for new ideas. A walk in the frosty air always inspires creativity!
New Year's toys - do-it-yourself paper umbrellas


A very beautiful New Year's toy made from a regular napkin, master class
I suggest knitting a small snowflake that can be used to decorate a Christmas tree by attaching a loop to the snowflake. If you knit such a snowflake from thin yarn, you can decorate children's clothing with it. This snowflake is knitted very quickly and easily. Even a novice knitter can handle this job.

Materials and tools:
Karachay acrylic yarn of white or blue color is used for knitting. Hook number 3 is suitable for this yarn. You can use thinner yarn, then the snowflake will be even smaller.

Abbreviations used in the text:
VP - air loop;
RLS – single crochet.
We start knitting the motif from the center. We perform the Amigurumi ring. It was invented by Japanese knitters for small knitted amigurumi toys. We call it a sliding or magic ring: we lay the white thread so that the end of the thread is in the palm of our hand, and wrap the working thread around the index finger (away from ourselves), insert the hook into the resulting ring, pick up the working thread and, pulling the loop into the ring, knit half-column. The ring is fixed and work can begin.

1 row. On the ring we knit sc, 3 ch, sc. The result was an arch of 3 VPs. Six such arches need to be made on the ring. Between the arches we knit one sc. We complete the row with a connecting loop into the first arch. Tighten the ring.

2nd row. We knit 1 sc, 10 VP. In the fourth loop of the chain we knit a connecting loop, 7 VP, a connecting loop to the same point, 7 VP again attached to the same loop and we knit three connecting loops down the chain. We knit 1 sc in the same arch.

To move on to the next arch, we knit 5 VP.

Then we knit a connecting loop into the second loop of the chain, 2 ch, sc into the next arch.

We repeat the ray: ** 10 VP, connecting loop in 4 VP of the chain, 7 VP, connecting loop, 7 VP, connecting loop in 4 VP of the chain, three connecting loops down the chain, RLS, 5 VP, connecting loop in the second loop of the chain, 2 VP, sc in next arch.

We repeat the pattern between the stars 4 more times. We complete the row with a connecting loop into the first arch.

We cut the thread and fasten it. To use a snowflake as a Christmas tree decoration, you need to starch it, prick it, drawing out the rays and dry it in a straightened state.

Snowflake - the toy for the Christmas tree is ready! The master class was prepared by Svetlana Chalkina.

DIY Christmas toys photo gallery

Cardboard heart

Styrofoam toys covered with glitter

From ordinary pistachio shells

Made of plastic (polymer clay) New Year's house

Gingerbread toys

Textile toy


Master classes presented in this video article
The New Year's period is the best time of the year for creativity and handicrafts. After all, it is the aura of magic that has the best influence on boundless imagination. No suitable materials? Don’t rush to go shopping at a store or handmade goods store. Perhaps you will find something interesting in boxes and chests.
With this we will say goodbye. I wish everyone a fabulous New Year's Eve! May the whole next year be incredibly successful, rich and happy!
See how to make New Year's tree decorations from plastic bottles, yarn, felt and even toilet paper rolls, as well as the symbol of 2018 - a dog.
Christmas toys made from yarn

You can quickly create such openwork decorations from scrap materials. You will need:
- yarn;
- plastic tray;
- Bowl;
- pins;
- PVA glue;
- marker;
- paper.

Now lay the yarn so that you get symmetrical curls or use a pattern that you come up with yourself.

Set aside the work, let the product dry completely, after which it’s time to hang it on the Christmas tree. In the same way, you can make a smaller copy of this tree. Don't forget to make a loop for hanging it on the tree.
Yarn is a very pliable material, so it can be used to create toys of almost any shape.

To make such a ball for the Christmas tree, take:
- white threads;
- Balloon;
- glitter;
- PVA glue;
- a bowl.

Now take the ball out of the bowl and let the glue drip off. Then cover the piece with glitter and hang it up to dry. When a day has passed, pierce the ball with a needle and remove it through the hole. Such a product can not only become a decoration for the Christmas tree, but will also decorate the room after the New Year.

Not only white threads, but also colored yarn will quickly turn into Christmas tree decorations. You will start 2018 with your own hands by contemplating a decorated Christmas tree, the items for which you will make yourself or with the involvement of other family members.

Very soon you will have such sparkling balls. To make them, you need to take:
- yarn;
- air balloons;
- bowl;
- glue;
- scissors;
- a needle.

As in the previous case, saturate the ball with PVA glue diluted with water. Hang the workpiece to dry, then pierce the ball to remove it. If you want, don't pierce it, just untie it and let the air out. Then you can remove the whole ball and use it.

If you want, make a backlight for each product by attaching Christmas tree garlands or an LED inside the element.
For such creativity, you can use almost any thread, even jute cord. See how decorating such products with satin ribbons gives them additional charm.

If you wish, cover the finished balls with gold paint, it will turn out very beautiful.
The next DIY Christmas tree decoration can then be taken to school or kindergarten.

Similar decorations are also made from yarn. First, pompoms are created from it, then they turn into an animal or bird. To make such a Christmas tree toy, take:
- yarn of the desired color;
- PVA glue;
- colored cardboard.

By the way, you can use this base to create other Christmas tree decorations. It can be round, heart-shaped, drop-shaped or Christmas tree-shaped.

You will need to wrap the cut-out cardboard blank with threads, secure the ends with glue, then decorate the toys at your discretion.
How to make Christmas tree decorations from felt?
This material is very beneficial; even beginners can use it to create decorations for the New Year’s holiday. At the same time, you do not need to have a sewing machine, since the presented Christmas tree toys made of felt are sewn by hand.

If you want to create such a Christmas tree, then take:
- cookie cutter;
- green felt;
- scissors;
- light green threads;
- a needle;
- multi-colored beads.
Decorate the Christmas tree with beads; you can also use round buttons on the stem.
If you have red and white felt, combining these colors will create incredibly beautiful Christmas tree decorations.

If you don’t know what to give your friend, mother, or grandmother for the New Year, you can sew oven mitts from felt that match the mood of this holiday and give them to them.
To make the following felt Christmas tree decorations, you don't need any patterns. But if you are not sure that you can immediately cut out the star correctly, then first draw it on a cardboard template, cut it out, and then attach it to the felt. Draw with chalk and cut out two parts for each toy.
Such blanks are placed one above the other, a padding polyester is placed inside and swept along the edge with a basting. Sew on the beads, attach a loop on top and you can hang the decorations on the New Year’s tree.

Even small scraps of felt will be useful. Cut out snowflakes of various shapes from them, sew them to each loop so that you can hang these products on the Christmas tree.

To make the next decoration, you need to cut a strip of felt 5 cm wide, and if you need a Christmas tree decoration for a large Christmas tree, then make it 10-15 cm wide. Cut one of the long edges of this strip of fabric in a straight line, making cuts at the same distance.
Roll this cut ribbon into a tight log. Sew a braid on top to secure the workpiece in this position. Sew on the loop, after which the work can be considered completed.

Decorate the Christmas tree with felt pine cones. To do this, take light and dark colored material.
On cardboard, draw patterns of flowers of different sizes, consisting of 4-8 petals. Thread a strong thread into a needle, string these blanks onto it in the following sequence: first put on it a small brown circle with a tail made of the same fabric, then put on a small light flower, and on it a brown one of the same size. Next comes a pair of slightly larger blanks.
Using this technology, assemble the cone so that the largest pieces are in the center. String further smaller ones, the smallest flower last.

If you are crafting with your child, have him draw a Christmas tree on paper, cut it out and use this template to create a felt tree. It is decorated with white circles that represent snowflakes.

Under the strict guidance of adults, a child will be able to make a snowman out of felt.

For such a toy, you need to cut a blank out of white fabric, consisting of two circles of different sizes. You will need 2 parts for each character. They are not completely sewn along the edges, then the padding polyester is put inside, and only then the remaining slot is swept away. All that remains is to decorate the figurine with a scarf, a hat, and sew on facial features from leftover fabric.
If you want to make a New Year's wreath, you can also use felt or other thick fabric. For the base, you need to cut two rings from such a fabric and one from padding polyester or holofiber. This soft filler is placed inside, the edges are swept away.

Now you need to decorate the wreath with gingerbread characters. Look, they are given in the next pattern.

For each, you also need to cut out two parts, seal them with filler, and decorate the blanks, following the photo hint.
DIY Christmas tree toy in the shape of a dog
Since 2018 is the year of the dog, don’t forget to hang a toy made in the shape of this animal on your Christmas tree.

If you want the New Year’s dog toy for the Christmas tree to be as voluminous as in the photo, then you need to cut out two outer parts of the body from fabric, as well as two inner lower ones. Small blanks are sewn together and also ground together with large ones. The head will be more voluminous if an insert is sewn on top.
A dog Christmas tree toy can be made from almost any material. Even a toilet paper roll will do. See how this scrap material can be turned into a fun dog.

To do this, just press well on the top of the workpiece to mark the animal’s ears. Then you need to paint the sleeve and glue the parts of the dog’s muzzle, tail and paws to it.
Here's another idea for such a decoration. If you want the toy to hang on the Christmas tree, then fold the thread into a loop and glue it to it. The bushings are arranged horizontally, then to each you need to glue the muzzle and paws of an animal made of paper, paint it all in the appropriate colors.

You can make a lot of funny dogs out of these bushings. It will be enough to glue to each paw and a muzzle on which ears and facial features are drawn, and the dog’s New Year’s toy for the Christmas tree is ready.

If you need to quickly decorate trees or a room for this holiday, then inflate balloons and glue two ears to each. Using a marker, draw the features of the muzzle, you will get wonderful dogs.

Even old hats can be turned into original dogs. Cut out eyes and ears from felt, and make a nose from pompoms. Glue these elements onto the hat, after which you can admire the work done.

If you have popsicle sticks, glue them onto a cardboard base to create the animal's face and front legs. Attach eyes for toys, other facial features, as well as ears and tail.

You can also make a dog for the New Year from a plastic bottle. The following photo tip will help you create it.

By the way, you can make other decoration elements for this bright holiday from plastic containers.
New Year's toys made from plastic bottles

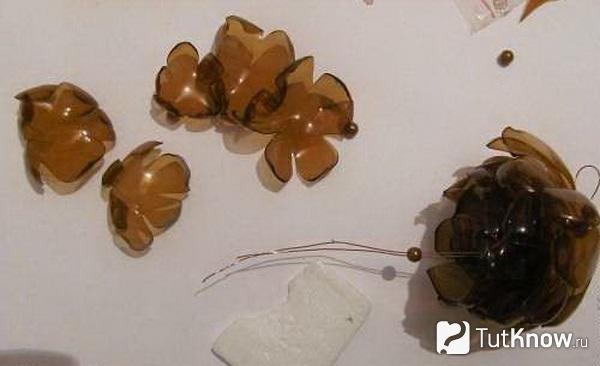
To make such a pine cone, you need to take:
- brown plastic bottles;
- scissors;
- pliers;
- awl;
- wire;
- beads.
Make a hole in the center of each with an awl. Hold these flowers over the flame of the burner, holding them with pliers. When the pieces have cooled, string them onto the wire, starting with the largest one. Secure with beads so that the elements do not move out.
To make a ball from a plastic bottle, take this container and cut out rings of the same size from it.
Now connect them all together so that the blanks resemble a ball. Tie individual elements using rain.

Now you can decorate the balls with tinsel and sparkles by gluing these elements to the base.

What's a Christmas tree without a New Year's bell? To make such a toy, take:
- plastic bottles;
- scissors;
- glue gun;
- polystyrene foam ball;
- ribbons;
- organza;
- sandpaper;
- nylon thread;
- decorative elements;
- gold paint.
To prevent the cut from being sharp, go over it with sandpaper or burn it over a flame.
Paint the items with gold paint. Through the neck, lower the nylon thread down, to which you need to tie a polystyrene foam ball. The organza ribbon should be glued to the bottom of the bell. Attach wire to hang the bell on the tree. But first, don't forget to decorate it as you wish.

The wreath will become a decoration for the Christmas tree or room decor. To do this, you need to cut off the bottoms of plastic bottles, cut them to make these pointed flowers, and then connect them to form a wreath.
Hello, friends! Well, have you already started the New Year's bustle? Yesterday we finally bought an artificial one, but there really isn’t much to decorate it with. Therefore, an interesting idea came to my mind about making Christmas tree decorations with my own hands.
I would like to invite you to do such an exciting thing. So throw laziness aside, call your kids and start creating New Year's!
After all, in any case, you have paper, glue, plastic bottles and other available materials. Well, there is, right? We will need all of them today. From them you can make animal faces, carved ones, as well as the Snow Maiden and Father Frost and a bunch of other wonderful decorations. So don’t think for a long time, but rather start the fun process.
Moreover, there will be more than enough ideas for such an undertaking. As always, I tried and found from the Internet the best options for making toys for the Christmas tree. And if you are ready, then we begin. 😉
Do not forget that in any business you need to use your own imagination. This is the only way you can get amazing and exclusive souvenirs.
DIY Christmas tree toys from scrap materials for children
First of all, I want to offer you interesting ideas for creating jewelry from different and almost any materials that are in every home.
Be sure to involve your children in creativity, because they are the ones who are looking forward to this magical holiday - New Year - more than anything else in the world. And they will be incredibly pleased to hang toys that they make themselves on the Christmas tree.
I suggest you make an interesting decoration in the form of a small Christmas tree from an egg tray.
"Christmas tree from an egg tray"

You will need:
- gouache;
- Super glue;
- paper egg packaging;
- scissors;
- brushes;
- PVA glue;
- thread;
- pencil.

Manufacturing process:
1. Take a paper egg carton and cut out 5-7 cells. Cut out parts from them as shown in the photo. Cut one of the cells in half, this will be the top.

2. Glue the parts together to form a tree. Roll the parts that come out of the halves into a cone and glue them at the top.

3. Take green gouache and paint the workpiece.

4. Cut out decorations from the leftover paper packaging and, if necessary, glue them together. Make small balls from a mixture of small pieces of paper and PVA glue.

5. Color the decorations.

6. Decorate the Christmas tree by gluing all the decor. Don't forget to glue the string by which you will weigh the toy.

7. Cover the product with clear varnish and dry. All is ready!

If you are a lover of expensive wine, then after emptying the bottle, do not rush to discard its cork. Collect them. And at the right time they will come in handy. For example, use them for the following purposes.
"Souvenir made from wine corks"

You will need:
- 6 natural wine bottle stoppers;
- natural twine;
- Super glue;
- scissors;
- confetti, small beads.

Manufacturing process:
1. Carefully cut each cork into 3 equal parts with a knife.

The knife must be sharp so that the corks do not crumble.
2. You should end up with 18 pieces.

3. Now lay out small triangles from these pieces on a hard surface. One triangle should consist of 6 pieces of corks. There should be 3 triangles in total.

4. Glue each resulting triangle.

5. Cut three 40 cm ropes from twine.

6. Tie each string in the middle, forming a loop.

7. Take a dried triangle, attach a loop knot to the top, coating the place where they touch with glue.

8. Loop the twine around the entire triangle and tie the loose ends tightly in a knot.

9. For a tighter fixation, the thread can also be coated with transparent glue.

10. Make the same thing from the two remaining triangular blanks.


Well, now try to make beautiful snowmen from iron corks.
"Snowmen"

You will need:
- ribbons;
- bottle caps;
- acrylic paints;
- buttons;
- glue.
Manufacturing process:
1. Take three good, non-deformed bottle caps. Wash and dry them. Then paint with white acrylic paint.

2. Once the pieces have dried, glue the lids onto the tape, leaving a loop on top.


4. Cut a small strip from a satin ribbon. This will be a scarf. Tie it over the plugs. And glue a button in the middle. The bright decoration in the shape of a snowman is completely ready.

You can also use not only corks, but also the bottles themselves. Just not glass, but plastic. For example, by cutting them into halves and then gluing the parts to the required length, you get an excellent blank for any toy. Let your imagination run wild. And then, using paints, bring the plastic blanks to life.
This is how beautiful and bright you can make a penguin. I think everything will be clear to you from the diagram.

Or fill the bottles with any New Year's souvenirs and decorate the top.

You can also cut strips from plastic and assemble a ball.


Here's a simple idea for making small toys out of paper and satin ribbons. Find New Year's pictures on the Internet, print them in the shape of a circle, and cut them out. Then glue it onto the cardboard. Weave the ribbons together and cover the outline with them. Glue the loop.

And here's another paper assembly for you. Also a very simple product, just for kids. Print the diagram and cut it out. Assemble the craft along the fold lines and glue it together. Decorate with beads, plasticine, etc. Glue a bow loop. That's all!

"Crystal Ball"

You will need:
- half beads made of glass and plastic;
- foam balls;
- trimmings of satin ribbons;
- scissors;
- glue gun
Manufacturing process:
1. Take a foam ball and start covering it in a circle with half beads. At the same time, you can lay out a specific pattern, or make the craft monochromatic.
Remember that the glue must be applied in a thin layer, otherwise the foam will melt.
2. After you have completely covered the entire ball, all you have to do is embellish it a little more. Simply tie a bow from satin scraps and glue to the item. Don't forget about the loop.

In the same way you can make balls from buttons. Just paint the foam balls first, and then glue on the multi-colored buttons.

And disposable plastic cups are generally a godsend for creativity. They just need to be turned upside down and covered with paper decorations, sequins, adhesive tape or painted with paints. And in the end you may end up with ringing bells and funny snowmen.


For variety, choose a very simple product - sew or assemble a large Christmas tree bow. You can make many small bows.

I also came up with the idea of combining the purchased version with homemade creativity. Buy transparent Christmas tree balls, carefully unscrew the top and add glitter. Screw the product. Or apply glue to the surface of the ball in the form of any pattern and also sprinkle with glitter. The crafts come out very beautiful.

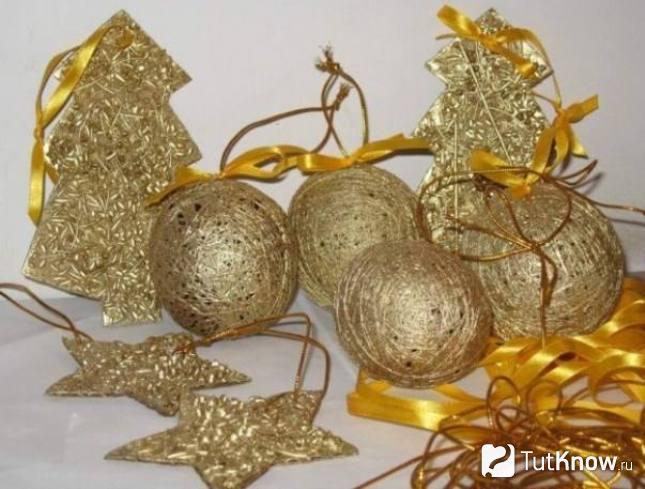
Of course, don’t forget about needlework using thick threads and regular glue.


Moreover, the use of this technology will allow you to make anything you want.

You can learn more about this technique here.

And here are the instructions on how such a miracle can be created.


Interesting products are also made from pasta. Usually they are glued together and thus made into snowflakes.


And a cool idea would be to decorate unnecessary old light bulbs. They are usually painted with acrylic paints and decorated with knitted, rag and other attributes.

You can also make toys from salt dough, plasticine or clay.

Or bake real edible souvenirs.

In fact, there are still a large number of holiday products that you can make with your own hands from improvised materials, it’s impossible to list them all. Therefore, we move on.
Christmas tree toys, crocheted with patterns
Now a selection for those who are interested in knitting. I found the coolest, in my opinion, crocheted souvenirs. I am sending it to you along with the diagrams. Knit for good health!
- "Bell";

- "Herringbone";

- "Angel";

- "Snowflake";

- "Father Frost";

- “Sweetie” and “Sock”;

- "Snowmen";

- "Dog";

- "Mouse";

- "Piggy".

DIY Christmas tree decorations made of felt and fabric (patterns and templates included)
From crocheting we move on to sewing from felt and any other fabric. Guys, this time I won’t explain to you what and how to sew, I’m sure you already know all this. After all, the main thing is to find patterns. This is exactly what I will help with.
I pumped up a wide variety of options. I kindly provide them to you. Save, cut and start sewing.


Master class on making a star for the top of a Christmas tree from paper and cardboard
Well, now let’s start making almost the most important attribute of a green tree - a star.
Of course, you can choose a different method of making, but I really liked the following magical transformation.
"Star made of shiny cardboard"

You will need:
- shiny cardboard;
- scissors;
- glue gun
Manufacturing process:
1. Take cardboard and cut strips of equal width and length from it.

If your cardboard is shiny on only one side, then first glue two sheets of cardboard together so that both sides are shiny.

3. Now bring the free ends of the strips together and glue them together as shown in the photo.

4. Connect the side strips together. You should end up with something like this.

5. Repeat steps 1 to 4, that is, glue another exactly the same part.

6. Connect and glue the two blanks together so that you end up with an eight-pointed star. Your three-dimensional star on the top of the spruce is ready.

I think that such a masterpiece will bring a lot of pleasure, especially when the lights flash on the branches and the star also sparkles with new colors.
Christmas tree toy 2020 in the form of a symbol of the year of the mouse
Do you remember what year is coming? That's right, the year of the Rat. So don’t forget to appease the Mistress and make a souvenir in the form of a funny mouse.
“Mouse from a Kinder Surprise container”

You can simply plant such a product on a branch or make a hole and secure it with a string.
You will need: one plastic container and several pieces of multi-colored plasticine.
Manufacturing process:


Here is a hero for the Year of the Pig.
"Piglet made of colored paper"

You will need:
- double-sided tape on foam;
- pink and red half cardboard;
- black marker;
- pencils;
- markers;
- glue;
- scissors.

Manufacturing process:
1. Take pink half-cardboard and cut out many strips 1 cm wide and 7 cm long.

2. Now use a pencil or scissors to twist each strip.

3. Apply glue to the top of one of the strips, and place another strip on top. Glue the strips in a circle in this way.

4. In the end you should get something like this.


6. Now cut out a long pink strip 0.5 cm wide.

7. Twist the strip so that you get a curl, like a pig’s tail.

8. Glue the tail to the ball.

9. Cut out two circles of different diameters and ears from half-cardboard. Cut out two small circles from red paper - these are the nostrils.

10. Glue a piece of double-sided tape onto a circle of smaller diameter. Attach it to a large circle. Using glue, glue the “nostrils”.

11. Using a black marker, draw eyes and outline the outline.

12. From red paper, cut out two strips 2 cm wide and 5 cm long. Paint them with the same black marker. This will be a scarf.

13. Glue the scarf to the back of the pig's head. Then glue the head to the body (volumetric ball). And don't forget to cut and glue the ribbon loop.

Agree, this is a very easy craft and is accessible for children's creativity.
Step-by-step instructions on how to make a New Year's toy from cotton wool
And ahead of us awaits a detailed master class on creating another Christmas tree decoration in the form of a bright cockerel. We will make it from ordinary cotton wool.
"Cotton Cockerel"

You will need:
- cardboard (thick but cutable);
- cotton wool (from a pharmacy, regular in a roll);
- cotton pads;
- white threads;
- potato starch;
- black half-bead eyes;
- tailor's pin (with a loop at the end);
- paints for painting.
Manufacturing process:
1. Take cardboard and draw the outline of a cockerel on it. Cut it out.

2. Unwind the cotton wool from the roll and tightly wrap it around the cut out outline to the legs.

3. Now wind the thread over the cotton wool. Do the same with the leg.


5. Cut wings (4 pcs.) and parts for the tail (4 pcs.) from cotton pads.

6. Cut out one comb and two parts for a beard from a cotton pad.

7. Make a starch paste and coat our rooster figurine with it. Then wrap thin pieces of dry cotton wool around our product. Apply paste to all uneven surfaces. Next, saturate all other parts with paste and carefully attach them to the cockerel. Form folds, fluff the tail, you can additionally make a thin strip of cotton wool and glue it around the neck. Glue on the eyes.

8. Dry the product upside down (hang it on the thread we left). And then paint it to your liking. Cut the thread and insert a pin, thread an elegant rope.

Use this technology to make other animals, fairy-tale heroes and characters.
Christmas tree toy “Garland” made from plastic bottles
Now we will make a decoration in the form of a garland. Moreover, the garland will not be simple, but made from plastic bottles. How do you like this idea? Personally, I'm delighted.
"Flower Garland"

You will need:
- plastic bottles with caps;
- spray paints;
- scissors;
- electric garland;
Manufacturing process:
1. Cut off the tops of the bottles. Make cuts to create a flower.

2. Round the petals and paint the blanks in any color.
3. While the flowers are drying, make cross-shaped cuts in the caps of these bottles. Insert light bulbs from an electric garland into the cuts.

4. When the pieces are dry, screw them to the lids, spread the product over the Christmas tree and turn on the electric garland. Admire the creation!

Well, a simple manufacturing option garlands of icicles.

You will need:

Manufacturing process:

Christmas tree crafts made from polymer clay
I’ll briefly tell you what figures can be made from clay. You can use plasticine as a material.
Here it is important to come up with a character, sculpt the details, then put them together, and then make a loop.
Here are a couple of patterns for sculpting winter characters.
- Father Frost;
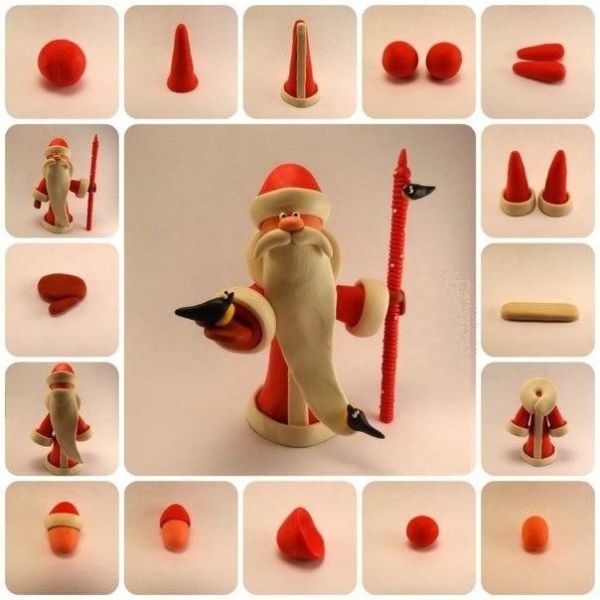
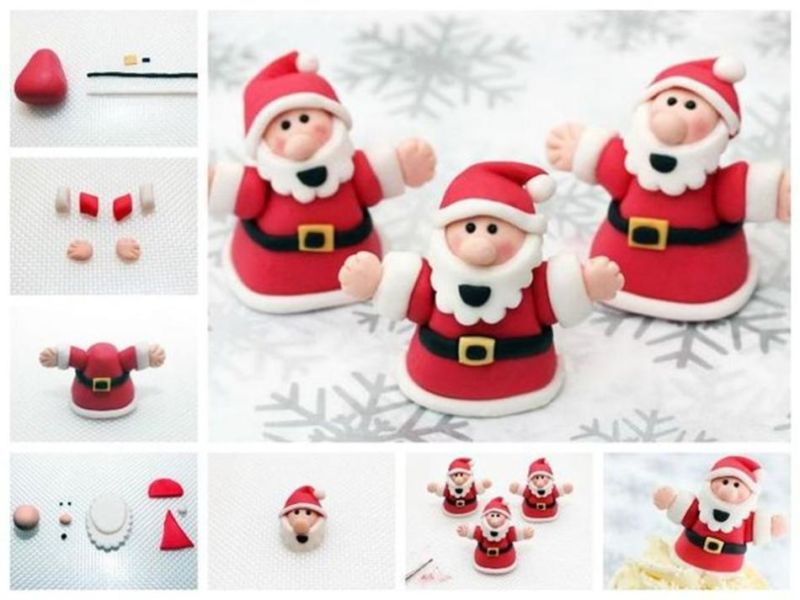
- Monkey;

- Girl;

- Snow Maiden;

- Piggy.

And options for finished work.


Video selection of the best wooden Christmas tree toys
Well, if you are interested in woodworking, then you will be interested in the following story. It contains ideas for creating wooden toys at home. So watch and create. By the way, such souvenirs are perfect as...
And this is where I end today. I look forward to your comments! Was I useful and creative? 😀 I think it’s undeniably yes.
I wish you to make what you like and, together with the kids, decorate the Christmas tree with homemade toys. With coming!